Free 186 More Best Homemade Tools eBook:  
Get tool plans

User Tag List

Page 1 of 3 1 2 3 LastLast
Results 1 to 10 of 24

Thread: Wood stove heat reclaiming unit

  1. #1
    Supporting Member Frank S's Avatar
    Join Date
    Aug 2015
    Location
    Peacock TX
    Posts
    11,633
    Thanks
    2,184
    Thanked 9,134 Times in 4,366 Posts

    Frank S's Tools

    Wood stove heat reclaiming unit

    Some call them heat exchangers but that is not quite true.
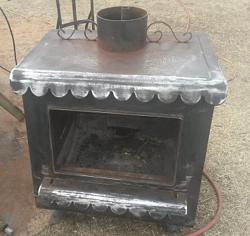
    My Earth Stone wood heater did a fair job as manufactured but I knew from past experiences that it could do much better.
    I decided since I needed to pull it out of the house and replace the chimney anyway I might as well do a couple of mods to it
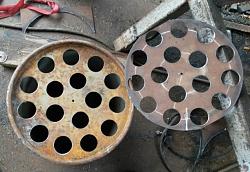
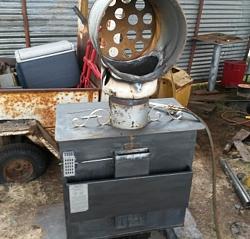
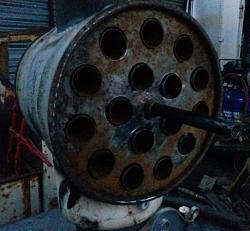
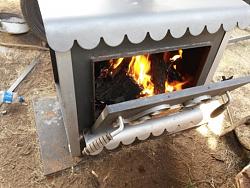
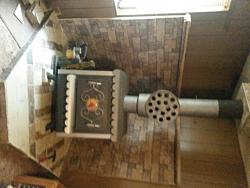
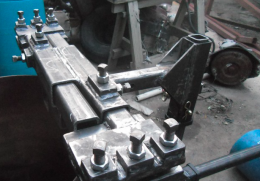
    First off I wire brushed it down and repainted it in 2 tone Charcoal gray with KBS Extreme temp paint dark on the lower then I made the recovery unit out of a 15 gallon shorty drum by hole sawing 15 holes in the top and bottom and a 3rd disk to put inside to serve as a means to drag the coke build up off the heat tubes then I welded in the 15 1.94" diameter 16 ga tubes then welded the top to the drum with the clean out plate inside and a pull rod to push or pull it back and forth. after I cut a 11" diameter hold in 1 side and an 8" hole in the opposite side I welded a section of an old water filter tank to 1 side then cut an 8" hole in that I formed a piece of 16 ga into an 8" - cylinder and welded that to the dome of the tank this formed an expansion chamber to allow the stove exhaust to spread out exposing more of the tubes to the the heat. then on the now top of the unit I welded a section of 8" chimney pipe and installed a damper which the stove never had before, which had allowed much of the thermal energy to be lost up the chimney then I painted the top of the stove and the added bits with KBS extreme temp light metallic Charcoal gray.
    This paint must be heat cured to 350 to 400°f for a minimum of 3 hrs before the stove could be returned to the house otherwise the fumes can be toxic to some people and they smell really bad anyway. So I built a fire in it then as the fire got hotter I stoked the stove completely full of mesquite
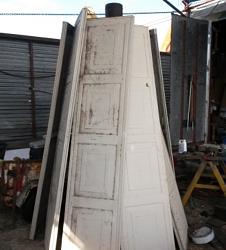
    Mesquite burns really hot To help trap some of the radiant heat to further assist in the curing of the paint I made a makeshift thermal enclosure by stacking steel garage door [panels all around the stove . With the intake air regulator wide open and the draw damper set at 1/2 I let it bur for several hours probably 3 to 3 1/2 then I opened the door and saw that I could stuff some more wood inside so I added another wheel barrow full and let it burn the rest of the day and into the night. This morning it had gotten down to 33 ° but when I went out and checked on the stove it was still warm
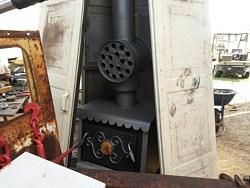
    Wood stove heat reclaiming unit-20170206_170855.jpgas.jpg
    Wood stove heat reclaiming unit-20170926_162458.jpgas.jpg
    Wood stove heat reclaiming unit-20170928_171429.jpgas.jpg
    Wood stove heat reclaiming unit-20170929_192615.jpgas.jpg
    Wood stove heat reclaiming unit-20171015_114406.jpgas.jpg
    Wood stove heat reclaiming unit-20171015_120506.jpgas.jpg
    Wood stove heat reclaiming unit-20171015_120517.jpgas.jpg
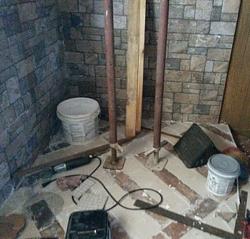
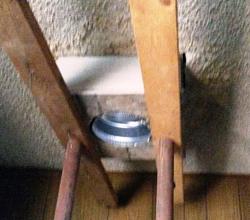
    Ceiling support jacks made out of pipe and scafold screws to hold the ceramic tile against the transition box until the cement dries.
    I screwed lathing to the bottom to the transition box to give the cement something to hold on to
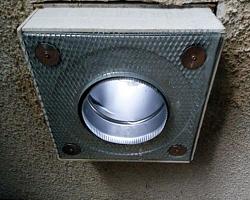
    The transition box is 16" sq. and I affixed 2 layers of 1/4" cement backer board on the 4 sides extending almost all the way to the roof the chimney is 8" ID 12" OD triple pipe stainless steel inner pipe
    Wood stove heat reclaiming unit-20171016_123735.jpgas.jpg
    Wood stove heat reclaiming unit-20171016_125408.jpgas.jpg
    Wood stove heat reclaiming unit-20171016_125415.jpgas.jpg
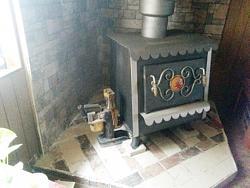
    The stove will sit on a 5 ft by 5 ft 4" thick raised concrete slab the fire protection walls are 5 ft high
    I screwed 1" firing strips to the walls then added 2 layers of 1/4" cement backer board then covered that with 3/8" thick ceramic tiles with a brick pattern there will be a heat deflecting mantle on top of the fire walls which will be clad in ceramic tiles and later have LED strip lights hidden under them for lighting effect

    186 More Best Homemade Tools eBook
    Last edited by Frank S; Oct 17, 2017 at 01:09 AM.
    Never try to tell me it can't be done
    When I have to paint I use KBS products

  2. The Following 12 Users Say Thank You to Frank S For This Useful Post:

    baja (Aug 27, 2020), clydeman (Aug 26, 2020), Drew1966 (Aug 26, 2020), Jon (Oct 17, 2017), Paul Jones (Mar 26, 2018), rendoman (Oct 20, 2017), rlm98253 (Oct 17, 2017), Scotty1 (Nov 14, 2018), Seedtick (Oct 17, 2017), Toolmaker51 (Jul 25, 2018), Tuomas (Oct 17, 2017), Zaakoc (Jul 24, 2018)

  3. #2
    Supporting Member Tuomas's Avatar
    Join Date
    Jun 2016
    Location
    Jyväskylä Finland
    Posts
    832
    Thanks
    558
    Thanked 1,865 Times in 507 Posts

    Tuomas's Tools
    That's cool. Oops. I mean't hot. Haven't seen that kind of before. It looks neat too.

    2,000+ Tool Plans

  4. #3
    Content Editor
    Supporting Member
    DIYer's Avatar
    Join Date
    Aug 2013
    Posts
    3,055
    Thanks
    793
    Thanked 1,888 Times in 1,683 Posts


    Thanks Frank S! We've added your Wood Stove Heat Recovery Unit to our Heating and Cooling category,
    as well as to your builder page: Frank S's Homemade Tools. Your receipt:


  5. #4
    Supporting Member McDesign's Avatar
    Join Date
    Sep 2016
    Posts
    259
    Thanks
    5
    Thanked 126 Times in 65 Posts

    McDesign's Tools
    Great! I've toyed with the idea of a similar device in the upstairs dryer duct to recover all that nice heat, without the moisture!

  6. #5
    Supporting Member Frank S's Avatar
    Join Date
    Aug 2015
    Location
    Peacock TX
    Posts
    11,633
    Thanks
    2,184
    Thanked 9,134 Times in 4,366 Posts

    Frank S's Tools
    For dryers you can make a much smaller unit out of a 2 or 3 gallon metal bucket with thin tubes and a muffin fan to draw the warmed air through but a fan powered by peltiers might work better since it would be powered by the radiant heat and not draw too much cooled air
    Never try to tell me it can't be done
    When I have to paint I use KBS products

  7. #6
    Supporting Member Frank S's Avatar
    Join Date
    Aug 2015
    Location
    Peacock TX
    Posts
    11,633
    Thanks
    2,184
    Thanked 9,134 Times in 4,366 Posts

    Frank S's Tools
    I could have made a much larger recovery unit for my wood stove but I didn't want to extract all of the thermals from the exhaust and risk loosing the upward draw
    Never try to tell me it can't be done
    When I have to paint I use KBS products

  8. #7
    Supporting Member Frank S's Avatar
    Join Date
    Aug 2015
    Location
    Peacock TX
    Posts
    11,633
    Thanks
    2,184
    Thanked 9,134 Times in 4,366 Posts

    Frank S's Tools
    Well today was time to re install the wood stove
    I have been wanting an excuse to use my Stanley 12 ton hydraulic toe jack for a year
    since the stove is a fixed height and the chimney is fully installed the stove had to be raised an inch to force the stove pipe into the receiving part of the transition box to make sure the pipe had a good seal I pushed it up to an inch and a half
    Wood stove heat reclaiming unit-20171019_154432.jpg
    I think it looks good all I need to do now is to clad the mantle with ceramic tiles and find me one of those really slow turning antique fans to place in the corner behind the stove on the mantle
    Wood stove heat reclaiming unit-20171019_154528.jpg
    Never try to tell me it can't be done
    When I have to paint I use KBS products

  9. #8
    Jon
    Jon is offline Jon has agreed the Seller's Terms of Service
    Administrator
    Supporting Member
    Jon's Avatar
    Join Date
    Jan 2012
    Location
    Colorado, USA
    Posts
    26,433
    Thanks
    8,100
    Thanked 40,241 Times in 11,772 Posts
    Congratulations Frank S - your Wood Stove Heat Recovery Unit is the Homemade Tool of the Week!

    An interesting build, especially because we don't see wood stove heat recovery units built very frequently on the net, even on dedicated woodburning forums like Hearth.com.

    Some nice entries this week: a Drilling Station by Tuomas, a Mill Tram by Captainleeward, a Dovetail Cutter by SteveJustSteve, a Rotary Converter by loyd, a Dial Gauge Chuck Mount by garage nut, a Drill Press Table Repair by Moby Duck, a Foredom Handpiece Hanger by mklotz, a Bench Saw Worktable by markfitz, and a Tool Van Trailer by Frank S.

    Frank S - we've added your tool entry to our All Homemade Tool of the Week winners post. And, you'll be receiving a $25 online gift card, in your choice of Amazon, PayPal, or bitcoin. Please PM me your current email address and gift card choice and I'll get it sent over right away.

    This is your 4th Homemade Tool of the Week win! Here are all of your winning tools:


  10. #9
    Supporting Member suther51's Avatar
    Join Date
    Jul 2016
    Posts
    380
    Thanks
    212
    Thanked 153 Times in 116 Posts
    I can truly appreciate this build as I have lived all my life with just wood heat at home (nothing like the radiant heat from a wood stove &#128512. My shop has a plate sleel stove in it that could benifit from some rendition of this heat recovery unit. But first it needs insulation! Thanks for showing.

    As a side note the panels you used to hold the heat in during the paint cureing jogged my thoughts to the ones that my boss has stacked out back of his shop yard from building his business building. May have to see if he will turn them loose. They would work great for the walls of the car port garage I want to build out of a greenhouse frame I salvaged last spring. The thing was very big for a back yard, back road green house, something like 32x80! All but a few of the rafters failed where the collar tie met the square tube rafters. No heat, too much snow, and not cutting the plastic as a last resort = total collapse. And to light of a frame for that wide a house in this area. What remains of the rafters will make about a 16 foot wide structure. Not enough time in the day.
    Eric

  11. #10
    Supporting Member Frank S's Avatar
    Join Date
    Aug 2015
    Location
    Peacock TX
    Posts
    11,633
    Thanks
    2,184
    Thanked 9,134 Times in 4,366 Posts

    Frank S's Tools
    I hate my computer these days.
    I started to create a reply and the keyboard jumped then wiped out everything I had typed.
    So I will create one in word then copy paste and see if that works better.
    Any way the heat recovery unit worked well except for a couple of issues which I will address when I build a stove for my workshop and install it there.
    I found that I had to maintain a very hot fire in the stove in order to prevent coking or creosote buildup. I used the cleanout disk several times but found that it was a lot of trouble eventually I had to use a slide hammer just to get it to move back and forth so I removed the unit. I wish now that I had flattened the tubes to an oval which would have meant the exhaust gases would have a higher velocity and would have remained hotter until reaching the chimney. There is a fine line between the amount of thermal recovery and maintaining a high enough exit velocity to insure proper combustion has occurred. Different wood has varying amounts of creosote in the unburned exhaust. The introduction of forced air at the fresh air intake would reduce the criticality of maintaining a hot exhaust to insure proper combustion and a complete reduction of materials to ash without creating the creosote residue in the chimney.
    After removing the unit, leaving the original straight stack to preserve heat I stacked 250 lbs. of 6 inch ceramic tiles on top of the stove, creating a thermal mass for heat storage. In doing this I found that I could build a medium to large fire of an evening with a small 8 inch fan behind the stove on the mantle and the ceiling fan on low with outside temps falling into the low 20’s or even down to single digits re stoke it once around midnight to keep the front half of the house comfortable so I blocked off the back half since we are only using the back 3 bed rooms for storage anyway I also burned through less than half the amount of wood we were previously using
    So there you have an update to the heat recovery unit at its present design there needs to be forced fresh air to create higher combustion temperatures or the tubes need to be oval possibly a combination of both
    Never try to tell me it can't be done
    When I have to paint I use KBS products

  12. The Following 5 Users Say Thank You to Frank S For This Useful Post:

    AmateurMachinist (Mar 28, 2019), baja (Aug 27, 2020), Jon (Mar 27, 2018), Toolmaker51 (Jul 25, 2018), Zaakoc (Jul 24, 2018)

Thread Information

Users Browsing this Thread

There are currently 1 users browsing this thread. (0 members and 1 guests)

Bookmarks

Posting Permissions

  • You may not post new threads
  • You may not post replies
  • You may not post attachments
  • You may not edit your posts
  •