Free 186 More Best Homemade Tools eBook:  
Get tool plans

User Tag List

Page 1 of 2 1 2 LastLast
Results 1 to 10 of 14

Thread: Why flat belts need crowned pulleys.

  1. #1
    Supporting Member tonyfoale's Avatar
    Join Date
    Nov 2016
    Location
    Spain
    Posts
    1,609
    Thanks
    722
    Thanked 2,706 Times in 726 Posts

    tonyfoale's Tools

    Why flat belts need crowned pulleys.

    This topic came up from mobyduck's response to my post on treadmill motors. Treadmill motors - my modifications.
    I thought that I had posted this explanation previously but a forum search did not throw it up so apologises if this is a repeat.

    ------------------
    As a teenager in the 1960s I had a Burgess 3 wheeled bandsaw, which like the milling machine of an earlier post, has followed me around the world and I still use it today. For some reason, which I don't recall, I built a 2 wheeled machine. Maybe I wanted full width at full height. Back then I used to cast stuff out of scrap aluminium and that's how I made the new bandsaw wheels. Even though I was aware that pulleys for flat belt driven machinery and commercial band saws etc. had at least one crowned pulley, the arrogance of youth lead me to believe that I knew better. It was obvious that a hollow pulley or bandsaw wheel would give better alignment. Arrogant I might have been back then but I was also quick to learn when I was wrong and I soon re-machined the hollowed out wheel to a crown shape and had no further problems of flying bandsaw blades.

    As an inquisitive lad I searched books (yes, the internet has not always existed) in the library for an explanation of this seemingly counter intuitive behaviour, but found no answer that satisfied. So I adopted my usual approach with such mysteries, that is I would lay awake in bed turning it over in my mind. One night it all clicked into place and I was a happy boy. However, recently during discussions with friends the subject resurfaced but I had forgotten the explanation. So back to a couple of sleepness nights to rediscover the mechanism. I hate to leave such matters hanging.

    So here is the flat belt on crowned pulleys explanation. I had to get it written down before I forget again and have to go through the mental gymnastics when the topic next resurfaces.
    The "trick" to it all, is to realise that the belt velocity is constant across its width but the pulley velocity is not. Then the relative velocities between pulley and belt work out in accordance with observation.
    It is easy to look at it in reverse and think that the part of the belt on the larger diameter is moving faster than the part of the belt on the smaller diam. That leads to the conclusion that the belts would fly off a crowned pulley, which I think is the intuitive reaction of most people. We know different though.

    To get an idea of the mechanisms at work we only need look at the crowned pulley and not any parallel pulleys in the loop.
    Firstly, let us consider only a slice of half the width of the belt passing over just one side of the pulley as in Fig.1.

    Why flat belts need crowned pulleys.-pulley-1.jpg Fig.1. Click for full size.

    If we consider the linear velocities across the width of the belt, say V1, V2 and V3, shown near the bottom of Fig.1, we can see that they must be equal or the belt would be tearing itself apart. We known that is not happening. In other words the linear forward velocity of all points on the belt must be equal.
    Now consider the circumferencial velocity of the pulley surface at points P1 and P2. Due to different diameters at these points it is obvious that P! has a higher velocity than P2.
    The only way that we can reconcile this with a belt which has a constant velocity across its surface is to realize that over most of the contact area between belt and pulley there is slip of varying magnitude.
    Fig.2 shows us a view looking from "A" in Fig.1.

    Why flat belts need crowned pulleys.-pulley-2.jpg Fig.2.

    It is reasonable to assume that somewhere around half way between points 1 and 2 the belt and pulley surface will be travelling at matched velocities. So at point 2 the belt will be travelling faster relative to the pulley surface and at point 1 the belt will be slower than the pulley. This means that the belt will be trying to climb up the crown of the pulley, as in Fig.3. Think of a car in a curve, the outer wheels will be travelling faster that the inner wheels. The belt is like the car and the pulley surface is like the road surface.

    Why flat belts need crowned pulleys.-pulley-3.jpg Fig.3.

    Let us now put a new full width belt on the pulleys in place of our sliced belt as in Fig.4.

    Why flat belts need crowned pulleys.-pulley-4.jpg Fig.4.

    Imagine that we did not put the belt on properly and it is a little offset to the right. We have seen that the crowned pulley produces a force tending to force the belt towards the crown. The wider the section of the belt on one side of the pulley the greater the difference in velocities between the outer edge and the inner edge and hence the greater the force. So in Fig.4 we can see that the force "F" on the right hand side is greater than "f" on the left side. This force imbalance will make the belt move toward the left until f = F or in other words the belt becomes centralized over the pulley. That is it automatically corrects any errors of alignment.
    This is in accord with our experience.

    Intuition often leads many (including me in my naive and inexperienced youth) towards the idea that a hollow pulley would centralise a belt. However, anyone who has tried this will have learnt very quickly that it doesn't work. Looking at Fig.5 we can easily see why.

    Why flat belts need crowned pulleys.-pulley-5.jpg Fig.5.

    As in the preceding explanation we can see that if the belt is not perfectly centred there will be unbalanced lateral forces acting on each side of the belt. This time the forces will act outwards rather than inwards as before. So when F > f as shown the belt will be flung off, which is exactly what anyone knows who has tried such pulleys. It reinforces any intial alignment error rather than correcting it.

    QED.

    186 More Best Homemade Tools eBook

  2. The Following 15 Users Say Thank You to tonyfoale For This Useful Post:

    aldenb (Jan 25, 2021), Andyt (Jan 27, 2021), baja (Jan 27, 2021), DIYer (Jan 27, 2021), DIYSwede (Jan 25, 2021), freddo4 (Jan 26, 2021), gumser (Jan 27, 2021), hotdog0627 (Jan 26, 2021), KustomsbyKent (Jan 26, 2021), lassab999 (Jan 27, 2021), Moby Duck (Jan 27, 2021), mwmkravchenko (Jan 26, 2021), olderdan (Jan 25, 2021), Saltfever (Feb 5, 2021), trevor_60_r (Jan 26, 2021)

  3. #2
    Supporting Member olderdan's Avatar
    Join Date
    Jun 2016
    Posts
    793
    Thanks
    1,463
    Thanked 1,586 Times in 470 Posts

    olderdan's Tools
    I remember your original writup Tony. QED indeed end of.

    2,000+ Tool Plans

  4. #3
    Supporting Member tonyfoale's Avatar
    Join Date
    Nov 2016
    Location
    Spain
    Posts
    1,609
    Thanks
    722
    Thanked 2,706 Times in 726 Posts

    tonyfoale's Tools
    Quote Originally Posted by olderdan View Post
    I remember your original writup Tony. QED indeed end of.
    "quod erat demonstrandum", which translates to "what was to be shown".

  5. #4
    Supporting Member metric_taper's Avatar
    Join Date
    Mar 2017
    Location
    Marion, Iowa
    Posts
    612
    Thanks
    238
    Thanked 266 Times in 161 Posts

    metric_taper's Tools
    Why crowned pulleys and bandsaw wheels?

    I had it saved as a link in my bookmarks.

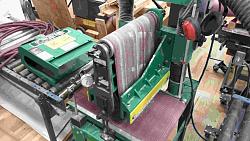
    I have a 13" wide belt sander that will not keep track with a convexed crown, and even though theory says a concave crown fails, it did not......
    The "original" China copy had the idler pulley a smooth cylinder, no crowning, and the motor driven pulley that contacts the wood work piece a convex crown. Well that didn't work, as it made the board have a dish concave scallop along it's length, and depending on where you fed the board, it would remove so much material, it would be burned by the belt.
    So I pulled the whole thing apart and machined the pulley in contact with the wood board (sanding belt in between) to be a perfect cylinder.
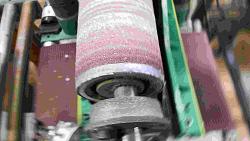
    I used duct tape on the idler pulley to make the crown convexed originally. But whenever the belt got warm, it would take off from center position, and the sanding belt would grind the sides of the machine internals. I muttled with it this way for years. Then last year I stripped off all the duct tape, and tried it with a convex crown. That has worked reliably.
    There were a few other serious manufacturing design/manufacturing defects. The power feed belt they used, that had a drive roller and idler, however the idler support brackets were machine in the incorrect location, and it was at an angle to the table, essentially twisting the boards being fed in. The root cause of machining the hole in the wrong location, looks like a casting pattern that didn't leave enough material to put the hole where it needed to be, so they just located it .1 inch higher. There were several importers of the 13x32 belt sander. I got mine from Woodworkers supply, with the Wood Tec name brand. But Harbor freight imported them and others.

  6. #5
    Supporting Member tonyfoale's Avatar
    Join Date
    Nov 2016
    Location
    Spain
    Posts
    1,609
    Thanks
    722
    Thanked 2,706 Times in 726 Posts

    tonyfoale's Tools
    Quote Originally Posted by metric_taper View Post
    I have a 13" wide belt sander that will not keep track with a convexed crown, and even though theory says a concave crown fails, it did not......
    The "original" China copy had the idler pulley a smooth cylinder, no crowning, and the motor driven pulley that contacts the wood work piece a convex crown. Well that didn't work, as it made the board have a dish concave scallop along it's length, and depending on where you fed the board, it would remove so much material, it would be burned by the belt.
    So I pulled the whole thing apart and machined the pulley in contact with the wood board (sanding belt in between) to be a perfect cylinder.
    I used duct tape on the idler pulley to make the crown convexed originally. But whenever the belt got warm, it would take off from center position, and the sanding belt would grind the sides of the machine internals. I muttled with it this way for years. Then last year I stripped off all the duct tape, and tried it with a convex crown. That has worked reliably.
    I am not surprised that you had problems with the convex crown on the work wheel. Terrible idea.
    You did not describe your machine but I am guessing that you have 3+ pulleys. 1 on the motor, at least one idler and the work pulley. I would put the crown on the motor pulley.

    The only reason that I know that would require a concave pulley is if one or more pulley axes is/are misaligned causing a tendency to throw the belt one way, compensated by the concave pulley trying to throw it the other way, hence compensating. On wide pulleys such as on a belt grinder it only takes a tiny axes misalignment to force the belt one way. In fact some machines do not have crowned wheels, instead there is a misalignment adjustment with which you can use to make the belt track true. The misalignment works like one half of a crowned pulley and obeys the same rules.

    Glad that you have found a workable solution.

    PS. You mentioned the problem got worse when warmed up. Expansion somewhere in the system may be causing any slight misalignment to change. 13" wide belts only need a tiny change to act differently.

  7. The Following User Says Thank You to tonyfoale For This Useful Post:

    trevor_60_r (Jan 26, 2021)

  8. #6
    Supporting Member rgsparber's Avatar
    Join Date
    Nov 2012
    Location
    Phoenix, AZ
    Posts
    1,321
    Thanks
    778
    Thanked 2,840 Times in 670 Posts

    rgsparber's Tools
    Tony,

    Outstanding explanation!

    Thank you :-)

    Rick
    Rick

  9. The Following User Says Thank You to rgsparber For This Useful Post:

    tonyfoale (Jan 27, 2021)

  10. #7

    Join Date
    Sep 2020
    Posts
    1
    Thanks
    0
    Thanked 1 Time in 1 Post
    Hi Tony, very comprehensive description for a subject that is not intuitive, well done for your efforts - I specialise in heavy duty conveyors in both above and underground mining conveyors where belt tracking is a constant problem and crowned pulleys are not uncommon for that reason - A simple explanation that I use in my training courses is that "Belts will always track to the high tension side of a pulley" - Hence your explanation above.

    Basic understanding of this principle is critical for those who have to maintain and adjust conveyor belts that are sometimes worth million's of $ and where belt edge damage can drastically shorten the life of a belt - Not to mention the cost of lost production.

  11. The Following User Says Thank You to npbryant For This Useful Post:

    tonyfoale (Jan 27, 2021)

  12. #8
    Supporting Member metric_taper's Avatar
    Join Date
    Mar 2017
    Location
    Marion, Iowa
    Posts
    612
    Thanks
    238
    Thanked 266 Times in 161 Posts

    metric_taper's Tools
    Quote Originally Posted by tonyfoale View Post
    I am not surprised that you had problems with the convex crown on the work wheel. Terrible idea.
    You did not describe your machine but I am guessing that you have 3+ pulleys. 1 on the motor, at least one idler and the work pulley. I would put the crown on the motor pulley.

    The only reason that I know that would require a concave pulley is if one or more pulley axes is/are misaligned causing a tendency to throw the belt one way, compensated by the concave pulley trying to throw it the other way, hence compensating. On wide pulleys such as on a belt grinder it only takes a tiny axes misalignment to force the belt one way. In fact some machines do not have crowned wheels, instead there is a misalignment adjustment with which you can use to make the belt track true. The misalignment works like one half of a crowned pulley and obeys the same rules.

    Glad that you have found a workable solution.

    PS. You mentioned the problem got worse when warmed up. Expansion somewhere in the system may be causing any slight misalignment to change. 13" wide belts only need a tiny change to act differently.


    What gets hot is the sanding belt, and elongates just enough to run away.
    However, by having the idler with a concave crown, the belt can only get so long, and it is captured by this trough.
    This is a two roller system;
    Why flat belts need crowned pulleys.-view-machine.jpg

    Top roller edge showing duct tape. This is a stable configuration as the bottom roller has no crown. A convexed crown in this machine was unstable.
    Why flat belts need crowned pulleys.-view-roller-edge.jpg

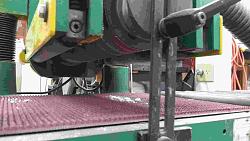
    Bottom view showing driver roller, opposite side of machine has 2HP motor with direct connection to this roller.
    Why flat belts need crowned pulleys.-bottom-view.jpg

  13. The Following User Says Thank You to metric_taper For This Useful Post:

    tonyfoale (Jan 27, 2021)

  14. #9
    Supporting Member
    Join Date
    Sep 2018
    Location
    Groningen, NL
    Posts
    44
    Thanks
    322
    Thanked 32 Times in 11 Posts

    Carnel's Tools
    Hi Tony,

    Thank you for your extensive explanation. For me there is a missing link of thinking between the following texts:
    "It is reasonable to assume that somewhere around half way between points 1 and 2 the belt and pulley surface will be travelling at matched velocities. So at point 2 the belt will be travelling faster relative to the pulley surface and at point 1 the belt will be slower than the pulley. "

    *************
    This is clear but the transition to the following piece of text requires an explanation for me. Why does this "means that... "?
    *************

    "This means that the belt will be trying to climb up the crown of the pulley, as in Fig.3. Think of a car in a curve, the outer wheels will be travelling faster that the inner wheels. The belt is like the car and the pulley surface is like the road surface."

    I refer to figure 3. If the belt in fig 3 runs upward there is a slipping force downward at point 2 and a slipping force upward at point 1 resulting in a clockwise torque. This torque combined with the upward moving of the belt drives the belt to the left.

    Harry Croon

  15. #10
    Supporting Member tonyfoale's Avatar
    Join Date
    Nov 2016
    Location
    Spain
    Posts
    1,609
    Thanks
    722
    Thanked 2,706 Times in 726 Posts

    tonyfoale's Tools
    Quote Originally Posted by Carnel View Post
    Hi Tony,

    Thank you for your extensive explanation. For me there is a missing link of thinking between the following texts:
    .......................................

    I refer to figure 3. If the belt in fig 3 runs upward there is a slipping force downward at point 2 and a slipping force upward at point 1 resulting in a clockwise torque. This torque combined with the upward moving of the belt drives the belt to the left.

    Harry Croon
    Harry,

    I do not know how else to explain it. I would suggest that you think about it in terms of velocities rather than slip forces. You have not said what you mean by slipping force when you talk about upward or downward forces. You have to specify whether you mean the force on the belt or the force on the pulley, these are equal and opposite.

    Here is another way to think of it. When you have slip the the tendency of the system will be to eliminate that slip, in this case that means matching the velocities of belt and pulley which is achieved by point 2 trying to move to the top of the crown.

    PS. My first paragraph assumes that your reference to up and down refers to my drawing and not laterally on the pulley.

Thread Information

Users Browsing this Thread

There are currently 1 users browsing this thread. (0 members and 1 guests)

Tags for this Thread

Bookmarks

Posting Permissions

  • You may not post new threads
  • You may not post replies
  • You may not post attachments
  • You may not edit your posts
  •