Free 186 More Best Homemade Tools eBook:  
Get tool plans

User Tag List

Page 1 of 2 1 2 LastLast
Results 1 to 10 of 20

Thread: Viaduct patterns and molds for 1:32 garden railroad.

  1. #1
    Supporting Member machiningfool's Avatar
    Join Date
    Jul 2015
    Location
    Seffner Florida
    Posts
    266
    Thanks
    0
    Thanked 273 Times in 146 Posts

    machiningfool's Tools

    Viaduct patterns and molds for 1:32 garden railroad.

    I thought I would show you what I am working on now. This project will take a long time, never ending. I am showing you some patterns and molds of a viaduct that I will eventually install in my back yard. Bob.

    186 More Best Homemade Tools eBook

  2. The Following 8 Users Say Thank You to machiningfool For This Useful Post:

    baja (Aug 21, 2019), Jon (Jan 9, 2016), kbalch (Jan 10, 2016), lassab999 (Oct 30, 2023), mwmkravchenko (Oct 2, 2021), Paul Jones (Jan 12, 2016), PJs (Jan 10, 2016), rlm98253 (Oct 2, 2021)

  3. #2
    Content Editor
    Supporting Member
    DIYer's Avatar
    Join Date
    Aug 2013
    Posts
    3,055
    Thanks
    793
    Thanked 1,885 Times in 1,682 Posts
    Thanks machiningfool! We've added your Viaduct Molds to our Model Making category, as well as to your builder page: machiningfool's Homemade Tools. Your receipt:


    2,000+ Tool Plans

  4. #3
    Supporting Member machiningfool's Avatar
    Join Date
    Jul 2015
    Location
    Seffner Florida
    Posts
    266
    Thanks
    0
    Thanked 273 Times in 146 Posts

    machiningfool's Tools
    I am adding some photos of how I am preparing the pattern for the mold. Viaduct patterns and molds for 1:32 garden railroad.-img_0248.jpgViaduct patterns and molds for 1:32 garden railroad.-img_0249.jpgViaduct patterns and molds for 1:32 garden railroad.-img_0250.jpgViaduct patterns and molds for 1:32 garden railroad.-img_0251.jpg
    Wherever urethane will be poured, the mold must be sealed or the urethane will run out, I know, because this has happened to me. I ended up scrambling to grab some more clay and sealing the leaks before the urethane set up, it was no fun.
    Last edited by machiningfool; Jan 12, 2016 at 09:35 AM.

  5. The Following 2 Users Say Thank You to machiningfool For This Useful Post:

    kbalch (Jan 12, 2016), Paul Jones (Jan 12, 2016)

  6. #4
    Supporting Member machiningfool's Avatar
    Join Date
    Jul 2015
    Location
    Seffner Florida
    Posts
    266
    Thanks
    0
    Thanked 273 Times in 146 Posts

    machiningfool's Tools
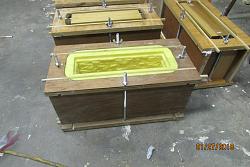
    Here are the completed molds for the viaduct columns and the last picture is of one that has been finished and ready for concrete. Just for some information about the price of this urethane material, it is fairly expensive, but it sure makes a good mold. The kits come in 24 pounds and cost 185 dollars. The cost of all of the molds in this endeavor will cost about 1200. I suppose that I could have designed the molds with less urethane, but the molds would have not been as sturdy. I will have to be pouring enough parts for about 180 feet of viaduct, so there are many parts to pour and the molds have to hold up. The total weight in urethane for the molds for the columns will weigh 84 lbs. and the arch portions will weigh 42 lbs. of urethane. Next I will be making the arch portion of the molds, as soon as I figure them out. You probably already know this, but the way that you figure how much urethane that you need is: Cubic inches of the mold, divided by 27.5 and that tells you how many lbs. of urethane that your mold takes. That is for this density of urethane. BITY mold materials, number 74-20/ Bob. Viaduct patterns and molds for 1:32 garden railroad.-img_0288.jpgViaduct patterns and molds for 1:32 garden railroad.-img_0289.jpgViaduct patterns and molds for 1:32 garden railroad.-img_0290.jpg
  7. The Following 2 Users Say Thank You to machiningfool For This Useful Post:

    kbalch (Jan 27, 2016), Paul Jones (Apr 27, 2016)

  8. #5
    Supporting Member machiningfool's Avatar
    Join Date
    Jul 2015
    Location
    Seffner Florida
    Posts
    266
    Thanks
    0
    Thanked 273 Times in 146 Posts

    machiningfool's Tools
    Today I ordered the 74-20 urethane from BITY mold supply and was happy to find out when ordering 120 lbs. of urethane, I could save some money, so instead of 1200., I am paying only 760. delivered, so quite a savings. The only problem is that the containers are in 5 gal. containers and I will have to transfer the urethane into gallon bottles, for easier pouring, oh well. Still working on the design of the arches and I am coming along pretty good, I think I have it licked. I will add some pictures when I get a little further along in the build. I forgot to tell you. You can probably see some sealing of the column molds with silicone and that is necessary so that the urethane does not leak out until it cures, very important. Once the urethane part of the molds are complete, it is not necessary to do any more sealing when the concrete is being poured into the molds. Bob.
    Last edited by machiningfool; Jan 29, 2016 at 06:29 PM.

  9. The Following User Says Thank You to machiningfool For This Useful Post:

    Paul Jones (Apr 27, 2016)

  10. #6
    Supporting Member machiningfool's Avatar
    Join Date
    Jul 2015
    Location
    Seffner Florida
    Posts
    266
    Thanks
    0
    Thanked 273 Times in 146 Posts

    machiningfool's Tools
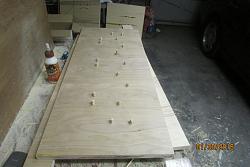
    Today I made the backing for the urethane face of the viaduct. It consists of a piece of plywood and wooden dowels to hold the urethane mold to the plywood. By sanding a groove in the dowels, it allows me, if I had to, to remove the urethane mold from the plywood backing and replace it. Here are some pictures.Viaduct patterns and molds for 1:32 garden railroad.-img_0304.jpgViaduct patterns and molds for 1:32 garden railroad.-img_0305.jpgViaduct patterns and molds for 1:32 garden railroad.-img_0306.jpgViaduct patterns and molds for 1:32 garden railroad.-img_0308.jpgViaduct patterns and molds for 1:32 garden railroad.-img_0309.jpg
  11. The Following User Says Thank You to machiningfool For This Useful Post:

    Paul Jones (Apr 27, 2016)

  12. #7
    Supporting Member machiningfool's Avatar
    Join Date
    Jul 2015
    Location
    Seffner Florida
    Posts
    266
    Thanks
    0
    Thanked 273 Times in 146 Posts

    machiningfool's Tools
    Here are some pictures of the final stage of making the column molds-preparing and pouring the second half of the molds. The ends of the mold are replaced with a full piece instead of the two pieces with the fence in between. Bob.Viaduct patterns and molds for 1:32 garden railroad.-img_0326.jpgViaduct patterns and molds for 1:32 garden railroad.-img_0327.jpgViaduct patterns and molds for 1:32 garden railroad.-img_0328.jpg

  13. The Following User Says Thank You to machiningfool For This Useful Post:

    Paul Jones (Apr 27, 2016)

  14. #8
    Supporting Member machiningfool's Avatar
    Join Date
    Jul 2015
    Location
    Seffner Florida
    Posts
    266
    Thanks
    0
    Thanked 273 Times in 146 Posts

    machiningfool's Tools
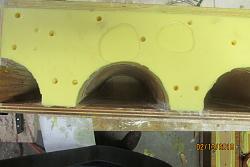
    Today, I finished pouring the arch portion of the viaduct molds and am now waiting for more urethane to pour the tunnels. Everything went well with the pouring of the faces of the arches. The tunnels will be poured with urethane and doweled so that the tunnel shapes will stay in place. Next after the tunnels will be cutting the bottom rectangular access holes in the bottom of the mold and then the top where the tracks reside. The top will be poured with urethane also. I designed part of the mold to be made out of fiberglass, but after looking at it again, I decided to have all of the parts of the mold made out off urethane. Here are some pictures of the progress. Bob.Viaduct patterns and molds for 1:32 garden railroad.-img_0330.jpgViaduct patterns and molds for 1:32 garden railroad.-img_0331.jpgViaduct patterns and molds for 1:32 garden railroad.-img_0332.jpg
  15. The Following User Says Thank You to machiningfool For This Useful Post:

    Paul Jones (Apr 27, 2016)

  16. #9
    Supporting Member machiningfool's Avatar
    Join Date
    Jul 2015
    Location
    Seffner Florida
    Posts
    266
    Thanks
    0
    Thanked 273 Times in 146 Posts

    machiningfool's Tools
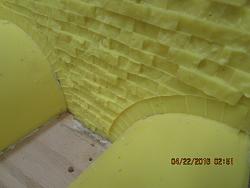
    I finally finished the viaduct mold. Here are some pictures of the finished mold and the pattern. The mold is in three parts, two sides and the bottom. This is the curved section and tomorrow I will assemble the straight section. I will add some pictures when I wrap the mold with steel and wood that is already constructed tomorrow. Bob.Viaduct patterns and molds for 1:32 garden railroad.-img_0418.jpgViaduct patterns and molds for 1:32 garden railroad.-img_0419.jpgViaduct patterns and molds for 1:32 garden railroad.-img_0420.jpg
    Last edited by machiningfool; Apr 22, 2016 at 04:11 PM.

  17. The Following 2 Users Say Thank You to machiningfool For This Useful Post:

    Jon (Apr 22, 2016), Paul Jones (Apr 27, 2016)

  18. #10
    Supporting Member machiningfool's Avatar
    Join Date
    Jul 2015
    Location
    Seffner Florida
    Posts
    266
    Thanks
    0
    Thanked 273 Times in 146 Posts

    machiningfool's Tools
    Thanks Jon. Here is the final step in the making of the mold. The steel braces are in place and except for some mold release, the mold is ready for pouring concrete. Bob.Viaduct patterns and molds for 1:32 garden railroad.-img_0421.jpgViaduct patterns and molds for 1:32 garden railroad.-img_0422.jpg

Thread Information

Users Browsing this Thread

There are currently 1 users browsing this thread. (0 members and 1 guests)

Bookmarks

Posting Permissions

  • You may not post new threads
  • You may not post replies
  • You may not post attachments
  • You may not edit your posts
  •