Free 186 More Best Homemade Tools eBook:  
Get 2,500+ tool plans, full site access, and more.

User Tag List

Page 1 of 2 1 2 LastLast
Results 1 to 10 of 18

Thread: Using steel rule and 90-degree tangent for centre height tool setting Quick and easy

  1. #1
    Supporting Member thehomeengineer's Avatar
    Join Date
    Nov 2017
    Location
    Berkshire UK
    Posts
    742
    Thanks
    751
    Thanked 2,209 Times in 431 Posts

    thehomeengineer's Tools

    Using steel rule and 90-degree tangent for centre height tool setting Quick and easy

    Hi All
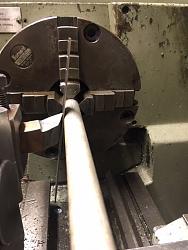
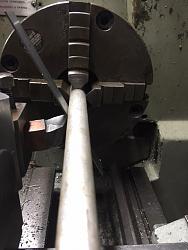
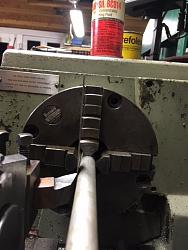
    I have seen a lot of lathe centre height setting gauges. (which I might add are nicely made) I usually set my tools against the revolving centre or dead centre from the tailstock. If I need to set a tool half way in to a job which is supported by the tailstock I use the following quick fix. I use a steel rule and simply set this between the work piece and the tool to be set. If the rule leans forward the tool is to high and if the rule leans back to low. So, when the rule is upright the tool is on centre height and therefore, the cutting edge must be at a 90-degree tangent to the centre line/height of the machine. Simply and very quick.

    photo showing rule between component and rule
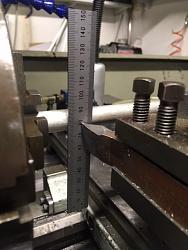
    Using steel rule and 90-degree tangent for centre height tool setting Quick and easy-img_0859.jpg

    Tool to high

    Using steel rule and 90-degree tangent for centre height tool setting Quick and easy-img_0862.jpg

    Tool to low

    Using steel rule and 90-degree tangent for centre height tool setting Quick and easy-img_0861.jpg

    Tool at centre height

    Using steel rule and 90-degree tangent for centre height tool setting Quick and easy-img_0863.jpg


    Thank you for viewing
    The Home Engineer

    186 More Best Homemade Tools eBook

  2. The Following 19 Users Say Thank You to thehomeengineer For This Useful Post:

    Andyt (Jun 20, 2018), baja (Jun 15, 2023), Captainleeward (Feb 22, 2018), chainsawd (Jan 21, 2021), greyhoundollie (Oct 17, 2018), Home-PC (Jan 21, 2021), Jon (Feb 21, 2018), lassab999 (Jun 9, 2023), LMMasterMariner (Feb 22, 2018), NortonDommi (Feb 22, 2018), olderdan (Feb 21, 2018), Paul Jones (Feb 21, 2018), PJs (Feb 21, 2018), Rikk (Jan 25, 2021), Seedtick (Feb 21, 2018), sossol (Jan 22, 2021), Syko Triker (Feb 22, 2018), Toolmaker51 (Oct 17, 2018), volodar (Jun 20, 2018)

  3. #2
    Content Editor
    Supporting Member
    DIYer's Avatar
    Join Date
    Aug 2013
    Posts
    3,055
    Thanks
    798
    Thanked 1,897 Times in 1,692 Posts


    Thanks thehomeengineer! We've added your Tool Height Setting Method to our Measuring and Marking category,
    as well as to your builder page: thehomeengineer's Homemade Tools. Your receipt:


    2,500+ Tool Plans
    New plans added on 01/15/2025: Click here for 2,702 plans for homemade tools.

  4. #3
    Supporting Member olderdan's Avatar
    Join Date
    Jun 2016
    Posts
    796
    Thanks
    1,464
    Thanked 1,598 Times in 473 Posts

    olderdan's Tools
    I remember once seeing an old toolmaker doing this on a drill press, I said why are you doing that, he said finding the centre of the bar.
    I said how accurate is that going to be? a couple of thou came the reply, and it was.
    We should not forget these old tricks, thanks for posting.

  5. The Following 5 Users Say Thank You to olderdan For This Useful Post:

    Paul Jones (Feb 21, 2018), PJs (Feb 21, 2018), thehomeengineer (Feb 21, 2018), Toolmaker51 (Oct 17, 2018), volodar (Jun 20, 2018)

  6. #4
    PJs
    PJs is offline
    Supporting Member PJs's Avatar
    Join Date
    Sep 2014
    Location
    Northern CA
    Posts
    1,844
    Thanks
    8,431
    Thanked 1,129 Times in 725 Posts

    PJs's Tools
    Quote Originally Posted by olderdan View Post
    I remember once seeing an old toolmaker doing this on a drill press, I said why are you doing that, he said finding the centre of the bar.
    I said how accurate is that going to be? a couple of thou came the reply, and it was.
    We should not forget these old tricks, thanks for posting.
    Roger that! That is the way I was taught way back when. The only thing I do different is use about 3-5 thou feeler gauge I keep in the drawer. I found using a scale the tool bit would get caught in the engraving and throw me off.

    Thanks for posting this The Home Engineer.

  7. The Following 6 Users Say Thank You to PJs For This Useful Post:

    Captainleeward (Feb 22, 2018), NortonDommi (Feb 22, 2018), Paul Jones (Feb 21, 2018), thehomeengineer (Feb 21, 2018), Toolmaker51 (Oct 17, 2018), volodar (Jun 20, 2018)

  8. #5

    Join Date
    Mar 2016
    Posts
    13
    Thanks
    0
    Thanked 9 Times in 4 Posts

    Thumbs up Congratulations

    Quote Originally Posted by thehomeengineer View Post
    Hi All
    I have seen a lot of lathe centre height setting gauges. (which I might add are nicely made) I usually set my tools against the revolving centre or dead centre from the tailstock. If I need to set a tool half way in to a job which is supported by the tailstock I use the following quick fix. I use a steel rule and simply set this between the work piece and the tool to be set. If the rule leans forward the tool is to high and if the rule leans back to low. So, when the rule is upright the tool is on centre height and therefore, the cutting edge must be at a 90-degree tangent to the centre line/height of the machine. Simply and very quick.

    photo showing rule between component and rule

    Click image for larger version. 

Name:	IMG_0859.JPG 
Views:	1296 
Size:	93.5 KB 
ID:	22297

    Tool to high

    Click image for larger version. 

Name:	IMG_0862.JPG 
Views:	949 
Size:	104.3 KB 
ID:	22298

    Tool to low

    Click image for larger version. 

Name:	IMG_0861.JPG 
Views:	890 
Size:	93.4 KB 
ID:	22299

    Tool at centre height

    Click image for larger version. 

Name:	IMG_0863.JPG 
Views:	902 
Size:	106.9 KB 
ID:	22300


    Thank you for viewing
    The Home Engineer
    Congratulations
    Finally, Someone has remembered the simplest and possibly best method of locating a lathe tool on center.
    I have quite enjoyed all the clamor of building "Hight Gages" to do the job when the absolute simplest and best method of locating was using a thin flat piece of metal against the work or something on the lathe that is always on the vertical center.
    An OLD Tool Maker
    Jon

  9. The Following 3 Users Say Thank You to Jonny For This Useful Post:

    PJs (Feb 22, 2018), Toolmaker51 (Oct 17, 2018), volodar (Jun 20, 2018)

  10. #6
    Supporting Member mklotz's Avatar
    Join Date
    Aug 2015
    Location
    LA, CA, USA
    Posts
    3,550
    Thanks
    363
    Thanked 6,586 Times in 2,166 Posts

    mklotz's Tools
    Quote Originally Posted by Jonny View Post
    Congratulations
    Finally, Someone has remembered the simplest and possibly best method of locating a lathe tool on center.
    I have quite enjoyed all the clamor of building "Hight Gages" to do the job when the absolute simplest and best method of locating was using a thin flat piece of metal against the work or something on the lathe that is always on the vertical center.
    An OLD Tool Maker
    Jon
    I might point out that it may be OK for setting tools used on the exterior of the workpiece but it isn't very useful for setting boring bars.
    ---
    Regards, Marv

    Failure is just success in progress
    That looks about right - Mediocrates

  11. The Following User Says Thank You to mklotz For This Useful Post:

    Toolmaker51 (Oct 17, 2018)

  12. #7
    Supporting Member thehomeengineer's Avatar
    Join Date
    Nov 2017
    Location
    Berkshire UK
    Posts
    742
    Thanks
    751
    Thanked 2,209 Times in 431 Posts

    thehomeengineer's Tools
    Hi Marv
    I simply move the tool to the opposite side of the workpiece and set the boring tool in the same way on the outer diameter. If using a boring bar it is highly unlikely that you would be using a centre to support the work piece.
    The Home Engineer
    Last edited by thehomeengineer; Feb 22, 2018 at 12:42 PM. Reason: Add more

  13. The Following 5 Users Say Thank You to thehomeengineer For This Useful Post:

    NortonDommi (Feb 22, 2018), PJs (Feb 22, 2018), Rikk (Jan 25, 2021), Toolmaker51 (Oct 17, 2018), volodar (Jun 20, 2018)

  14. #8

    Join Date
    Oct 2016
    Posts
    7
    Thanks
    0
    Thanked 12 Times in 3 Posts

    fandres's Tools
    Thanks thehomeengineer neat trick worth remembering.

  15. The Following User Says Thank You to fandres For This Useful Post:

    thehomeengineer (Jun 20, 2018)

  16. #9

    Join Date
    Feb 2018
    Posts
    3
    Thanks
    0
    Thanked 0 Times in 0 Posts
    chuck a piece of ROUND bar in your 3 jaw, out of true a bit? swing the chuck round so that the tool tip touches the run out high spot(felt tip pen applied to bar, if fussy) install rule and carry on.

  17. #10
    Supporting Member marksbug's Avatar
    Join Date
    Apr 2016
    Posts
    1,942
    Thanks
    778
    Thanked 384 Times in 310 Posts
    Quote Originally Posted by thehomeengineer View Post
    Hi Marv
    I simply move the tool to the opposite side of the workpiece and set the boring tool in the same way on the outer diameter. If using a boring bar it is highly unlikely that you would be using a centre to support the work piece.
    The Home Engineer
    ditto!!! many guys would not of thunk about that, simple things make the jobs eazyer. I my self bought one of those fancy aluminum red "edge technology" level thingy. it seems like a good idea at the tyme where my lathe is it's a little difacult to see that angle within a degree or 3......that dam fancy anodized pretty little tool( and when I say little I mean little) is so small I cant use it..... no I dont have mondo charlie hands, but if I was a 12 year old girl I might be able to use it. they make about 4 versions of it.some have a rod that go's in the chuck witch would be perfect if you set every tool ahead of time and had lots of holders...I like to set it off the work peice....almost impossiable with this little POS. it's also so narrow it's hard to get square on any thing..... I was expecting it to be about 3x as large as it is and be able tog grab it and go quickly. So for now it's on the wall of shame. And to farther add to the issues....setting the vial square to the tiny POS with the small set screw that moves the vial when snuged down... is pretty reedickyoulass. as I always say" YOU CANT FIX STUPID" and yes I did fall into that category when a spent the $16 or 18 what ever it was for the junk. But!!! It is made in USA. ( for the spellen teachers, my spellen is better than the tool i just dissscribed.)

  18. The Following 3 Users Say Thank You to marksbug For This Useful Post:

    thehomeengineer (Jun 21, 2018), Toolmaker51 (Oct 17, 2018), volodar (Jun 20, 2018)

Thread Information

Users Browsing this Thread

There are currently 1 users browsing this thread. (0 members and 1 guests)

Bookmarks

Posting Permissions

  • You may not post new threads
  • You may not post replies
  • You may not post attachments
  • You may not edit your posts
  •