Free 186 More Best Homemade Tools eBook:  
Get tool plans

User Tag List

Page 1 of 2 1 2 LastLast
Results 1 to 10 of 13

Thread: trunion turning set up

  1. #1
    Supporting Member Frank S's Avatar
    Join Date
    Aug 2015
    Location
    Peacock TX
    Posts
    11,634
    Thanks
    2,186
    Thanked 9,134 Times in 4,366 Posts

    Frank S's Tools

    trunion turning set up

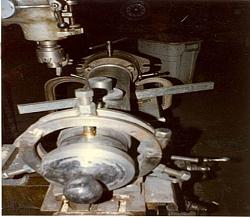
    While expanding the photos of my old eclectic computer screen background that I had made of some of my more memorable jobs and designs I stumbled on this one almost hidden like an Easter egg
    It is a set up that I used to turn the trunions on a cannon that I was making for a reenactment drill team.
    the set up required the use of 1 of my homemade steady rests a super spacer chucked at the bore end and a boring head with the cutter facing inwards on my 3 HP Bridgeport J head mill

    trunion turning set up-picture1.jpg
    the cannon bore was .300 wall 2" bore 4130 tubing embedded in the casting and it weighed around 300 pounds
    Download plans for lathes.
    Never try to tell me it can't be done
    When I have to paint I use KBS products

  2. The Following 12 Users Say Thank You to Frank S For This Useful Post:

    baja (Dec 17, 2020), gunsgt1863 (Jun 18, 2018), Jon (Jun 19, 2018), mr mikey (Feb 21, 2024), mwmkravchenko (Dec 15, 2023), NortonDommi (Jun 19, 2018), Paul Jones (Aug 10, 2018), PJs (Jun 19, 2018), rossbotics (Aug 9, 2018), Scotty1 (Dec 16, 2020), Seedtick (Jun 18, 2018), Toolmaker51 (Sep 19, 2018)

  3. #2
    Supporting Member desbromilow's Avatar
    Join Date
    Aug 2012
    Location
    Australia
    Posts
    801
    Thanks
    527
    Thanked 362 Times in 207 Posts

    desbromilow's Tools
    Frank,

    how was the bore tubing embedded in the casting?
    cast in place, or pressed in later? (or glued in?)

    if cast in, what was the process used to control shrinkage and assist in the alignment?


    thanks,
    Des


    Quote Originally Posted by Frank S View Post
    While expanding the photos of my old eclectic computer screen background that I had made of some of my more memorable jobs and designs I stumbled on this one almost hidden like an Easter egg
    It is a set up that I used to turn the trunions on a cannon that I was making for a reenactment drill team.
    the set up required the use of 1 of my homemade steady rests a super spacer chucked at the bore end and a boring head with the cutter facing inwards on my 3 HP Bridgeport J head mill

    Click image for larger version. 

Name:	Picture1.jpg 
Views:	637 
Size:	36.1 KB 
ID:	24397
    the cannon bore was .300 wall 2" bore 4130 tubing embedded in the casting and it weighed around 300 pounds
    Download plans for lathes.

  4. #3
    Supporting Member Frank S's Avatar
    Join Date
    Aug 2015
    Location
    Peacock TX
    Posts
    11,634
    Thanks
    2,186
    Thanked 9,134 Times in 4,366 Posts

    Frank S's Tools
    Des, the bore was cast in place the pour was vertical muzzle up the mold was made of packed green sand around a wax model the wax was melted away.
    the bore tube was 2.050" ID 3" OD 4130 with a half depth 2TPI left and right hand thread cut in the OD threaded on the butt end 3" deep @ 12 TPI then a flanged 3" long plug was made .030 over-sized the butt end of the tube was heated to 1000° for 20 minutes than the plug was screwed in place till it bottomed out and the flange was welded to the tube. A rig was built to lower guide and force if need be the tube in to the molten cast iron once the pour reached a few inches high the tube was lowered in place and held there though out the pour 2 large diameter sprews angling up from the trunions insured a complete fill of those once the pour was well past the trunions Sand plugs capped the sprew tubes it was 2 weeks after the pour was complete before the foundry got around to breaking open the mold mostly because they were busy doing their production pours.
    Once I got the cannon barrel to my shop I turned ground sanded and polished the entire surface and ran a clean up home down the bore drilled the hole for the fuse and gave it to the customer to finish and mount in his cradle that he built I never got to see it fired but I had heard that their reenactments always ended with a big bang.
    Never try to tell me it can't be done
    When I have to paint I use KBS products

  5. The Following 4 Users Say Thank You to Frank S For This Useful Post:

    baja (Dec 17, 2020), NortonDommi (Jun 19, 2018), PJs (Jun 19, 2018), Scotty1 (Dec 16, 2020)

  6. #4
    Supporting Member desbromilow's Avatar
    Join Date
    Aug 2012
    Location
    Australia
    Posts
    801
    Thanks
    527
    Thanked 362 Times in 207 Posts

    desbromilow's Tools
    Thanks Frank... great to understand how it was done.

    Quote Originally Posted by Frank S View Post
    Des, the bore was cast in place the pour was vertical muzzle up the mold was made of packed green sand around a wax model the wax was melted away.
    the bore tube was 2.050" ID 3" OD 4130 with a half depth 2TPI left and right hand thread cut in the OD threaded on the butt end 3" deep @ 12 TPI then a flanged 3" long plug was made .030 over-sized the butt end of the tube was heated to 1000° for 20 minutes than the plug was screwed in place till it bottomed out and the flange was welded to the tube. A rig was built to lower guide and force if need be the tube in to the molten cast iron once the pour reached a few inches high the tube was lowered in place and held there though out the pour 2 large diameter sprews angling up from the trunions insured a complete fill of those once the pour was well past the trunions Sand plugs capped the sprew tubes it was 2 weeks after the pour was complete before the foundry got around to breaking open the mold mostly because they were busy doing their production pours.
    Once I got the cannon barrel to my shop I turned ground sanded and polished the entire surface and ran a clean up home down the bore drilled the hole for the fuse and gave it to the customer to finish and mount in his cradle that he built I never got to see it fired but I had heard that their reenactments always ended with a big bang.

  7. #5
    Supporting Member Frank S's Avatar
    Join Date
    Aug 2015
    Location
    Peacock TX
    Posts
    11,634
    Thanks
    2,186
    Thanked 9,134 Times in 4,366 Posts

    Frank S's Tools
    Des, On most of my builds both past and present. I tend to err (sometimes to the extreme) on the side of over explaining. I sometimes feel my dissertations may actually turn people off or prevent them from posting to a thread because they either are bored from my lengthy posts, or cannot think of anything to add or ask.
    Among some of my favorite contributors here on these forums are in no particular order. Homemade Tools built by mklotz - HomemadeTools.net
    Homemade Tools built by Captainleeward - HomemadeTools.net
    Homemade Tools built by Paul Jones - HomemadeTools.net
    Homemade Tools built by Rick Sparber - HomemadeTools.net
    Homemade Tools built by jjr2001 - HomemadeTools.net
    Homemade Tools built by rossbotics - HomemadeTools.net
    Homemade Tools built by PJs - HomemadeTools.net
    Homemade Tools built by Toolmaker51 - HomemadeTools.net
    Homemade Tools built by thehomeengineer - HomemadeTools.net
    Homemade Tools built by tonyfoale - HomemadeTools.net
    I've been making things for going on 55 years pretty much all over the world but I have learned and many things from these guys I applaud their experiences and respect all of them. There are many more as well I just ran into a mental wall for their names
    Never try to tell me it can't be done
    When I have to paint I use KBS products

  8. The Following 5 Users Say Thank You to Frank S For This Useful Post:

    baja (Dec 17, 2020), HobieDave (Mar 26, 2020), Paul Jones (Aug 10, 2018), PJs (Jun 19, 2018), Toolmaker51 (Sep 19, 2018)

  9. #6
    Supporting Member NortonDommi's Avatar
    Join Date
    Jul 2014
    Location
    North Island, New Zealand.
    Posts
    990
    Thanks
    1,800
    Thanked 531 Times in 319 Posts

    NortonDommi's Tools
    Hi Frank S,
    With regard to " I sometimes feel my dissertations may actually turn people off or prevent them from posting to a thread because they either are bored from my lengthy posts, or cannot think of anything to add or ask."
    Your explanations are excellent and it is in the details that clarification of the process lies. Now come the next revolution or alien invasion I know how to build a better cannon.

  10. The Following 2 Users Say Thank You to NortonDommi For This Useful Post:

    Paul Jones (Aug 10, 2018), Toolmaker51 (Sep 19, 2018)

  11. #7
    Supporting Member Frank S's Avatar
    Join Date
    Aug 2015
    Location
    Peacock TX
    Posts
    11,634
    Thanks
    2,186
    Thanked 9,134 Times in 4,366 Posts

    Frank S's Tools
    Thanks NortonDommi, you are another of the contributors who I follow with great interest
    I don't know about a better cannon but it was very functional at 42 inches long with a 34 inch bore length 10" diameter at the butt and 8" diameter at the muzzle the 4130 tube made it much stronger than anything that could have been produced back in the day.
    I would have loved to had been there the day they fired off a plastic sleeve filled with a 2 pound load of 3/4" ball bearings. at a guys barn from 150 ft. I was told it looked like the door had been hit by a mortar
    Never try to tell me it can't be done
    When I have to paint I use KBS products

  12. The Following 3 Users Say Thank You to Frank S For This Useful Post:

    NortonDommi (Jun 19, 2018), Paul Jones (Aug 10, 2018), PJs (Jun 19, 2018)

  13. #8
    Content Editor
    Supporting Member
    DIYer's Avatar
    Join Date
    Aug 2013
    Posts
    3,055
    Thanks
    793
    Thanked 1,888 Times in 1,683 Posts


    Thanks Frank S! We've added your Trunion Turning Setup to our Machining category,
    as well as to your builder page: Frank S's Homemade Tools. Your receipt:


  14. #9
    Supporting Member Frank S's Avatar
    Join Date
    Aug 2015
    Location
    Peacock TX
    Posts
    11,634
    Thanks
    2,186
    Thanked 9,134 Times in 4,366 Posts

    Frank S's Tools
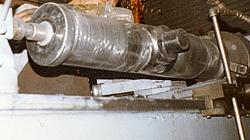
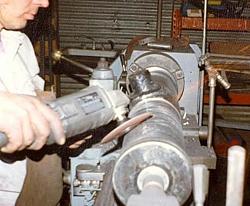
    I found a couple more pics of the cannon
    trunion turning set up-cannon-1.jpg
    trunion turning set up-cannon.jpg
    Never try to tell me it can't be done
    When I have to paint I use KBS products

  15. The Following User Says Thank You to Frank S For This Useful Post:

    NortonDommi (Aug 9, 2018)

  16. #10
    Supporting Member Paul Jones's Avatar
    Join Date
    May 2014
    Location
    Del Mar, California
    Posts
    1,231
    Thanks
    5,810
    Thanked 1,461 Times in 657 Posts

    Paul Jones's Tools
    Frank S,

    You never bore me with me with your "over explaining" the construction methods because I always learn something new and interesting from you. Your more than 55 years of experience is very welcomed with me and thank you for all your postings.

    Regards,
    Paul Jones

Thread Information

Users Browsing this Thread

There are currently 1 users browsing this thread. (0 members and 1 guests)

Bookmarks

Posting Permissions

  • You may not post new threads
  • You may not post replies
  • You may not post attachments
  • You may not edit your posts
  •