Free 186 More Best Homemade Tools eBook:  
Get 2,500+ tool plans, full site access, and more.

User Tag List

Results 1 to 10 of 10

Thread: A trick to assembling something with multiple bolts

  1. #1
    Supporting Member Frank S's Avatar
    Join Date
    Aug 2015
    Location
    Peacock TX
    Posts
    11,728
    Thanks
    2,235
    Thanked 9,228 Times in 4,405 Posts

    Frank S's Tools

    A trick to assembling something with multiple bolts

    This is more of a mechanics hack than anything else.
    A lot of times I find myself having to assemble parts with multiple bolts in awkward positions.
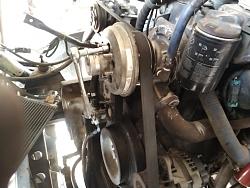
    This is particularly true when replacing the air operated fan clutch on a Mack engine and doubly so when you do not remove the radiator.
    The Borg Warner Air operated fan clutch has 6 recessed bolts that holds in on there is also a spacer shim between it and the water pump pulley making it all the more difficult to hold everything and start the bolts which also have split lock washers on them as well.
    It is all too easy to drop a bolt inside of the housing assembly or loose a lock washer off while trying to insert the bolt.
    loosing a washer or dropping a bolt inside especially after having successfully instilling the previous 5, only leaves you with a single course of action,
    Remove it vigorously shake the housing until you can get the bolt or washer in position to remove it with a slender probe magnet or needle nose pliers. You may get lucky though and it falls out.
    Here is a little trick I learned when dealing with an assembly and a handful of bolts to capture them in place.
    Sometimes a spot of grease will suffice but there are times when grease contamination is unacceptable.
    Other times a single rubber band stretched around all of the bolt shanks or a string tied tightly around them will work if you can cut loose the anchorage after the bolts are started.
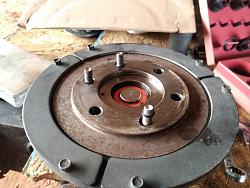
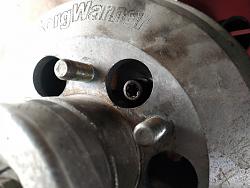
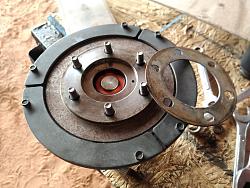
    Another way is to use O-rings, as I did in this case. I placed a bolt in position then rolled a small O-ring over it to hold it in place.
    As with the fan clutch many things have a small camphor on the holes allowing the O-ring to be left in place
    A trick to assembling something with multiple bolts-img_20210627_170810fc.jpg

    A trick to assembling something with multiple bolts-img_20210627_171056fc.jpg

    A trick to assembling something with multiple bolts-img_20210627_171242fc.jpg
    This allows me to hold the assembly slightly away from the mating part and one by one start each bolt a few threads
    If you just jam in in place you will risk knocking most if not all of the bolts out of their holes.
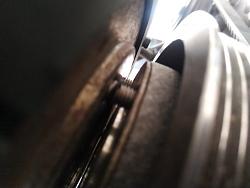
    A trick to assembling something with multiple bolts-img_20210627_171645fc.jpg
    A trick to assembling something with multiple bolts-img_20210627_172306dc.jpg

    186 More Best Homemade Tools eBook
    Never try to tell me it can't be done
    When I have to paint I use KBS products

  2. The Following 19 Users Say Thank You to Frank S For This Useful Post:

    baja (Jun 29, 2021), bruce.desertrat (Jun 29, 2021), darkoford (Jul 4, 2021), davesrepair (Feb 23, 2024), DIYer (Jun 29, 2021), Jon (Jul 2, 2021), KustomsbyKent (Jun 28, 2021), luvmygto (Jun 29, 2021), metric_taper (Jun 28, 2021), mr mikey (Oct 17, 2023), NortonDommi (Jun 28, 2021), nova_robotics (Jun 28, 2021), Paul Jones (Jun 29, 2021), Philip Davies (Jul 5, 2021), Ralphxyz (Oct 21, 2023), RetiredFAE (Jun 28, 2021), Scotty1 (Jun 29, 2021), sossol (Jul 4, 2021), Toolmaker51 (Jun 28, 2021)

  3. #2
    Supporting Member
    Join Date
    Nov 2017
    Posts
    414
    Thanks
    40
    Thanked 216 Times in 121 Posts

    Elizabeth Greene's Tools
    This would also be great for holding wheel studs in place while getting situated to pull them into a hub. They take some finagling to get in place but seem to have no trouble at all falling out. This would prevent that.

    2,500+ Tool Plans

  4. #3
    Supporting Member Frank S's Avatar
    Join Date
    Aug 2015
    Location
    Peacock TX
    Posts
    11,728
    Thanks
    2,235
    Thanked 9,228 Times in 4,405 Posts

    Frank S's Tools
    Quote Originally Posted by Elizabeth Greene View Post
    This would also be great for holding wheel studs in place while getting situated to pull them into a hub. They take some finagling to get in place but seem to have no trouble at all falling out. This would prevent that.
    Yes there are several applications for a method such as this, most especially where a dropped bolt or stud can fall inside of a assembly requiring you to start over to retrieve it
    Last edited by Frank S; Jun 28, 2021 at 11:24 PM.
    Never try to tell me it can't be done
    When I have to paint I use KBS products

  5. #4
    Supporting Member Toolmaker51's Avatar
    Join Date
    Feb 2016
    Location
    Midwest USA
    Posts
    5,338
    Thanks
    7,048
    Thanked 3,021 Times in 1,905 Posts

    Toolmaker51's Tools
    Quote Originally Posted by Frank S View Post
    Yes there are several applications for a method such as this most especially where a dropped bolt or stud can fall inside of a assembly requiring you to start over to retrieve it
    But think of all the colorful vocabulary $&^#(@* that would not have developed!
    Sincerely,
    Toolmaker51
    ...we'll learn more by wandering than searching...

  6. The Following 2 Users Say Thank You to Toolmaker51 For This Useful Post:

    davesrepair (Feb 23, 2024), old kodger (Jul 4, 2021)

  7. #5
    Content Editor
    Supporting Member
    DIYer's Avatar
    Join Date
    Aug 2013
    Posts
    3,055
    Thanks
    798
    Thanked 1,897 Times in 1,692 Posts


    Thanks Frank S! We've added your Bolt Holding Method to our Fastening category,
    as well as to your builder page: Frank S's Homemade Tools. Your receipt:


    New plans added on 01/15/2025: Click here for 2,702 plans for homemade tools.

  8. #6
    Supporting Member Philip Davies's Avatar
    Join Date
    Dec 2015
    Location
    Reading, Berks, UK
    Posts
    955
    Thanks
    1,291
    Thanked 1,064 Times in 360 Posts

    Philip Davies's Tools
    My solution would be to use those small, but powerful magnetic probes, if the nut will pass over it. I like the suggestion of O rings. I had not thought of that.

  9. #7
    Supporting Member Frank S's Avatar
    Join Date
    Aug 2015
    Location
    Peacock TX
    Posts
    11,728
    Thanks
    2,235
    Thanked 9,228 Times in 4,405 Posts

    Frank S's Tools
    Quote Originally Posted by Philip Davies View Post
    My solution would be to use those small, but powerful magnetic probes, if the nut will pass over it. I like the suggestion of O rings. I had not thought of that.
    Not sure how the magnetic probes would work in this instance where there are several bolts to pass through a deeply recessed hole in an otherwise hollow housing into a blind threaded flange But I can see your solution on some things.
    I've lost count of how many of these things I've changed through out the years. They are not too bad with the radiator out of the truck but when having to change one on the side of the road for some guy who is running out of hours in his log book. trying to fiddle with 1 bolt at a time hoping the stupid spring washer doesn't fall off or you drop the bolt off the end of your 3/8 drive #45 torqux bit while trying to start it gets to be a pain.
    I've found the fastest way is to use either o rings on each bolt or a large rubber band around all of them, hold the clutch drive about 3/8' from the water pump flange use the driver like a real stubby screw driver and start each one 2 or 3 threads then if a rubber band was used just slice it with a knife. in the case of the o rings there is enough champer to allow them to remain in place.
    When removing the old unit you almost always have to air up the clutch after removing the fan so you can turn it to get the holes to align up with the recessed bolts.
    I have replaced some that had grenaded internally and would not release when that happens all thoughts of returning for core refund are swept from the table just take an air chisel and beat to apart enough to get at the bolts.
    Never try to tell me it can't be done
    When I have to paint I use KBS products

  10. The Following 2 Users Say Thank You to Frank S For This Useful Post:

    Philip Davies (Jul 6, 2021), Toolmaker51 (Jul 9, 2021)

  11. #8
    Supporting Member Toolmaker51's Avatar
    Join Date
    Feb 2016
    Location
    Midwest USA
    Posts
    5,338
    Thanks
    7,048
    Thanked 3,021 Times in 1,905 Posts

    Toolmaker51's Tools
    Plus air chisels have equal appetite for imperial OR metric, hopefully less than Gr8 or 10.9 ISO.
    Sincerely,
    Toolmaker51
    ...we'll learn more by wandering than searching...

  12. #9
    Supporting Member Frank S's Avatar
    Join Date
    Aug 2015
    Location
    Peacock TX
    Posts
    11,728
    Thanks
    2,235
    Thanked 9,228 Times in 4,405 Posts

    Frank S's Tools
    Quote Originally Posted by Toolmaker51 View Post
    Plus air chisels have equal appetite for imperial OR metric, hopefully less than Gr8 or 10.9 ISO.
    The only problem is to cut a metric 10.9 with an air chisel you have to use an air compressor that has bar pressure while cutting a gr8 bolt the air pressure must be in PSI I have 1 air chisel that states 6.2 bar max and one that has 90PSI stamped on it now what I need is a 17mm chisel for the one that has 90PSI and a 11/16" chisel for the one that uses bar then run both of them on my compressor that has a KPA gage
    Never try to tell me it can't be done
    When I have to paint I use KBS products

  13. #10
    Supporting Member Toolmaker51's Avatar
    Join Date
    Feb 2016
    Location
    Midwest USA
    Posts
    5,338
    Thanks
    7,048
    Thanked 3,021 Times in 1,905 Posts

    Toolmaker51's Tools
    Quote Originally Posted by Frank S View Post
    The only problem is to cut a metric 10.9 with an air chisel you have to use an air compressor that has bar pressure while cutting a gr8 bolt the air pressure must be in PSI I have 1 air chisel that states 6.2 bar max and one that has 90PSI stamped on it now what I need is a 17mm chisel for the one that has 90PSI and a 11/16" chisel for the one that uses bar then run both of them on my compressor that has a KPA gage
    Solution.
    Gas wrench.
    One size fits most.


    2,500+ Tool Plans
    Sincerely,
    Toolmaker51
    ...we'll learn more by wandering than searching...

Thread Information

Users Browsing this Thread

There are currently 1 users browsing this thread. (0 members and 1 guests)

Bookmarks

Posting Permissions

  • You may not post new threads
  • You may not post replies
  • You may not post attachments
  • You may not edit your posts
  •