Free 186 More Best Homemade Tools eBook:  
Get 2,500+ tool plans, full site access, and more.

User Tag List

Page 4 of 41 FirstFirst 1 2 3 4 5 6 7 8 9 10 11 12 13 14 15 16 17 18 19 20 21 22 23 24 25 26 27 28 ... LastLast
Results 31 to 40 of 408

Thread: Took the first step towards building my shop

  1. #31
    Supporting Member Frank S's Avatar
    Join Date
    Aug 2015
    Location
    Peacock TX
    Posts
    11,716
    Thanks
    2,228
    Thanked 9,207 Times in 4,399 Posts

    Frank S's Tools
    Quote Originally Posted by metric_taper View Post
    OK Polyisocyanurate, I think this is the stuff the home stores sell with aluminum foil on both sides. I've seen this thicker stuff show up on craigslist by the truck load, it's used, so I don't know what industry had it for surplus.

    I hope the weather holds so you can make headway.
    We had our first snow Monday night, and some more tonight. This is way earlier then normal, by 1+ months. As well highs in the upper 30s to low 40s for the next week, statistically 55 is the norm. I'm still not done with outdoor chores for the fall.
    the same stuff but not foil backed this stuff has a 1/16" thick water resistant paper cladding on both sides you can hold a piece of it under water for days and it will not dissolve the paper or absorb hardly any of the water.
    You can support a 4"thick panel on saw horses at the ends and 2 men can stand in the middle of it.
    it weighs .878 lbs per sq ft and will be just over 3,600 lbs weight added to the roof or about equal to a double layer of the vinyl clad roll insulation
    this stuff has an "R" value of between 7 & 8 per inch. deducting a few percent for probable gaps and heat transference of the steel purlins I expect I will have an approximate total R value in the roof of around 26 to 28 the walls and doors will be insulated with the same stuff so the building should be cozy enough

    186 More Best Homemade Tools eBook
    Last edited by Frank S; Oct 30, 2019 at 12:46 PM.
    Never try to tell me it can't be done
    When I have to paint I use KBS products

  2. #32
    Supporting Member metric_taper's Avatar
    Join Date
    Mar 2017
    Location
    Marion, Iowa
    Posts
    628
    Thanks
    242
    Thanked 270 Times in 164 Posts

    metric_taper's Tools
    Quote Originally Posted by Frank S View Post
    the same stuff but not foil backed this stuff has a 1/16" thick water resistant paper cladding on both sides you can hold a piece of it under water for days and it will not dissolve the paper or absorb hardly any of the water.
    You can support a 4"thick panel on saw horses at the ends and 2 men can stand in the middle of it.
    it weighs .878 lbs per sq ft and will be just over 3,600 lbs weight added to the roof or about equal to a double layer of the vinyl clad roll insulation
    this stuff has an "R" value of between 7 & 8 per inch. deducting a few percent for probable gaps and heat transference of the steel purlins I expect I will have an approximate total R value in the roof of around 26 to 28 the walls and doors will be insulated with the same stuff so the building should be cozy enough

    The foil backed stuff I see is not in any way capable of being loaded. I've had it damaged from wind load in the back of the truck. They have it in 1/2 and 1" thickness only.

    2,500+ Tool Plans

  3. #33
    Supporting Member suther51's Avatar
    Join Date
    Jul 2016
    Posts
    380
    Thanks
    213
    Thanked 153 Times in 116 Posts
    A local amish sawmill owner gets seconds of the poly iso foam. Last winter we put 3 inches in the walls of the older part of our house (plank construction). From just two layers of leaky plaster and lath to poly iso, what a difference. Also what a difference in price, I have seen used sheets going for $50 a sheet, we paid about 23, wish we had done the whole house this way. Foil face by the way.

  4. #34
    Supporting Member Frank S's Avatar
    Join Date
    Aug 2015
    Location
    Peacock TX
    Posts
    11,716
    Thanks
    2,228
    Thanked 9,207 Times in 4,399 Posts

    Frank S's Tools
    Quote Originally Posted by metric_taper View Post
    The foil backed stuff I see is not in any way capable of being loaded. I've had it damaged from wind load in the back of the truck. They have it in 1/2 and 1" thickness only.
    Just cutting through the paper backing on this stuff I have will take out the blade of a box knife in a few strokes.
    Some of what I have has a taper to the sheet beginning at 1/2" going up to 1 1/2" thick and some @ 1" going to 2" and some @ 2" going to 3" so what ever it was ordered for it must have been for a specific purpose. I just turn the tapered sheets thin to thick to come up with the thickness I want
    Never try to tell me it can't be done
    When I have to paint I use KBS products

  5. #35
    Supporting Member Big Sexy's Avatar
    Join Date
    Feb 2017
    Posts
    164
    Thanks
    4
    Thanked 26 Times in 23 Posts
    Frank you say you are getting too old, but I suspect you and I are a lot alike and couldn’t imagine letting anyone else do the welding.

  6. #36
    Supporting Member Frank S's Avatar
    Join Date
    Aug 2015
    Location
    Peacock TX
    Posts
    11,716
    Thanks
    2,228
    Thanked 9,207 Times in 4,399 Posts

    Frank S's Tools
    Quote Originally Posted by Big Sexy View Post
    Frank you say you are getting too old, but I suspect you and I are a lot alike and couldn’t imagine letting anyone else do the welding.
    your are correct there
    Never try to tell me it can't be done
    When I have to paint I use KBS products

  7. #37
    Supporting Member suther51's Avatar
    Join Date
    Jul 2016
    Posts
    380
    Thanks
    213
    Thanked 153 Times in 116 Posts
    If I understand correctly the taper is a standard used in flat roofs to add a slight pitch for drainage.

  8. #38
    Supporting Member Frank S's Avatar
    Join Date
    Aug 2015
    Location
    Peacock TX
    Posts
    11,716
    Thanks
    2,228
    Thanked 9,207 Times in 4,399 Posts

    Frank S's Tools
    At around 4 PM this afternoon the wind died to dead calm we got 2.7 inches of rain yesterday so no possible fire hazard to the dead grass around the shop.
    The wife was doing something in the house so I knew I wouldn't have to put up with her objecting my deciding to set the truss since I had already been running the backhoe and she would be paying no attention to hearing it.
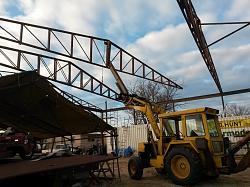
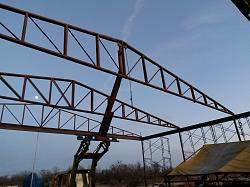
    I put my fork boom extension on that I had made special for this task then raised the truss in place with the help of a palm sized chain com a long and a couple of large C clamps it was ready to be welded in place. This may have sounded easy but I had to climb the scaffold several times and go on top of the container several times to accomplish the task but it just goes to show that what I had been telling all my friends that these trusses could be installed by one person was true
    Now I am ready to move on to the next phase of the shops construction.
    Took the first step towards building my shop-20191108_165559vcx.jpg

    Took the first step towards building my shop-20191108_175318vcx.jpg
    Never try to tell me it can't be done
    When I have to paint I use KBS products

  9. #39
    Supporting Member metric_taper's Avatar
    Join Date
    Mar 2017
    Location
    Marion, Iowa
    Posts
    628
    Thanks
    242
    Thanked 270 Times in 164 Posts

    metric_taper's Tools
    Frank, you must have some eye alignment trick to put the truss up, and get the bottom to be nearly in the correct place to weld. Seems that with the fork extension holding it up, that you could slide one side to where you need it, but getting the other side correct via your tractor must have some trick involved.
    I bet you figure out how to put the purlins in without a helper.

  10. #40
    Supporting Member Frank S's Avatar
    Join Date
    Aug 2015
    Location
    Peacock TX
    Posts
    11,716
    Thanks
    2,228
    Thanked 9,207 Times in 4,399 Posts

    Frank S's Tools
    Metric_taper, there was no way to slide the truss from side to side as the device straddled the center support. at most I could fudge movement with my little come a long about 2 inches.
    The truss was canted slightly to one end which allowed me to sit that end down on the top plate then climb up and secure it with a rope then I lowered the other end until it just touched carried the coma a long and a C clamp up and the weld stinger. With the other end sitting firmly on the top plate almost perfectly over the column I welded the end I was working on then went to the opposite end and repeated what I had done.
    From start to finish it took a couple hours but a lot of that time was in just maneuvering the long truss up and over the things on the ground like the container and the tent where I have a trailer being worked on. then getting as close to center with the backhoe and as square to the building as possible, not easy with a machine of that size with actually limited maneuvering room when you stop to think about it. We had about as much if not more difficulty in positioning the Skytrack forklift when we set the first 4 probably more since I was not the one operating it the guy who was is a truck driver not a machine operator. and the 3rd guy helping had shoulder issues and 3 fused vertebrae in his neck preventing him form doing much more than hold a rope on the ground.
    I'll get the purlins up I'm sure. I may make some more mods to the extension and mount it on the hoe then probably remove the fence on the garden side and drive across it, no problem there since I haven't tilled it under yet
    Never try to tell me it can't be done
    When I have to paint I use KBS products

Thread Information

Users Browsing this Thread

There are currently 13 users browsing this thread. (0 members and 13 guests)

Bookmarks

Posting Permissions

  • You may not post new threads
  • You may not post replies
  • You may not post attachments
  • You may not edit your posts
  •