Free 186 More Best Homemade Tools eBook:  
Get tool plans

User Tag List

Page 1 of 2 1 2 LastLast
Results 1 to 10 of 16

Thread: TIG Pedal build

  1. #1
    Supporting Member Charst's Avatar
    Join Date
    Jan 2018
    Posts
    18
    Thanks
    0
    Thanked 71 Times in 10 Posts

    Charst's Tools

    TIG Pedal build

    Hi all!

    I bought a nice used TIG welding machine the other day. It is an Italian make you might have never heard of. It is a ca. 2002 "SELCO Genesis 200 AC-DC" with water cooling and lots of nice features and it is in perfect condition - BUT! - It came without a foot pedal for the amperage control. Especially for welding aluminum, the use of a foot pedal makes life alot easier (to have proper heat control). So I searched the web to find a pedal that would work with my new welder. But finding the combination of a 10k Ohms potentiometer control with a 7-pin connection plug of military standard and a reasonable design/rigidity was in vain...

    During my search I got the impression that there is some kind of "two class society" when it comes to welding equipment. You either find cheap stuff from the far east or the high end manufacturers stuff which I sometimes found ridiculously expensive.
    Finally I decided to build a pedal by myself.
    The only components I did not have was the potentiometer, the signal cable and the plug. I got the first two from an electronics market for less than € 20.-. All other parts (except for the sheet metal) came out of my scrap box. As an example: The switch - needed to initiate the arc start - is a micro swith from the controls of an old Honda motorcycle. My research for the plug gave prices around €50 so I decided to build that one as well. Attached are pictures of some sketches I made, of the pedal and the DIY-plug.
    It was fun to build and it works perfect. The weight is about 4 kilos so it does not hop around when pushing the pedal.

    Greeting

    Charst
    Attached Thumbnails Attached Thumbnails TIG Pedal build-1.jpg   TIG Pedal build-2.jpg   TIG Pedal build-3.jpg   TIG Pedal build-4.jpg   TIG Pedal build-5.jpg  

    TIG Pedal build-6.jpg   TIG Pedal build-7.jpg   TIG Pedal build-8a.jpg   TIG Pedal build-9.jpg   TIG Pedal build-10.jpg  

    TIG Pedal build-11.jpg   TIG Pedal build-12.jpg   TIG Pedal build-13.jpg   TIG Pedal build-14.jpg   TIG Pedal build-15.jpg  

    TIG Pedal build-16.jpg   TIG Pedal build-17.jpg   TIG Pedal build-18.jpg   TIG Pedal build-19.jpg   TIG Pedal build-20.jpg  

    TIG Pedal build-21.jpg   TIG Pedal build-22.jpg   TIG Pedal build-23.jpg   TIG Pedal build-24.jpg  

    186 More Best Homemade Tools eBook
    Last edited by Charst; Aug 9, 2020 at 09:47 AM.

  2. The Following 17 Users Say Thank You to Charst For This Useful Post:

    57_210 (Aug 16, 2020), chy_farm (Aug 15, 2020), dubbby (Aug 16, 2020), Eaglewood (Aug 10, 2020), HobieDave (Jun 21, 2021), Jon (Aug 9, 2020), mr mikey (Aug 25, 2024), nova_robotics (Aug 10, 2020), Paul Jones (Aug 14, 2020), Scotsman Hosie (Aug 14, 2020), Scotty12 (Aug 11, 2020), thevillageinn (Aug 16, 2020), tonyfoale (Aug 9, 2020), Tooler2 (Sep 7, 2024), Toolmaker51 (Aug 11, 2020), tooly (Aug 10, 2020), trevor_60_r (Aug 17, 2020)

  3. #2
    Content Editor
    Supporting Member
    DIYer's Avatar
    Join Date
    Aug 2013
    Posts
    3,055
    Thanks
    793
    Thanked 1,888 Times in 1,683 Posts


    Thanks Charst! We've added your TIG Pedal to our Welding category,
    as well as to your builder page: Charst's Homemade Tools. Your receipt:


    2,000+ Tool Plans

  4. The Following User Says Thank You to DIYer For This Useful Post:

    freddo4 (Aug 10, 2020)

  5. #3
    Supporting Member Crusty's Avatar
    Join Date
    May 2019
    Location
    Dry Gulch, Tx
    Posts
    749
    Thanks
    220
    Thanked 854 Times in 325 Posts

    Crusty's Tools
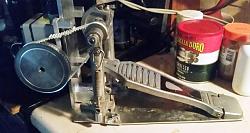
    You're definitely right about there being two classes of TIG welders - affordable and workable if a good choice is made and really expensive commercial grade. I've found my Lotos TIG welder to be usable for everything I need to do and I could afford to buy it so that's what I use. Many of the asian welders come with a foot pedal that's inconvenient to use, including my Lotos, so I modified it to overcome the deficiencies. I transplanted the controls onto a used bass drum kick pedal for a rugged and heavy pedal which stays in place (I know what you mean about chasing the pedal with your foot while trying to run a bead) and I further modified the drive to change the control box travel of 30º to a pedal which travels more than 60º using an XL timing belt drive and that gives me finer control of my welding current. The plus is that the pedal works in the usual direction instead of having to position it backwards as you must do with the supplied pedal. It's been working well for me and is rugged enough to survive the typical abuse of a welding shop.

    TIG Pedal build-foot-pedal-side.jpg


    Note to editor: This is already in my builder's page so no need to include it again.
    If you can't make it precise make it adjustable.

  6. The Following 2 Users Say Thank You to Crusty For This Useful Post:

    freddo4 (Aug 10, 2020), Scotsman Hosie (Aug 14, 2020)

  7. #4
    Supporting Member Charst's Avatar
    Join Date
    Jan 2018
    Posts
    18
    Thanks
    0
    Thanked 71 Times in 10 Posts

    Charst's Tools
    Hi Crusty!
    I like the idea of a fusion between musical stuff and welding equipment
    Thanks for you comment!

    Charst

  8. #5
    Supporting Member Crusty's Avatar
    Join Date
    May 2019
    Location
    Dry Gulch, Tx
    Posts
    749
    Thanks
    220
    Thanked 854 Times in 325 Posts

    Crusty's Tools
    I think it's a better use of my time finding something which I can buy and modify to suit my application than to spend the countless hours building it all from scratch. Many of my designs incorporate things already made by someone else as a starting point. I get more done that way and at a reasonable cost.
    If you can't make it precise make it adjustable.

  9. #6
    Supporting Member
    Join Date
    Jun 2018
    Posts
    13
    Thanks
    3
    Thanked 4 Times in 3 Posts
    Quote Originally Posted by Crusty View Post
    You're definitely right about there being two classes of TIG welders - affordable and workable if a good choice is made and really expensive commercial grade. I've found my Lotos TIG welder to be usable for everything I need to do and I could afford to buy it so that's what I use. Many of the asian welders come with a foot pedal that's inconvenient to use, including my Lotos, so I modified it to overcome the deficiencies. I transplanted the controls onto a used bass drum kick pedal for a rugged and heavy pedal which stays in place (I know what you mean about chasing the pedal with your foot while trying to run a bead) and I further modified the drive to change the control box travel of 30º to a pedal which travels more than 60º using an XL timing belt drive and that gives me finer control of my welding current. The plus is that the pedal works in the usual direction instead of having to position it backwards as you must do with the supplied pedal. It's been working well for me and is rugged enough to survive the typical abuse of a welding shop.

    Click image for larger version. 

Name:	Foot pedal side.jpg 
Views:	470 
Size:	43.2 KB 
ID:	36220


    Note to editor: This is already in my builder's page so no need to include it again.
    I bet it come with the same one as my ahp alpha tig. I love that foot pedal. For some reason my ankle does not do the forward pivot movement for a regular foot pedal very well so I much prefer the push straight down movement of the Asian foot pedals. Just wish I could find a way to keep it in place. I thought about making a bracket to attach it to my chair I sit in to tig weld

  10. #7
    Supporting Member Crusty's Avatar
    Join Date
    May 2019
    Location
    Dry Gulch, Tx
    Posts
    749
    Thanks
    220
    Thanked 854 Times in 325 Posts

    Crusty's Tools
    Many of those CE TIG units use the exact same control box.

    Before I reworked my pedal I attached the control box to an 18" square of 5/8" plywood and that kept it in the general vicinity of my foot.
    If you can't make it precise make it adjustable.

  11. #8
    Supporting Member jdurand's Avatar
    Join Date
    May 2019
    Location
    Krasnodar Krai, Russian Federation
    Posts
    1,469
    Thanks
    127
    Thanked 768 Times in 426 Posts

    jdurand's Tools
    I used to have to make quite a few of those hot melt glue and epoxy plugs. I used to test aerospace and military gear so we needed to plug into the gear but nobody ever gave us mating cables. So... box of spare pins and glue. We just put a piece of paper over the female, stabbed the pins through, put a tube over and filled.

    Then there were Winchester Connectors. If you could assemble a Winchester connector right on the first try, you could do anything in Ikea blindfolded and drunk. I finally got to bringing the Winchester sales rep in, pointing at some piece of aerospace gear on my bench and saying we needed 5 or whatever of the mating connectors. ASSEMBLED. No, I didn't care what the pin numbers were, which screw finishes, or anything else. FIT THE HOLES and not be missing parts.

  12. The Following 2 Users Say Thank You to jdurand For This Useful Post:

    PJs (Aug 26, 2024), Tooler2 (Sep 7, 2024)

  13. #9
    Supporting Member mwmkravchenko's Avatar
    Join Date
    Nov 2017
    Location
    Perth Ontario Canada
    Posts
    1,042
    Thanks
    5,271
    Thanked 394 Times in 280 Posts
    Nicely thought out heavy duty TIG pedal. Should last you a very long time. The onl thing that might ever fail could be the potentiometer.

  14. #10
    Supporting Member Charst's Avatar
    Join Date
    Jan 2018
    Posts
    18
    Thanks
    0
    Thanked 71 Times in 10 Posts

    Charst's Tools
    Quote Originally Posted by mwmkravchenko View Post
    Nicely thought out heavy duty TIG pedal. Should last you a very long time. The onl thing that might ever fail could be the potentiometer.
    Hi!

    How's your Shrinker-Stretcher doing? Is it already in operation?

    My tip is that the filament will be the first thing conk out. We shall see...
    At the moment it works just fine.

    Charst

Thread Information

Users Browsing this Thread

There are currently 1 users browsing this thread. (0 members and 1 guests)

Tags for this Thread

Bookmarks

Posting Permissions

  • You may not post new threads
  • You may not post replies
  • You may not post attachments
  • You may not edit your posts
  •