Free 186 More Best Homemade Tools eBook:  
Get 2,500+ tool plans, full site access, and more.

User Tag List

Page 1 of 2 1 2 LastLast
Results 1 to 10 of 11

Thread: Thread checking

  1. #1
    Supporting Member mklotz's Avatar
    Join Date
    Aug 2015
    Location
    LA, CA, USA
    Posts
    3,550
    Thanks
    363
    Thanked 6,587 Times in 2,167 Posts

    mklotz's Tools

    Thread checking

    I suppose this is more a hint than a tool but it's still a useful device that should be valuable to novice machinists.

    In modelmaking one makes a lot of threaded parts and, as a consequence, acquires a large collection of taps and dies. Whenever I encounter a new thread and need to buy threading tackle, I buy two taps and a die for the required size. I use the tap to make a nut and then adjust the die to make a stud that is a smooth running fit in the nut. These test pieces go in a pill vial, along with the taps and dies. The cap of the vial is Sharpie-marked (black for inferial and red for metric) with the thread designation, and tap drill for 65% thread depth (makes threading easier and reduces tap breakage). A large 'LH' in green is added for left-hand taps and dies.

    If one encounters an unidentified thread, there are numerous ways to identify it. If it's a male bolt/screw, thread checker plates, e.g.,

    Enco - Guaranteed Lowest Prices on Machinery, Tools and Shop Supplies

    can work but they often don't cover the smaller or seldom-used sizes and, more importantly, are impossible to use if the threaded stud is attached to machinery that blocks the rotation of the checker. Nut and bolt checkers, e.g.,

    Nut & Bolt Thread Checker (Inch & Metric) - Tap And Die Sets - Amazon.com

    suffer similarly in size coverage.

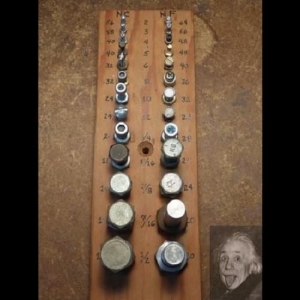
    I could dig my test pieces out of their vials and use them as checks but that's too tedious for me. So I put together a plate with a nut and bolt sample of all the sizes I encounter...


    In the case of bolts not in my collection (e.g., the very uncommon 5-44), I simply make another set of checkers using the tap and die in my collection. Since I have a fairly large fastener collection, this happens very infrequently.

    A personalized set like this covers several points. Any nut or bolt can be removed and taken to the questioned thread for checking plus its presence in the set proves that I have the necessary threading tackle to make whatever is required, male or female.

    Make yourself one of these; it will save you both time and aggravation.

    186 More Best Homemade Tools eBook
    Last edited by mklotz; Jul 8, 2017 at 03:12 PM.
    ---
    Regards, Marv

    Failure is just success in progress
    That looks about right - Mediocrates

  2. The Following 11 Users Say Thank You to mklotz For This Useful Post:

    baja (Aug 22, 2019), jackman (Jul 29, 2017), Jon (May 18, 2016), kboy0076 (Jan 2, 2024), lazarus (Jun 3, 2016), ncollar (May 19, 2016), oldpastit (Aug 22, 2019), Paul Jones (May 21, 2016), rlm98253 (Dec 10, 2017), Seedtick (May 19, 2016), Shaper (Dec 11, 2017)

  3. #2
    Content Editor
    Supporting Member
    DIYer's Avatar
    Join Date
    Aug 2013
    Posts
    3,055
    Thanks
    798
    Thanked 1,897 Times in 1,692 Posts

    Thanks mklotz! We've added your Thread Checker Board to our Measuring and Marking category,
    as well as to your builder page: mklotz's Homemade Tools. Your receipt:


    2,500+ Tool Plans
    Last edited by Jon; Oct 27, 2021 at 11:12 PM.
    New plans added on 01/17/2025: Click here for 2,706 plans for homemade tools.

  4. #3
    PJs
    PJs is offline
    Supporting Member PJs's Avatar
    Join Date
    Sep 2014
    Location
    Northern CA
    Posts
    1,844
    Thanks
    8,431
    Thanked 1,129 Times in 725 Posts

    PJs's Tools
    Thanks Marv. I've seen boards like this (Mr.Pete I think). Handy but a bit cumbersome IMHO. I found and like the Stud/nut rope on Amazon a while back (wish list) as it would be handy and could be used as test fits while still chucked up. It could also be added to by building additional sizes one runs across as necessary. Although they don't state it, but would assume they are 2-a/b fits. The use of thread standards is just too costly for us home shop guys on a budget. I do like your idea of the vials with all the necessary tools per size, particularly the tiny stuff.

    The cap of the vial is Sharpie-marked (black for inferial and red for metric) with the thread designation, and tap drill for 65% thread depth (makes threading easier and reduces tap breakage).
    Thread depth is an interesting topic. Is 65% your go-to or just for smaller taps? IIRC, standard tap charts are for ~70-75%, giving a ~2a/b fit. A while back I had a big lesson on tapping a 6-32 thru hole in a 1/4-28 SHCS (socket head cap screw). Obviously a tough do with the hardness, length of engagement, thread depth and type of taps. With an adjustable die its pretty easy to ease into it but on the male end there are not adjustable taps but a lot of profiles, materials and types to choose from and cost can be an issue for the hi-zute ones. Being your kit is substantial I would be interested in your thoughts on types you prefer.

    Thanks, ~PJ
    ‘‘Always do right. This will gratify some people and astonish the rest.’’
    Mark Twain

  5. The Following User Says Thank You to PJs For This Useful Post:

    Paul Jones (May 21, 2016)

  6. #4
    Supporting Member mklotz's Avatar
    Join Date
    Aug 2015
    Location
    LA, CA, USA
    Posts
    3,550
    Thanks
    363
    Thanked 6,587 Times in 2,167 Posts

    mklotz's Tools
    The formula for determining tap drill size while allowing for depth-of-thread is:

    TD = MD - 0.013*DOT/P

    where:

    TD = tap drill size
    MD = major diameter of thread
    DOT = depth-of-thread expressed as percentage
    P = pitch of thread expressed in tpi

    The simpler, more commonly used formula,

    TD = MD - 1/P

    assumes

    0.013*DOT = 1

    which leads to

    DOT = 1/0.013 = 77 %

    In all but the most critical applications, you don't need anywhere near that much engagement and it just makes threading much more difficult and leads to tap breakage.

    My DRILL program has a chart for recommended DOT on various materials...

    Recommended Depth of Thread:

    MATERIAL DOT (%)

    MILD AND UNTREATED STEELS 60-65
    HIGH CARBON STEEL 50
    HIGH SPEED STEEL 55
    STAINLESS STEEL 50
    FREE CUTTING STAINLESS STEEL 60
    CAST IRON 70-75
    WROUGHT ALUMINUM 65
    CAST ALUMINUM 75
    WROUGHT COPPER 60
    FREE CUTTING YELLOW BRASS 70
    DRAWN BRASS 65
    MANGANESE BRONZE 55
    MONEL METAL 55-60
    NICKEL SILVER (GERMAN SILVER) 50-60

    but I find that 65% is a good compromise for almost any thread, large or small. Of course, most of my work is model building so ultimate thread strength is almost never an issue. If you're going to build safety-sensitive stuff, seek professional recommendations for DOT.
    ---
    Regards, Marv

    Failure is just success in progress
    That looks about right - Mediocrates

  7. The Following 4 Users Say Thank You to mklotz For This Useful Post:

    baja (Aug 22, 2019), Paul Jones (May 21, 2016), PJs (May 19, 2016), Toolmaker51 (May 19, 2016)

  8. #5
    PJs
    PJs is offline
    Supporting Member PJs's Avatar
    Join Date
    Sep 2014
    Location
    Northern CA
    Posts
    1,844
    Thanks
    8,431
    Thanked 1,129 Times in 725 Posts

    PJs's Tools
    Thank You Marv! Great chart and recommendations. Makes sense now seeing the chart. I'm sure many others will find it useful too! Regards, ~PJ
    ‘‘Always do right. This will gratify some people and astonish the rest.’’
    Mark Twain

  9. The Following User Says Thank You to PJs For This Useful Post:

    Paul Jones (May 21, 2016)

  10. #6
    Supporting Member Paul Jones's Avatar
    Join Date
    May 2014
    Location
    Del Mar, California
    Posts
    1,231
    Thanks
    5,810
    Thanked 1,463 Times in 657 Posts

    Paul Jones's Tools
    Marv,

    I like the idea and have been wanted to do this with a pair of stud/nut ropes that PJs mentioned. I bought these from ENCO with my 20% discount and free shipping offer. One set is metric and the other Imperial but the thin steel cabling used to string the stud/nut combination is convenient for keeping the set together but makes it very difficult to use. I wanted to do something like you did with a labelled board and cut the thread/nut sets off the cable and place into a convenient board. Using the stud/nut without the cabling getting the way will be a lot easier but I haven't done this yet. At now I have your example.

    Thanks for posting this and a BIG thank you for the threading formula by material,
    Paul

  11. The Following User Says Thank You to Paul Jones For This Useful Post:

    PJs (May 21, 2016)

  12. #7
    Supporting Member mklotz's Avatar
    Join Date
    Aug 2015
    Location
    LA, CA, USA
    Posts
    3,550
    Thanks
    363
    Thanked 6,587 Times in 2,167 Posts

    mklotz's Tools
    I had considered getting the metric nut and bolt checkers on a cable from ENCO but put it off. It seemed to me that the cable would really get in the way; your comments seem to confirm that. Plus, the advertised item doesn't cover a lot of the really small metric threads I encounter. I suppose I'll just make another board like the one shown when a find a nice round toit.

    I'm glad you liked the formula. Too many people want cumbersome tables when an entire table can be condensed into a single formula. Every shop should have a scientific calculator - they're dirt cheap now - and with one even the most math-fearing has no excuse for not using a formula.

    Here's another one. Thread-forming taps, which displace rather than cut metal to form threads, need larger tap drills. There is a formula for this too and it includes an allowance for depth-of-thread...

    Tap drill size for a thread-forming tap can be found from:
    tap drill = OD - 0.0068*(DOT)/pitch
    For example, with a 1/4-20 tap and a desired depth of thread of 65%, we have:
    tap drill = 0.25 - 0.0068*65/20 = 0.228 in. (#1 drill)

    65 % DOT for a conventional, metal-cutting tap would yield a tap drill of 0.208 or a #4 drill.
    ---
    Regards, Marv

    Failure is just success in progress
    That looks about right - Mediocrates

  13. The Following 2 Users Say Thank You to mklotz For This Useful Post:

    Paul Jones (May 21, 2016), PJs (May 21, 2016)

  14. #8
    PJs
    PJs is offline
    Supporting Member PJs's Avatar
    Join Date
    Sep 2014
    Location
    Northern CA
    Posts
    1,844
    Thanks
    8,431
    Thanked 1,129 Times in 725 Posts

    PJs's Tools
    One set is metric and the other Imperial but the thin steel cabling used to string the stud/nut combination is convenient for keeping the set together but makes it very difficult to use.
    Thanks for the heads up on the cable type Paul. I can see now how it could be inconvenient, especially on smaller ones. Perhaps for your board you could use some kind of pin with a slight curve that would fit through the cable hole and hold them relatively well for storage. Did you find the thread quality to be pretty good? Look forward to seeing what you come up with.

    Here's another one. Thread-forming taps, which displace rather than cut metal to form threads, need larger tap drills. There is a formula for this too and it includes an allowance for depth-of-thread...
    Thanks again Marv for including thread-forming formulas. I've never used them but understand they create very high quality threads. I agree about calculators. TI36's (solar) have been around for ages and keep several around the house and shop for what ever comes up and are way cheap ($10-15). Even taught my students back in the day to solve Kirchoff laws problems with them. I do find I am using the "RealCalc" app on my C-phone more and more and does pretty much all I need. I've built a pretty good collection over the years in Excel that I use on my tablet or phone in the shop and find it handy without having to remember too many formulas or look them up. Not as extensive as yours or as complex but did build one for Catanary calcs on tubing and round bar of various materials.

    Thanks Much, ~PJ
    ‘‘Always do right. This will gratify some people and astonish the rest.’’
    Mark Twain

  15. #9
    Supporting Member mklotz's Avatar
    Join Date
    Aug 2015
    Location
    LA, CA, USA
    Posts
    3,550
    Thanks
    363
    Thanked 6,587 Times in 2,167 Posts

    mklotz's Tools
    Thread-forming taps have several advantages over ordinary taps.

    They create no chips so there's nothing to clog up and break the tap while tapping.

    Since they form no chips they don't require flutes in the tap body; thus the tap body is stronger and better able to resist breakage.

    Formed threads are stronger than cut threads because there are fewer stress risers.


    My favorite calculator (I have two of them) is the HP 35s...

    http://www.amazon.com/HP-F2215AA-ABA...eywords=hp+35s

    The major advantage for me is that it is programmable. I can keep it loaded with oft-used computations as well as quickly constructing on-the-run calculations that will be repeated for a particular job. It can operate in algebraic or RPN (Reverse Polish Notation) mode. I use the latter exclusively because of many years experience with assembly language but the former is there for folks who don't get it. Runs forever on two 3 volt coin batteries.

    I also have, but don't really use, a full-scientific calculator I bought for 99 cents at the local dollar store. I bought it to prove to a colleague just how cheaply calculators can be had.
    ---
    Regards, Marv

    Failure is just success in progress
    That looks about right - Mediocrates

  16. The Following User Says Thank You to mklotz For This Useful Post:

    PJs (May 22, 2016)

  17. #10
    Supporting Member Frank S's Avatar
    Join Date
    Aug 2015
    Location
    Peacock TX
    Posts
    11,729
    Thanks
    2,238
    Thanked 9,233 Times in 4,407 Posts

    Frank S's Tools
    At my recommendation the company I was with in Kuwait upgraded our threading to roll threading, both internal and external, the heads for the many sizes of bar stocks we used were an expensive initial cash outlay but the quality and speed of the product production quickly paid back our investment many times over in the first year.
    A single head can do quite a wide range of thread diameters of the same pitch or different pitches by changing out the rollers but for production speeds having several sizes of heads proved advantageous
    Last edited by Frank S; May 22, 2016 at 10:31 AM.
    Never try to tell me it can't be done
    When I have to paint I use KBS products

  18. The Following User Says Thank You to Frank S For This Useful Post:

    PJs (May 22, 2016)

Thread Information

Users Browsing this Thread

There are currently 1 users browsing this thread. (0 members and 1 guests)

Bookmarks

Posting Permissions

  • You may not post new threads
  • You may not post replies
  • You may not post attachments
  • You may not edit your posts
  •