Free 186 More Best Homemade Tools eBook:  
Get tool plans

User Tag List

Page 1 of 2 1 2 LastLast
Results 1 to 10 of 18

Thread: Tap wrench guide

  1. #1
    Supporting Member mklotz's Avatar
    Join Date
    Aug 2015
    Location
    LA, CA, USA
    Posts
    3,541
    Thanks
    363
    Thanked 6,568 Times in 2,163 Posts

    mklotz's Tools

    Tap wrench guide

    A tapping guide is used to keep a tap straight when it's not possible to mount the work on the lathe or mill. The simplest style is nothing more than a block of metal with a hole to match the tap diameter drilled through. While that works, it doesn't support the tap wrench so it's still possible to put undue side pressure on the tap and break it.

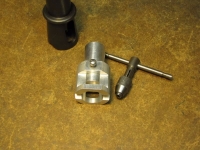
    Professional guides like the black one in the picture below use a fitted wrench that turns freely in the support column. They're expensive for an occasional-use tool.

    It's easy to make one to fit a conventional T-handle tap wrench. I bored an aluminum cylinder to be a running fit on the wrench chuck and added a through hole to permit the tap to extend out the bottom of the cylinder.


    This cylinder is held in a base that can adjust up and down on the cylinder and is held in place by a screw. Cutouts in the base permit in situ cleaning and lubrication of the tap. The cutouts also provide a means of clamping the base to the work if that is required. A V-groove on the bottom of the base allows the tool to be used on shafts and cylindrical workpieces.


    186 More Best Homemade Tools eBook
    Last edited by mklotz; Jul 8, 2017 at 02:21 PM.
    ---
    Regards, Marv

    Failure is just success in progress
    That looks about right - Mediocrates

  2. The Following 28 Users Say Thank You to mklotz For This Useful Post:

    baja (Jan 3, 2020), benkeller3 (Nov 25, 2017), Carnel (Jan 3, 2020), CHP (Feb 27, 2016), emu roo (Nov 17, 2022), EnginePaul (Nov 17, 2022), Jeff Michel (Apr 20, 2018), jjr2001 (Jan 8, 2018), Jon (Feb 26, 2016), kbalch (Feb 26, 2016), kngtek (Nov 26, 2017), lassab999 (Jul 13, 2023), MeJasonT (Jun 19, 2024), Moby Duck (Nov 24, 2017), mr mikey (Nov 18, 2022), n9dug (Jan 2, 2020), NortonDommi (Nov 25, 2017), Paul Jones (Feb 26, 2016), PJs (Feb 29, 2016), Ralphxyz (Jun 25, 2024), rebuilder1954 (Jun 19, 2024), RetiredFAE (May 9, 2022), rlm98253 (Nov 24, 2017), Toolmaker51 (Nov 18, 2022), trevor_60_r (Nov 18, 2022), uv8452 (Jul 13, 2023), WmRMeyers (Nov 18, 2022), zarembak (Jan 3, 2020)

  3. #2
    Content Editor
    Supporting Member
    DIYer's Avatar
    Join Date
    Aug 2013
    Posts
    3,055
    Thanks
    793
    Thanked 1,892 Times in 1,687 Posts
    Thanks mklotz! We've added your Tap Wrench Guide to our Tapping and Threading category, as well as to your builder page: mklotz's Homemade Tools. Your receipt:


    2,000+ Tool Plans

  4. #3
    Supporting Member mr95gst's Avatar
    Join Date
    Apr 2014
    Location
    Murfreesboro, TN, USA
    Posts
    75
    Thanks
    23
    Thanked 188 Times in 39 Posts

    mr95gst's Tools
    That is pretty slick. Does it use the knurled surface of the tap tightening nut as the inner "bear" surface?

  5. The Following User Says Thank You to mr95gst For This Useful Post:

    jjr2001 (Jan 8, 2018)

  6. #4
    Supporting Member mklotz's Avatar
    Join Date
    Aug 2015
    Location
    LA, CA, USA
    Posts
    3,541
    Thanks
    363
    Thanked 6,568 Times in 2,163 Posts

    mklotz's Tools
    Quote Originally Posted by mr95gst View Post
    That is pretty slick. Does it use the knurled surface of the tap tightening nut as the inner "bear" surface?
    Yes, it does. My guide is made of aluminum so there will be a very slight amount of wear. I'm not concerned about that because the tool is used only infrequently and the tiny amount of wear that might result will not affect its operation.

    If you're concerned about wear, make the sleeve from steel or, alternatively, turn the knurling off the lock nut and mill some flats so it can be tightened with a wrench.
    ---
    Regards, Marv

    Failure is just success in progress
    That looks about right - Mediocrates

  7. The Following User Says Thank You to mklotz For This Useful Post:

    jjr2001 (Jan 8, 2018)

  8. #5
    Supporting Member carl blum's Avatar
    Join Date
    Nov 2021
    Location
    Charleston, South Carolina
    Posts
    115
    Thanks
    5
    Thanked 71 Times in 38 Posts

    carl blum's Tools
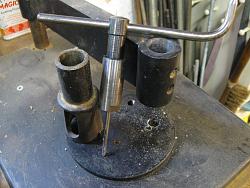
    Tap wrench guide-tapguide.jpgHi: I bought one of these tap guides back in 1977. Then I made this stand to hold it over parts. It was over 25 years before I broke a tap in it, and I was just being sloppy. It is all anodized aluminum and still works fine. Carl.
    Attached Thumbnails Attached Thumbnails Tap wrench guide-p02-head.jpg   Tap wrench guide-p18-12v-turnout-motor-installed.jpg   Tap wrench guide-p20-funky-power-tapper-drill-press.jpg  

  9. The Following User Says Thank You to carl blum For This Useful Post:

    WmRMeyers (Jul 24, 2023)

  10. #6
    Supporting Member Toolmaker51's Avatar
    Join Date
    Feb 2016
    Location
    Midwest USA
    Posts
    5,336
    Thanks
    7,044
    Thanked 3,014 Times in 1,903 Posts

    Toolmaker51's Tools
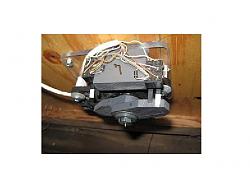
    In response to Carl Blum & post *5; The tap wrench handle I comprehend, well as pix of motorized tapdriver built from a hand drill motor/ gear head; with a mechanical forward-reverse arrangement. Very creative all around. I'd prefer a tap chuck over a drill chuck; but that is less than secondary importance.

    Pic titled P18-12v Turnout Motor Installed.JPG needs some descriptive detail, please.
    Tap wrench guide-p18-12v-turnout-motor-installed.jpg
    Sincerely,
    Toolmaker51
    ...we'll learn more by wandering than searching...

  11. #7
    Supporting Member carl blum's Avatar
    Join Date
    Nov 2021
    Location
    Charleston, South Carolina
    Posts
    115
    Thanks
    5
    Thanked 71 Times in 38 Posts

    carl blum's Tools

    Model Railroad Turnout Control

    Hello Toolmaker51:
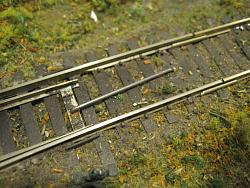
    The turnout motor is mounted under the model train layout. At the bottom you can see the end of a piano wire that runs through the motor and table to the tracks above. By twisting the wire it moves the point rails. Very easy to install. The gray blocks are cams that hit the limit switches to stop the motor and to light up signals. The block with "7" on it is tapped for mounting and the switches. The top mounting plate is tapped to hold everything else. We made 75 of these in series production.
    Commercial turnout motors require a sizeable hole be drilled before the track is laid. Torque wire control can be installed without disturbing anything above.
    Carl.
    Tap wrench guide-img_4146.jpg
    Last edited by carl blum; Nov 18, 2022 at 08:48 AM. Reason: Add photo

  12. The Following 2 Users Say Thank You to carl blum For This Useful Post:

    Toolmaker51 (Nov 18, 2022), WmRMeyers (Jul 24, 2023)

  13. #8
    Supporting Member mklotz's Avatar
    Join Date
    Aug 2015
    Location
    LA, CA, USA
    Posts
    3,541
    Thanks
    363
    Thanked 6,568 Times in 2,163 Posts

    mklotz's Tools
    Quote Originally Posted by carl blum View Post
    Hello Toolmaker51:
    The turnout motor is mounted under the model train layout. At the bottom you can see the end of a piano wire that runs through the motor and table to the tracks above. By twisting the wire it moves the point rails. Very easy to install. The gray blocks are cams that hit the limit switches to stop the motor and to light up signals. The block with "7" on it is tapped for mounting and the switches. The top mounting plate is tapped to hold everything else. We made 75 of these in series production.
    Commercial turnout motors require a sizeable hole be drilled before the track is laid. Torque wire control can be installed without disturbing anything above.
    Carl.
    I'm sorry but I fail to see how the switch actuator motor is related to the thread subject, tap wrench guide. Can you clarify, please ?
    ---
    Regards, Marv

    Failure is just success in progress
    That looks about right - Mediocrates

  14. The Following User Says Thank You to mklotz For This Useful Post:

    Toolmaker51 (Nov 18, 2022)

  15. #9
    Supporting Member carl blum's Avatar
    Join Date
    Nov 2021
    Location
    Charleston, South Carolina
    Posts
    115
    Thanks
    5
    Thanked 71 Times in 38 Posts

    carl blum's Tools
    Each motor has 12 tapped holes and I have made two series of motors for a total of 150 motors or over 1800 tapped holes. Motorized tapping was a real time saver. Plus I still have a power tapper and wrote an article for Village Press. The tap guide stand has an aluminum guide and is still fine after 50 years. Carl.

  16. The Following User Says Thank You to carl blum For This Useful Post:

    Toolmaker51 (Nov 18, 2022)

  17. #10
    Supporting Member Toolmaker51's Avatar
    Join Date
    Feb 2016
    Location
    Midwest USA
    Posts
    5,336
    Thanks
    7,044
    Thanked 3,014 Times in 1,903 Posts

    Toolmaker51's Tools
    It all makes sense now, though never had guessed at model railroading angle
    Already big fan of power tapping, power insertion of Heli-Coils, and power running of fasteners.
    The electric motor driven tapping head is unique; not dependent on machine speed range, of course reversible rotation is function tying it together.
    Is it capable of 3/8-16 in steel?
    Sincerely,
    Toolmaker51
    ...we'll learn more by wandering than searching...

Thread Information

Users Browsing this Thread

There are currently 1 users browsing this thread. (0 members and 1 guests)

Bookmarks

Posting Permissions

  • You may not post new threads
  • You may not post replies
  • You may not post attachments
  • You may not edit your posts
  •