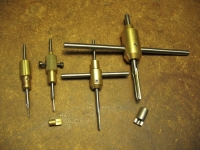
If you want to avoid breaking taps, especially small ones, I recommend that you build some tap guides like the ones shown below.
Each guide has a free wheeling pin at the top that is grasped in the drill chuck after drilling the pilot hole. The body of the tool, which holds the tap, turns and slides up and down freely on this pin.
On the far left is a finger operated one for 0-80 and 1-72 sizes. It has a single hole to fit the common shank size on my taps of this size. A setscrew bearing on one of the tap's flats holds the tap in place.
Next to it is a slightly larger version fitted with "collets" so it can take several sizes of tap shanks (00-90 and 2-56 primarily). The (removable) black screws can be used for a little extra torque when needed but I almost never use them.
The advantage of these two holders is the fact that one can't exert much torque with one's fingertips so overtwisting the tap just can't happen. The guide pin, of course, prevents one from tilting the tap side-to-side - a major cause of breakage.
The one in the middle is for somewhat larger taps - nos. 3, 4 and 5 primarily. The handles provide for a little more torque but not too much.
The one on the right is for the bigger taps and is also set up with "collets". It's major advantage, and the prime reason I made it, is its low height profile so it doesn't eat up all the headspace on my mill drill.
I also use the guide pin principle for making tap extenders.
Here again, a guide pin is fitted and the tap is secured with a setscrew. A flat on the shaft allows the small tap wrench to lock at any point on the extender to provide torque.
The guide rod is only 1/4" diameter so the whole unit functions like a pulley tap, which can be pricey.


 LinkBack URL
 About LinkBacks


 Reply With Quote

 Dreaded, "Bink".
  Thanks for posting these! ~PJ


Bookmarks