Free 186 More Best Homemade Tools eBook:  
Get tool plans

User Tag List

Page 1 of 2 1 2 LastLast
Results 1 to 10 of 13

Thread: Simple Wood Lathe

  1. #1
    Supporting Member EclecticNeophyte's Avatar
    Join Date
    Apr 2013
    Location
    TriCities, WA.
    Posts
    82
    Thanks
    42
    Thanked 118 Times in 35 Posts

    EclecticNeophyte's Tools

    Simple Wood Lathe

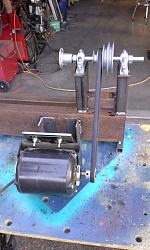
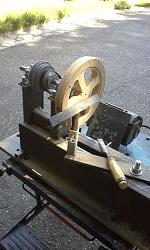
    Simple Wood Lathe-20140725_173920.jpgSimple Wood Lathe-20140726_144154.jpg


    "The machine to be described is not put forward as an 'ideal' lathe, but as an example of of a plain lathe of simple and straightforward construction to which additions can be made as time, fancy, or necessity dictates." - G.B. Round, MODEL ENGINEER; circa 1959

    Here's my latest in a short string of power tools...I just finished it today. I've always wanted a small wood lathe, but just never seemed to get a handle on either the dollars, or a design I was happy with. I recently visited a friend of mine that lives in Spokane, WA., who showed me one that was 'home made'. It was built on two sections of channel steel...this was all the inspiration I needed! I don't have a large amount of space in my shop, and am not likely to attempt turning long posts for a bed. So the entire unit is only 24 inches from one end to the other.

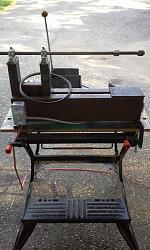
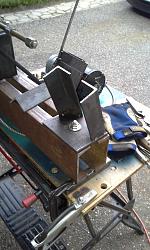
    The included photos should be pretty self explanatory: the bed is two sections of 2" x 5" channel, positioned to form a 'box' or square tube; with a 1" gap between them. The uprights that support the pillow-block bearings, are 1 1/2" x 3" x 3/16" rectangular tube. There is a short section of 2" x 2" x 3/16" square tube, that is about 3"-4" long. As with most of my projects, everything you see in the pictures, are items I had 'laying around'. The motor is an old craftsman, salvaged from an even older Montgomery Wards scroll saw, that I sold years ago. The tool rest is just a scrap piece of 1" x 1" x 1/8" angle steel, that has been welded to a 1/2" dia steel rod. The 'thumb screw' that holds sets the height of the tool rest is just a 1/4 x 20 x 1/2" long hex bolt. I then tack welded a pair of flat washers, onto the head of the 1/4 x 20 bolt to form 'ears'.

    The hub that the wooden wheel is mounted to, is just a diecast hub from an old squirrel cage fan. I'll eventually get around to making a tailstock, and maybe bed extensions; but for now, it suits my needs very well. I'll also add a 'on/off' switch to the front, so I'm not constantly fiddling with the power cord...

    BTW, that quote at the beginning is from an article (available here, I think), that describes a metal lathe built back in the 1950's. I'm also in the process of building one that is based on that lathe (e.g., the one that George Round built), and hope to show it off here as well...

    -EclecticNeophyte

    186 More Best Homemade Tools eBook
    Last edited by EclecticNeophyte; Jul 26, 2014 at 06:27 PM.

  2. The Following User Says Thank You to EclecticNeophyte For This Useful Post:

    kbalch (Jul 28, 2014)

  3. #2
    kbalch's Avatar
    Join Date
    Jun 2012
    Location
    Clermont, FL
    Posts
    5,034
    Thanks
    2,275
    Thanked 532 Times in 384 Posts
    Thanks EclecticNeophyte! I've added your Wood Lathe to our Wood Lathes and Metalworking categories, as well as to your builder page: EclecticNeophyte's Homemade Tools. Your receipt:


    2,000+ Tool Plans

  4. #3
    Content Editor
    Supporting Member
    DIYer's Avatar
    Join Date
    Aug 2013
    Posts
    3,055
    Thanks
    793
    Thanked 1,888 Times in 1,683 Posts
    Nice work!

  5. #4
    Supporting Member EclecticNeophyte's Avatar
    Join Date
    Apr 2013
    Location
    TriCities, WA.
    Posts
    82
    Thanks
    42
    Thanked 118 Times in 35 Posts

    EclecticNeophyte's Tools
    Thanks!

    One detail I overlooked mentioning, is that the spindle center is 7 1/2" above the bed. So although I have not tried it, one should be able to turn an object 15" in diameter... That's on the bed side...which means the tool rest would be perpendicular to the bed. If the piece to turn is mounted on the left side of the headstock, then it would be something larger. Just not certain what that 'something' would [safely] be... One would also certainly want to mount this lathe on something other than a workmate table, such as shown in the photos.

    -EN

  6. #5
    Supporting Member Altair's Avatar
    Join Date
    Aug 2013
    Posts
    12,020
    Thanks
    1,365
    Thanked 30,313 Times in 9,998 Posts
    Thanks for sharing EclecticNeophyte. Simple yet effective design. Scaling up the bed for longer workpieces wouldn't be a problem.

  7. #6
    Supporting Member EclecticNeophyte's Avatar
    Join Date
    Apr 2013
    Location
    TriCities, WA.
    Posts
    82
    Thanks
    42
    Thanked 118 Times in 35 Posts

    EclecticNeophyte's Tools
    Quote Originally Posted by Altair View Post
    Thanks for sharing EclecticNeophyte. Simple yet effective design. Scaling up the bed for longer workpieces wouldn't be a problem.
    My friend in Spokane suggested "bed extensions", which would make for greater flexibility if storage space is a concern. I still need to build a tail-stock for it. I'll post photos once I've accomplished that...

    -EN

  8. #7
    Supporting Member Altair's Avatar
    Join Date
    Aug 2013
    Posts
    12,020
    Thanks
    1,365
    Thanked 30,313 Times in 9,998 Posts
    Great idea. Looking forward to your update EN.

  9. #8
    Supporting Member EclecticNeophyte's Avatar
    Join Date
    Apr 2013
    Location
    TriCities, WA.
    Posts
    82
    Thanks
    42
    Thanked 118 Times in 35 Posts

    EclecticNeophyte's Tools
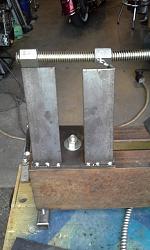
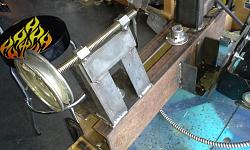
    ...some progress on the tailstock. The allthread is for alignment, and then a section of it, along with the nuts; will be used for the screw.
    Simple Wood Lathe-20140815_165525.jpg

    Simple Wood Lathe-20140815_183219.jpg
    Getting the angles right, is always a challenge (for me).

    Simple Wood Lathe-20140815_183350.jpg
    ...some adjustment is always needed. Particularly when building the tailstock last... There will be a plate welded to the (foreground) side of the angle pieces, and will mate with the Acme (5/8 - 8) nuts.

    ToDo's:

    - Shim the headstock bearings, to make the spindle more parallel to the bed.
    - Adjust the height of the tailstock to match the spindle
    - Weld it all together
    - Attach a 1" guide to the underside of the tailstock base, to keep it aligned with the axis of the spindle.
    Last edited by EclecticNeophyte; Aug 16, 2014 at 07:23 PM.

  10. The Following User Says Thank You to EclecticNeophyte For This Useful Post:

    Home-PC (Sep 27, 2021)

  11. #9
    Supporting Member EclecticNeophyte's Avatar
    Join Date
    Apr 2013
    Location
    TriCities, WA.
    Posts
    82
    Thanks
    42
    Thanked 118 Times in 35 Posts

    EclecticNeophyte's Tools
    ...forgot a rather important todo:

    - Make a handle for the screw!

  12. #10
    Supporting Member EclecticNeophyte's Avatar
    Join Date
    Apr 2013
    Location
    TriCities, WA.
    Posts
    82
    Thanks
    42
    Thanked 118 Times in 35 Posts

    EclecticNeophyte's Tools
    Ok, here's the (nearly) finished item...

    Simple Wood Lathe-20140816_164450.jpg

    I still need to work out an alignment mechanism, and then either grind a point on the end of the screw; or machine it to fit some sort of center on the end. I'd also like to be able to attach a small Jacobs chuck, but we'll see... For now, it's usable for nearly anything I'll likely do with this wood lathe.

    -EN
    Last edited by EclecticNeophyte; Aug 16, 2014 at 07:14 PM.

  13. The Following User Says Thank You to EclecticNeophyte For This Useful Post:

    Home-PC (Sep 27, 2021)

Thread Information

Users Browsing this Thread

There are currently 1 users browsing this thread. (0 members and 1 guests)

Bookmarks

Posting Permissions

  • You may not post new threads
  • You may not post replies
  • You may not post attachments
  • You may not edit your posts
  •