Free 186 More Best Homemade Tools eBook:  
Get tool plans

User Tag List

Page 1 of 4 1 2 3 4 LastLast
Results 1 to 10 of 40

Thread: Silver soldering small components

  1. #1
    Supporting Member thehomeengineer's Avatar
    Join Date
    Nov 2017
    Location
    Berkshire UK
    Posts
    740
    Thanks
    751
    Thanked 2,191 Times in 429 Posts

    thehomeengineer's Tools

    Silver soldering small components

    Hi All
    As I am making progress on my 2” scale Clayton steam wagon clutch mechanism I thought I would share how I silver solder small components.
    The biggest issue I find is holding the components together during the soldering process so they don’t move. Over the years I have come up with several different solutions to this problem. The issue with silver soldering is a gap of about 0.05mm - 0.1mm (0.002” - 0.004”) is needed to allow the solder to capillary into and through the joint. So clapping tight together is a no no as the solder will only sit around the edge and not penetrate the joint.
    So when tight fitting components are needed to be soldered like the examples you below these need to be addressed.

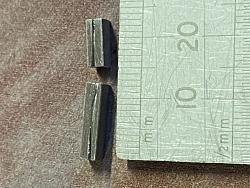
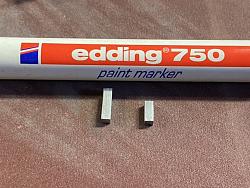
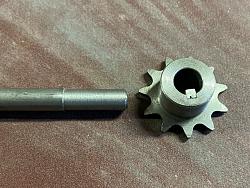
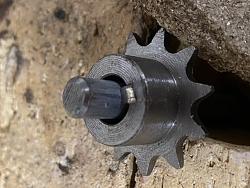
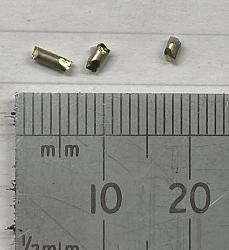
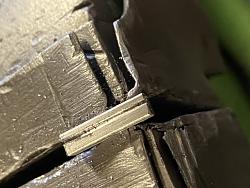
    The first example is a key in a keyway. As the key is tight fit the the keyway the underside of the key is simply gouged in this case with a junior hacksaw so the solder can flow into and under the tight joint. To stop solder attaching itself to areas I don’t want it to be I use a paint pen to cover the areas to be protected as the solder will only capillary to clean surfaces.

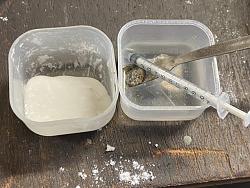
    Flux is a key component to obtaining a good joint. I mix the powder with clean water until it is slightly runnier than toothpaste. Adding a little water at a time.
    Silver soldering small components-dafee977-b9f5-439d-8938-82043fab4d20.jpeg

    Silver soldering small components-5324ffad-435b-4ad3-a92a-2c7aef24d6ca.jpeg Silver soldering small components-c539ddd4-d004-441d-ae67-a20fd4563b67.jpeg
    Junior Hacksaw groove.

    Silver soldering small components-a8955c5a-2c1a-4d9b-b58b-255e93b17be3.jpeg
    surfaces painted with pen to protect from unwanted solder.

    Silver soldering small components-c0a131ad-b5d1-46ac-9490-a2d84da41cc0.jpeg
    key in place and a sacrificial bar also painted to hold the key in place.

    Silver soldering small components-0324d2f4-aa0b-4383-ba6e-7aaae4d8604f.jpeg
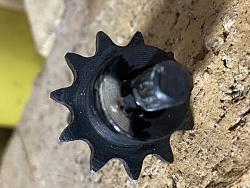
    Ready for soldering flux has been added to joint. (note the small price of solder cut from a stick)
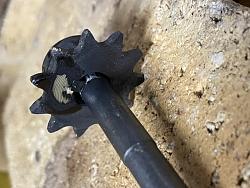
    Silver soldering small components-28f35c1e-073e-465c-a83f-b71bac4138a9.jpeg Silver soldering small components-1b801166-1538-4379-8a70-133686cbf481.jpeg
    The solder has penetrated through the joint.
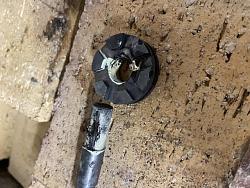
    Silver soldering small components-27c8f36c-aca4-4579-a858-99bab0adcdee.jpeg
    Sacrificial bar removed.

    To clean in this case I use my shot blast cabinet but if it was a pressure fitting it would go into a acid bath. (Water and Sulphuric acid: Safety note add acid to water)

    Second example:
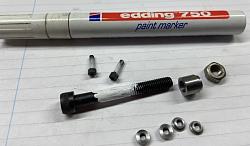
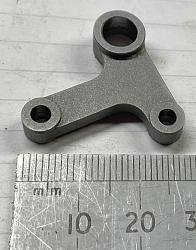
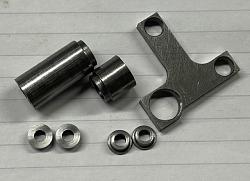
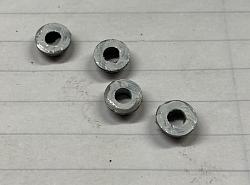
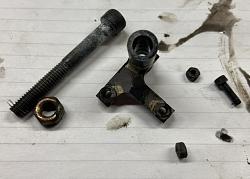
    I have made a bell crank and held the pieces together with screw. Remembering to leave a gap. The bushes are made slightly wider than the mating plate so when clamped leave a small gap. The bushes are a slide fit. The screws holding the pieces together are again painted so any chance of solder bonding these in place is eliminated.

    Silver soldering small components-8e21c06c-4468-44f3-9214-ae1e209b7fe6.jpeg
    components tone soldered

    Silver soldering small components-6c2a42ab-ba02-4860-a457-0211d426121c.jpeg Silver soldering small components-da1221bc-680e-4ee9-9a79-d41991b1bb00.jpeg
    Both clamping bolts and components painted.
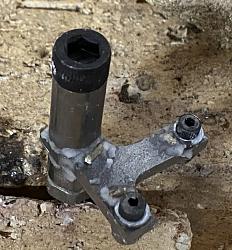
    Silver soldering small components-a2741122-61ed-49d6-87db-c030b3d11ac8.jpeg Silver soldering small components-00b60b06-efb9-4345-84d4-40c0fe5961cb.jpeg
    fluxed up and solder in place. No such thing as to much flux!

    Silver soldering small components-c2915772-5012-4f8c-bfc3-9df3f92ddc10.jpeg
    soldered am screws removed.

    Silver soldering small components-e0a4d7c1-bea3-49fe-b8d1-972540e0bf94.jpeg Silver soldering small components-85f9bc45-e276-4170-8d63-9f585d3f81ba.jpg
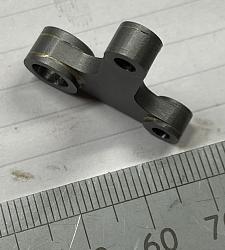
    completed bell crank.

    Silver soldering small components-e0d47488-9483-41f8-902d-00dc7bc32e80.jpeg
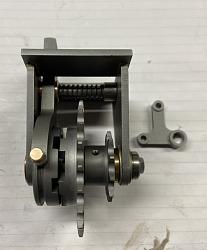
    Dog clutch and bell crank.

    Hope this will be of interest and thank you for viewing
    The Home Engineer

    186 More Best Homemade Tools eBook

  2. The Following 32 Users Say Thank You to thehomeengineer For This Useful Post:

    albertq (Mar 19, 2024), anderswallerius (Jul 15, 2020), baja (May 6, 2020), Beserkleyboy (May 10, 2020), bob_3000 (Mar 19, 2024), Christophe Mineau (May 11, 2020), elk-a-holic (May 12, 2020), FEM2008 (May 4, 2020), GKK (May 10, 2020), high-side (May 5, 2020), Inner (May 5, 2020), JDrouin (May 4, 2020), Jon (May 7, 2020), kngtek (May 4, 2020), KustomsbyKent (Jul 21, 2022), mr herb (May 6, 2020), mr mikey (Jul 22, 2022), mwmkravchenko (May 11, 2020), Okapi (May 5, 2020), olderdan (May 3, 2020), Paul Jones (May 10, 2020), Philip Davies (May 5, 2020), Quinton 357 (May 10, 2020), Ralphxyz (Mar 19, 2024), RetiredFAE (Jul 21, 2022), Rikk (May 6, 2020), Sleykin (May 12, 2020), sossol (May 10, 2020), thevillageinn (May 6, 2020), Tonyg (May 5, 2020), Toolmaker51 (May 10, 2020), trevor_60_r (Nov 18, 2022)

  3. #2
    Supporting Member olderdan's Avatar
    Join Date
    Jun 2016
    Posts
    793
    Thanks
    1,463
    Thanked 1,585 Times in 470 Posts

    olderdan's Tools
    Superb workmanship, that bell crank looks like a casting which I suppose is the objective. Thanks for the hints on silver soldering.
    I do a lot of stainless parts for my motorcycles, do you have any tips on fluxes and rod for that material?.

    2,000+ Tool Plans

  4. The Following User Says Thank You to olderdan For This Useful Post:

    thehomeengineer (May 3, 2020)

  5. #3
    Supporting Member thehomeengineer's Avatar
    Join Date
    Nov 2017
    Location
    Berkshire UK
    Posts
    740
    Thanks
    751
    Thanked 2,191 Times in 429 Posts

    thehomeengineer's Tools
    Hi Olderdan
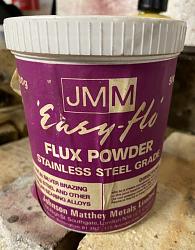
    I use Johnson Matthey easy flo flux stainless steel (SS) grade for everything (purple tin) steel, brass, copper, stainless and so on. It has a higher temperature tolerance so gives you longer to solder without everything going black as the flux burns off. Rather than the standard easy flow (green tin) This SS grade flux can be used with all solder in their silver solder range. On stainless I normally use easy flow silver solder which is the lower end of the temperature range for silver soldering 650-680 degrees. If you go to the higher end the flux is on its limits and can burn off. Everything has to be spotlessly clean to get a good joint. You can never have to much flux. I Hope this helps please let me know if you need any more information.

    Silver soldering small components-d532fb23-047a-4f31-af4e-dac16f746e11.jpeg
    The Home Engineer

  6. The Following 9 Users Say Thank You to thehomeengineer For This Useful Post:

    albertq (Mar 19, 2024), mtsintra (May 28, 2024), mwmkravchenko (May 11, 2020), olderdan (May 4, 2020), Paul Jones (May 10, 2020), Ralphxyz (Mar 19, 2024), Rikk (May 6, 2020), Sleykin (May 12, 2020), Toolmaker51 (May 10, 2020)

  7. #4
    Supporting Member olderdan's Avatar
    Join Date
    Jun 2016
    Posts
    793
    Thanks
    1,463
    Thanked 1,585 Times in 470 Posts

    olderdan's Tools
    Thanks home engineer that info will be useful to me, I noticed your dyslexia comment. I to am so afflicted, apparently 1 in 10 adults have the condition to some degree so maybe 1700 members on HMT. I am sure that will be corrected. This was never noticed in my school years so I was just considered a bit slow but apparently it is not an indication of basic intelligence. Aniway thinks agaan.

  8. The Following 2 Users Say Thank You to olderdan For This Useful Post:

    mwmkravchenko (May 11, 2020), thehomeengineer (May 4, 2020)

  9. #5
    Supporting Member Moby Duck's Avatar
    Join Date
    Jan 2016
    Posts
    400
    Thanks
    1,270
    Thanked 206 Times in 131 Posts

    Moby Duck's Tools
    You can also buy small premixed tubes of powdered silver solder and flux in various grades. Just carefully "grease" the joining surfaces with this, clamp if necessary, wipe off excess and heat up with a torch. It is very clean to use, and a small tube is often cheaper than a stick of silver solder. If having trouble with any type of silver soldering it is often a good idea to silver-tin the components first. Once lightly fluxed, assembled and heated, they stick together like magic.

  10. The Following 4 Users Say Thank You to Moby Duck For This Useful Post:

    Christophe Mineau (May 11, 2020), Paul Jones (May 10, 2020), Ralphxyz (Mar 19, 2024), thehomeengineer (May 5, 2020)

  11. #6
    kngtek's Avatar
    Join Date
    Dec 2016
    Posts
    18
    Thanks
    47
    Thanked 15 Times in 8 Posts
    Excellent craftmanship!

    I have three questions on your technique:
    Q1) How do you preheat the metal parts? Would a butane torch work in this case?
    Q2) How do you measure the correct temperature range for soldering? Would Tempil Sticks (temperature-measuring crayons) work for this application?, or a thermocouple?, or a temperature gun?
    Q3) At what point does brazing become necessary (in lieu of silver soldering)? Presumably the stresses on your parts during operation aren't high enough to cause the silver solder joints to fail?

    Gary Kingsep (kngtek)

  12. The Following 2 Users Say Thank You to kngtek For This Useful Post:

    Sleykin (May 12, 2020), thehomeengineer (May 5, 2020)

  13. #7
    Supporting Member Okapi's Avatar
    Join Date
    Mar 2013
    Location
    Switzerland
    Posts
    222
    Thanks
    346
    Thanked 132 Times in 76 Posts

    Okapi's Tools
    Nice work, and a lot of patience to make them!!!
    Do you have tested silver(I have copper soldering too) soldering with sheet solder, since I use that they are a lot of difficulties which disappeared, especially for soldering hard metal on tools or replacing hard metal teeth on saw blades.

  14. The Following User Says Thank You to Okapi For This Useful Post:

    thehomeengineer (May 5, 2020)

  15. #8
    Supporting Member thehomeengineer's Avatar
    Join Date
    Nov 2017
    Location
    Berkshire UK
    Posts
    740
    Thanks
    751
    Thanked 2,191 Times in 429 Posts

    thehomeengineer's Tools
    Quote Originally Posted by kngtek View Post
    Excellent craftmanship!

    I have three questions on your technique:
    Q1) How do you preheat the metal parts? Would a butane torch work in this case?
    Q2) How do you measure the correct temperature range for soldering? Would Tempil Sticks (temperature-measuring crayons) work for this application?, or a thermocouple?, or a temperature gun?
    Q3) At what point does brazing become necessary (in lieu of silver soldering)? Presumably the stresses on your parts during operation aren't high enough to cause the silver solder joints to fail?

    Gary Kingsep (kngtek)
    Hi Gary

    Thank you for the comment.

    I use a Mapp gas and Bernzomatic torch https://www.screwfix.com/p/bernzomat...ng-torch/71976 for small fabrications which quickly gets most smaller materials up to temperature. On the bigger fabrications like copper boilers I use a Sievert propane gas torch off a large propane bottle. The reason for this you have the option to change the torch burner size. On my Sweetpea Loco boiler I had two large Sievert torches to maintain the heat need. Practical Engineering Some people use the propane for main heat and a Oxy/Propane for localised heat.

    To measure the temperature is a combination of things. The first being experience (please don't think I am blowing my own trumpet, believe me I had a lot of items end up in the scrap bin when I first started silver soldering) But the best advise I could give is the flux.

    The flux goes through four changes as you heat it.

    1st: when heating the water is evaporated off so the flux bubbles up white.

    2nd Once the bubbling stops it settles down to a smoother white almost like back to powder.

    3rd: As the temperature increases the flux changes state again and looks like glass (at this point very close to the soldering temperature 600 degrees)

    4th: the flux then goes into a almost water/clear state and this is when the temperature has been reached to apply the rod (650/700 degrees).

    Another couple of tips for anyone starting out silver soldering is:

    The job has to be spotlessly clean to allow the solder to flow.
    You can never apply to much flux. But you can apply to much solder which can be expensive, unsightly and difficult to clean up.
    Do not put the solder stick to close to the flame as the end will melt and drop off. Remember it is the heat from the job that melts the solder NOT the flame. So you must get the heat correct in the job for the solder to flow.
    Try and heat from one side of the job and apply the solder opposite as the solders capillary action will be drawn to the heat source and the solder will flow nicely into the joint.

    Brazing is another level up in temperature.

    I hope this information has answered your questions
    Many thanks again
    The Home Engineer

  16. The Following 10 Users Say Thank You to thehomeengineer For This Useful Post:

    cognitdiss (Apr 3, 2024), mtsintra (May 28, 2024), mwmkravchenko (May 11, 2020), Okapi (May 6, 2020), Paul Jones (May 10, 2020), Philip Davies (May 11, 2020), Ralphxyz (Mar 19, 2024), Rikk (May 6, 2020), Sleykin (May 12, 2020), Toolmaker51 (May 10, 2020)

  17. #9
    Supporting Member thehomeengineer's Avatar
    Join Date
    Nov 2017
    Location
    Berkshire UK
    Posts
    740
    Thanks
    751
    Thanked 2,191 Times in 429 Posts

    thehomeengineer's Tools
    Quote Originally Posted by Okapi View Post
    Nice work, and a lot of patience to make them!!!
    Do you have tested silver(I have copper soldering too) soldering with sheet solder, since I use that they are a lot of difficulties which disappeared, especially for soldering hard metal on tools or replacing hard metal teeth on saw blades.
    Hi Okapi
    I am not sure what tested silver is?
    I have used copper to copper which is not as nice as silver soldering as it doesn't flow as well. I have never used the solder that is suspended in flux which is like a paste you paint on. This tends to be used in jewellery making but I definitely would like to give it ago just to see what type of results I could get but very expensive to buy. I do use different melting point solders on some fabrications so I have less chance of effecting the previous joint but generally as long as there is no flux present the previous solder joints require a higher temperature to remelt the joint.
    Many thanks again
    The Home Engineer

  18. #10
    kngtek's Avatar
    Join Date
    Dec 2016
    Posts
    18
    Thanks
    47
    Thanked 15 Times in 8 Posts
    Hi HomeEngineer,

    Thanks for answering my soldering questions. After rereading your text, especially the second example, I now realise that your soldering technique allows you to: a) make complicated parts which would be much more difficult to machine in one piece and b) assemble them without the need for special fasteners. You can probably tell from my questions that my soldering experience is quite limited. This method of fabrication – assembly by soldering can clearly produce quite sophisticated components.

    Gary Kingsep

  19. The Following 3 Users Say Thank You to kngtek For This Useful Post:

    Paul Jones (May 10, 2020), Sleykin (May 12, 2020), thehomeengineer (May 6, 2020)

Thread Information

Users Browsing this Thread

There are currently 3 users browsing this thread. (1 members and 2 guests)

  1. wombat50

Bookmarks

Posting Permissions

  • You may not post new threads
  • You may not post replies
  • You may not post attachments
  • You may not edit your posts
  •