Free 186 More Best Homemade Tools eBook:  
Get tool plans

User Tag List

Page 3 of 4 FirstFirst 1 2 3 4 LastLast
Results 21 to 30 of 40

Thread: Silver soldering small components

  1. #21
    Rikk's Avatar
    Join Date
    Nov 2018
    Posts
    115
    Thanks
    248
    Thanked 80 Times in 42 Posts

    Rikk's Tools
    Quote Originally Posted by thehomeengineer View Post
    Hi Murph
    I have never used alcohol but will definitely try it. The reason I use water is I can mix a small batch of flux and as long as I put in a sealed container it lasts for months. Flux is not cheap and I never seem to be able to mix the actual amount I need so this works for me. I have not had the issue with the flux splatter? Do you place the heat directly on to the joint as this will cause a problem with the flux as the heat from torch can burn the flux off before the material is up to the correct temperature. This is more prevalent on larger assemblies and I apply the heat uniformly around the joint and on the largest material section and allow the heat to move toward the joint. But I am very interested in the alcohol especially on smaller assemblies.
    I'm learning from this thread, so I am not even a novice. It seems that if you used alcohol, perhaps denatured alcohol that is refined more, you could still store the flux in a sealed (alcohol proof) container, and if some of the alcohol evaporates, you can just add more. The flux will still be there, but it will just be thicker.

    186 More Best Homemade Tools eBook

  2. The Following User Says Thank You to Rikk For This Useful Post:

    thehomeengineer (May 11, 2020)

  3. #22
    Supporting Member mwmkravchenko's Avatar
    Join Date
    Nov 2017
    Location
    Perth Ontario Canada
    Posts
    1,042
    Thanks
    5,271
    Thanked 394 Times in 280 Posts
    Quote Originally Posted by Rikk View Post
    I'm learning from this thread, so I am not even a novice. It seems that if you used alcohol, perhaps denatured alcohol that is refined more, you could still store the flux in a sealed (alcohol proof) container, and if some of the alcohol evaporates, you can just add more. The flux will still be there, but it will just be thicker.
    If you want to try alcohol use Methyl Hydrate. It is pure alcohol. Sometimes sold as gasoline antifreeze where the climate is colder.

    2,000+ Tool Plans

  4. The Following User Says Thank You to mwmkravchenko For This Useful Post:

    Rikk (May 11, 2020)

  5. #23
    Supporting Member mwmkravchenko's Avatar
    Join Date
    Nov 2017
    Location
    Perth Ontario Canada
    Posts
    1,042
    Thanks
    5,271
    Thanked 394 Times in 280 Posts
    @ thehomeengineer

    I'm slightly dyslexic as well. And I have close friends and relatives who are. They are all capable intelligent folks. I think sometimes it is a blessing/curse. We see the world differently. And that's what allows us to do things that other people are either scared of trying or simply do not see the possibility of accomplishing.

    I liked your tutorial on soldering. My German grandfather taught me how to solder. Clean, clean and clean again. Then like you say flux, flux and flux again.

    The key is indirect heat. Not the flame as you point out so well. Heat the surrounding area that oyu want to solder to and let the heat wick into the joint area.

    Thanks for tip about soldering stainless. I will be finding that flux.

    Always enjoy your tips and techniques.

    Mark

  6. The Following 2 Users Say Thank You to mwmkravchenko For This Useful Post:

    Sleykin (Mar 7, 2024), thehomeengineer (May 11, 2020)

  7. #24
    Supporting Member thehomeengineer's Avatar
    Join Date
    Nov 2017
    Location
    Berkshire UK
    Posts
    740
    Thanks
    751
    Thanked 2,191 Times in 429 Posts

    thehomeengineer's Tools
    Hi Mark
    Thank you for the kind words. HMT is a great place to gain additional advice, tips and advice on all aspects of engineering and wood working. I appreciate the feedback on my posts.
    The Home Engineer

  8. #25
    Supporting Member mwmkravchenko's Avatar
    Join Date
    Nov 2017
    Location
    Perth Ontario Canada
    Posts
    1,042
    Thanks
    5,271
    Thanked 394 Times in 280 Posts
    Quote Originally Posted by thehomeengineer View Post
    Hi Mark
    Thank you for the kind words. HMT is a great place to gain additional advice, tips and advice on all aspects of engineering and wood working. I appreciate the feedback on my posts.
    The Home Engineer
    Thanks! I am a rather accomplished cabinetmaker/carpenter. Have done this for nearly 40 years. An amateur machinist with a broad variety of experience but no claim to knowing exactly what is what is every application.

    I learn from many. And I'm experienced enough to know when people are experienced themselves or if they are just posting something they barely understand.

    Thanks again.

  9. #26
    Supporting Member thehomeengineer's Avatar
    Join Date
    Nov 2017
    Location
    Berkshire UK
    Posts
    740
    Thanks
    751
    Thanked 2,191 Times in 429 Posts

    thehomeengineer's Tools
    Quote Originally Posted by petertha View Post
    Very, very nice.
    In your final assembly pictures does the dark mat finish come from the blasting only, or was there some kind of color/heat treatment used that gives it that nice gunmetal look? Are you showing this build in some other forum I can follow along?
    Hi petertha
    I have my own website you might like to have a look at. It has different projects I have completed or still working on. Please take a look at Practical Engineering
    The Home Engineer

  10. #27
    Supporting Member thehomeengineer's Avatar
    Join Date
    Nov 2017
    Location
    Berkshire UK
    Posts
    740
    Thanks
    751
    Thanked 2,191 Times in 429 Posts

    thehomeengineer's Tools
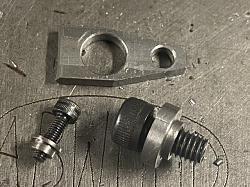
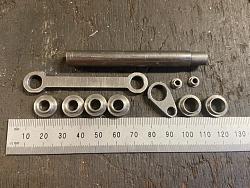
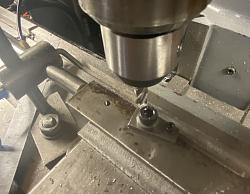
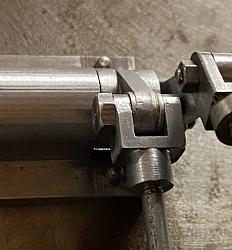
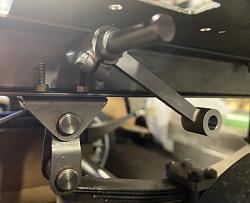
    I have progressed the clutch linkage and have fabricated some of the levers using silver soldering.

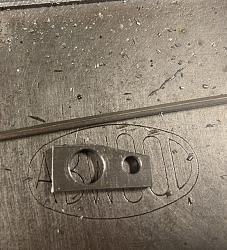
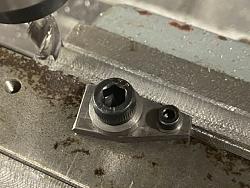
    I have included some photos of the process I use to machine tapers on levers etc.
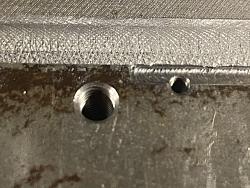
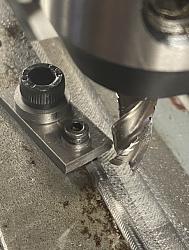
    To machine the tapered lever, the two holes are drilled at the correct pitch in the stock material. Then the coordinates are calculated to set the workpiece at half the required inclusive angle. A sacrificial piece of material is then drilled tapped at these calculated coordinates to set the piece at the correct angle. The lever can then be clamped and machined to produce the first taper. To complete the process the lever is flipped over and the second angle machined and then filed using file buttons to the final shape. The photos below will hopefully make things clearer.

    Silver soldering small components-665b5a3e-7aa2-4252-8cff-db1413cae4ae.jpeg Clamp screws and lever ready to be filed

    Silver soldering small components-1c2f9b81-75a0-4ebe-bca7-aa7f8d4bf851.jpegThe completed parts ready for soldering

    Silver soldering small components-942fcf87-5806-42a2-9b4e-e7eccdc75b8c.jpeg Sacrificial material drilled to set angle

    Silver soldering small components-fa0bf4c8-bddc-4351-b4b2-6df381ead20e.jpeg Silver soldering small components-6d060f93-f1a8-4f24-af80-b26b8b943095.jpeg Silver soldering small components-66976b61-b109-441d-868b-dc6918a77f69.jpeg Machining first taper

    Silver soldering small components-7f621444-3d36-42d3-b9c8-2dd13c169363.jpeg Second taper completed

    Silver soldering small components-82538fad-1ed2-4fd7-960a-384c78c05684.jpegCompleted taper lever

    Silver soldering small components-217ab06c-dc76-4760-a3d2-9d075b2ead79.jpeg One of the soldered links in place on the engine

    Thank you for viewing
    The Home Engineer
    Last edited by thehomeengineer; May 14, 2020 at 07:14 PM.

  11. The Following 9 Users Say Thank You to thehomeengineer For This Useful Post:

    Captainleeward (May 14, 2020), FEM2008 (May 14, 2020), JoeH (May 15, 2020), Karl_H (May 14, 2020), Okapi (May 15, 2020), Philip Davies (May 18, 2020), Rangi (May 15, 2020), Sleykin (Mar 7, 2024), Toolmaker51 (May 15, 2020)

  12. #28
    Supporting Member Karl_H's Avatar
    Join Date
    Sep 2013
    Posts
    911
    Thanks
    671
    Thanked 481 Times in 266 Posts

    Karl_H's Tools
    Thanks!
    That is a lesson I am just learning - take a few extra minutes to make a jig.
    I have a couple chunks of metal with all sorts of holes in them - I don't recall what most of the are for now, but they were in just the right place when I needed them.

  13. The Following 2 Users Say Thank You to Karl_H For This Useful Post:

    thehomeengineer (May 14, 2020), Toolmaker51 (May 15, 2020)

  14. #29

    Join Date
    Jul 2019
    Location
    Ohio, USA
    Posts
    170
    Thanks
    200
    Thanked 101 Times in 51 Posts
    Quote Originally Posted by mwmkravchenko View Post
    If you want to try alcohol use Methyl Hydrate. It is pure alcohol. Sometimes sold as gasoline antifreeze where the climate is colder.
    Thanks for the tip - I'll have to try it. I currently use ethyl alcohol to replenish my paste solder (used for electronic surface mount soldering). Methyl Hydrate (methanol) used to be widely available in RC hobby stores for glo-plug engines. Electric has replaced most glo-plug engines but there still some that use them.

  15. #30

    Join Date
    Jul 2019
    Location
    Ohio, USA
    Posts
    170
    Thanks
    200
    Thanked 101 Times in 51 Posts
    @ thehomeengineer

    Thank you for the post. I have learned a few things from your posts and enjoy your craftsmanship. I also liked your soft-jaws and wire cutting guillotine on your website.

    FEM

  16. The Following User Says Thank You to FEM2008 For This Useful Post:

    thehomeengineer (May 15, 2020)

Thread Information

Users Browsing this Thread

There are currently 1 users browsing this thread. (0 members and 1 guests)

Bookmarks

Posting Permissions

  • You may not post new threads
  • You may not post replies
  • You may not post attachments
  • You may not edit your posts
  •