Free 186 More Best Homemade Tools eBook:  
Get tool plans

User Tag List

Page 1 of 2 1 2 LastLast
Results 1 to 10 of 15

Thread: Shop Press Brinell test

  1. #1
    Supporting Member Cascao's Avatar
    Join Date
    Feb 2016
    Location
    Brasil
    Posts
    153
    Thanks
    118
    Thanked 430 Times in 106 Posts

    Cascao's Tools

    Question Shop Press Brinell test

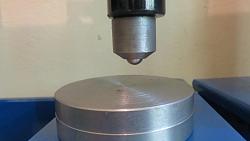
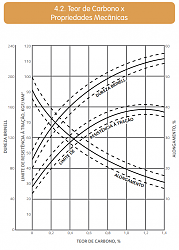
    The idea here is to use a regular shop press plus a bearing ball to conduct a Brinell test.
    My goal is identify unknown steels and relate brinell hardness with ultimate strenght.

    There is a formula witch relate load, ball diameter and indentation to material hardness:
    https://me-mechanicalengineering.com...hardness-test/

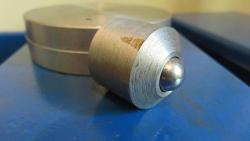
    I Made the "holder" for 10mm (3/8") ball. The holder let only 3mm (1/8") of the ball exposed.
    Shop Press Brinell test-20171118131352.jpg
    For sure the holder is a must if you doesn't want to brinell test your press ram.
    Shop Press Brinell test-20171118131316.jpg
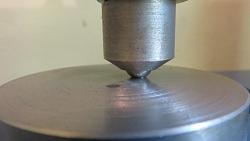
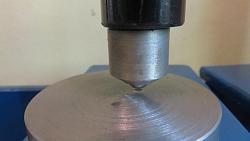
    Tested some 1020, 1045, A36, SCH80 and AL 6061 I have at scrap bin.
    Shop Press Brinell test-20171118131254.jpg
    Shop Press Brinell test-20171118131307.jpg

    Shop Press Brinell test-brinell.png

    Problems found:
    * My readings ended being a bit off expected numbers. Had a tough time taking precise measurements with a paquimeter. I Had read that there is a dedicated microscopes for this....maybe a good photo and convert pixel to mm....this will be my next try.
    * Not know the shop press manometer error. Need a way to check it.

    Hazards: At 3tons, there much risk of ball bearing exploding? Use safety glasses!

    186 More Best Homemade Tools eBook

  2. The Following 4 Users Say Thank You to Cascao For This Useful Post:

    MeJasonT (Apr 30, 2019), Saltfever (Feb 22, 2020), Seedtick (Nov 20, 2017), tonyfoale (Nov 21, 2017)

  3. #2
    Supporting Member tonyfoale's Avatar
    Join Date
    Nov 2016
    Location
    Spain
    Posts
    1,606
    Thanks
    720
    Thanked 2,703 Times in 726 Posts

    tonyfoale's Tools
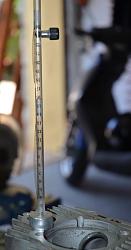
    There is a simpler test method which is perhaps better suited to DIY manufacture. Known as a Scleroscope and its modern derivative the Leeb hardness tester. These are rebound testers. Basically you drop a ball or other type of "hammer" from a know height and measure how far it rebounds. The Leeb uses modern methods of measuring drop and rebound velocities. Some copper coil wire and an Arduino could easily take care of the measuring. I made a basic scleroscope using a glass tube, down which I drop a 6 mm ball bearing, I have a scale on the side so that I can measure the rebound height.

    Shop Press Brinell test-hardnesstester.jpg

    Here is a pic. of mine. I hold the ball up with an external magnet which I pull away to release the ball and then I note the rebound height. Not super sophisticated but simple to make and it works well. I sometimes think about replacing the magnet with an electromagnet and making a velocity transducer to measure drop and rebound velocities, but other tasks put that down the priority table.

    2,000+ Tool Plans

  4. The Following 6 Users Say Thank You to tonyfoale For This Useful Post:

    Cascao (Nov 21, 2017), DIYer (Nov 21, 2017), DIYSwede (Jun 2, 2019), kngtek (Nov 21, 2017), MeJasonT (Apr 30, 2019), Tonyg (Mar 10, 2019)

  5. #3
    Content Editor
    Supporting Member
    DIYer's Avatar
    Join Date
    Aug 2013
    Posts
    3,055
    Thanks
    793
    Thanked 1,885 Times in 1,682 Posts


    Thanks Cascao! We've added your Brinell Testing Setup to our Measuring and Marking category,
    as well as to your builder page: Cascao's Homemade Tools. Your receipt:


  6. #4
    Content Editor
    Supporting Member
    DIYer's Avatar
    Join Date
    Aug 2013
    Posts
    3,055
    Thanks
    793
    Thanked 1,885 Times in 1,682 Posts


    Thanks tonyfoale! We've added your Scleroscope to our Measuring and Marking category,
    as well as to your builder page: tonyfoale's Homemade Tools. Your receipt:


  7. The Following User Says Thank You to DIYer For This Useful Post:

    MeJasonT (Apr 30, 2019)

  8. #5
    Supporting Member tonyfoale's Avatar
    Join Date
    Nov 2016
    Location
    Spain
    Posts
    1,606
    Thanks
    720
    Thanked 2,703 Times in 726 Posts

    tonyfoale's Tools
    Quote Originally Posted by Cascao View Post
    Problems found:
    * My readings ended being a bit off expected numbers. Had a tough time taking precise measurements with a paquimeter. I Had read that there is a dedicated microscopes for this....maybe a good photo and convert pixel to mm....this will be my next try.
    * Not know the shop press manometer error. Need a way to check it.
    Can you borrow or rent a load cell with attached meter? You do a one off calibration of your press manometer with that. Maybe some reasonably accurate scales.

    About the indentation measurement are you only trying to measure the diameter or the depth as well. The derivation of the formula, that you referenced, which includes the depth is purely from an rearrangement of the formula with only the diameter so there is no need to measure depth. You can get electronic microscopes based on small cameras very cheaply off the net. One of these would do a reasonable job of measuring the diameter.
    If you calibrate your press it might be easier to get good results by getting some Rockwell indenters and doing Rockwell testing rather than Brinell. With Rockwell you measure penetration depth rather than indentation diameter. You can place a sensitive dial gauge twix the press and the work piece to measure penetration. This is likely to be easier.

  9. The Following User Says Thank You to tonyfoale For This Useful Post:

    MeJasonT (Apr 30, 2019)

  10. #6
    Supporting Member Cascao's Avatar
    Join Date
    Feb 2016
    Location
    Brasil
    Posts
    153
    Thanks
    118
    Thanked 430 Times in 106 Posts

    Cascao's Tools
    First tests showed me that I need to work on this issues. But seems like it worth the effort to keep messing with.
    Thank Tony for the ideas you bring me. Will try to meassure penetrating depth with brinell ident and do some match to convert it to diameter.

  11. The Following User Says Thank You to Cascao For This Useful Post:

    MeJasonT (Apr 30, 2019)

  12. #7
    Supporting Member tonyfoale's Avatar
    Join Date
    Nov 2016
    Location
    Spain
    Posts
    1,606
    Thanks
    720
    Thanked 2,703 Times in 726 Posts

    tonyfoale's Tools
    Quote Originally Posted by Cascao View Post
    First tests showed me that I need to work on this issues. But seems like it worth the effort to keep messing with.
    Thank Tony for the ideas you bring me. Will try to meassure penetrating depth with brinell ident and do some match to convert it to diameter.
    If you follow the Rockwell testing loads and indenter specifications then you wouldn't need to convert depth to diameter, the Rockwell hardness is based on penetration depth. At least one of the Rockwell scales uses a diamond shaped stylus and so diameter is not relevant. Rather than make your own you can buy Rockwell indenters off the net for not much money. To cover most jobs you probably only need 2, one each for the B & C scales, maybe three if you think that you'll need scale A also.
    https://www.ebay.com/p/Hrc-3-Steel-D....c100005.m2219

    If you continue with your own made indenters there is a simple way to do better than using STEEL ball bearings. If get an old or broken carbide milling cutter of the right diameter you can grind a hemisphere on one end and use that. The carbide is harder than steel balls.
    Last edited by tonyfoale; Nov 23, 2017 at 09:24 AM. Reason: Added bit about carbide.

  13. The Following User Says Thank You to tonyfoale For This Useful Post:

    MeJasonT (Apr 30, 2019)

  14. #8
    Supporting Member tonyfoale's Avatar
    Join Date
    Nov 2016
    Location
    Spain
    Posts
    1,606
    Thanks
    720
    Thanked 2,703 Times in 726 Posts

    tonyfoale's Tools
    Cascao,

    I forgot to mention that perhaps for a DIY project the biggest advantage of the Rockwell over Brinell is that for the B scale the load is only 100 kgf, and for the C scale used for hard steel the load is 150 kgf. plus 10 kgf pre-load. This is much less than needed for a Brinell test.
    Traditional manual Rockwell testers use weights to apply the load so you don't need to calibrate a variable load source, you just need to accurately weigh some steel, iron or lead weights. Wait it even gets better. You don't even need such heavy weights which would be a struggle to change. It is usual to apply the load through a lever system of typically around 25:1 so that means you use weights of 4 or 6 kg. To slow the application of the load an hydraulic damper is used.

    So the only measuring that you need to do is the depth of penetration. To gain an idea of the accuracy required, consider that using the C scale on some steel with a HR of 50 the indent will be 0.1 mm so if you had a 0.0025 mm dial gauge you would have a resolution of 2.5% at that hardness level. Of course you leverage the indicator like the weights and gain resolution that way.

    Because the loads are so relatively low you could easily build a dedicated machine without making it massive. All helping towards a DIY solution.
    Last edited by tonyfoale; Nov 23, 2017 at 10:27 AM. Reason: Spelling correction.

  15. The Following 2 Users Say Thank You to tonyfoale For This Useful Post:

    Cascao (Nov 24, 2017), MeJasonT (Apr 30, 2019)

  16. #9
    Supporting Member Cascao's Avatar
    Join Date
    Feb 2016
    Location
    Brasil
    Posts
    153
    Thanks
    118
    Thanked 430 Times in 106 Posts

    Cascao's Tools
    Rockwell can be a option, my concern is the small indentation depth causing more measurement imprecision. Brinell seems more "crude" and if I fix this measurement issue, it's will use only the shop press I already have.

  17. The Following User Says Thank You to Cascao For This Useful Post:

    MeJasonT (Apr 30, 2019)

  18. #10
    Supporting Member tonyfoale's Avatar
    Join Date
    Nov 2016
    Location
    Spain
    Posts
    1,606
    Thanks
    720
    Thanked 2,703 Times in 726 Posts

    tonyfoale's Tools
    Quote Originally Posted by Cascao View Post
    Rockwell can be a option, my concern is the small indentation depth causing more measurement imprecision.
    I would question your perceived imprecision, particularly on a DIY setup. It is likely to be more precise to measure a depth with a dial indicator than to optically measure the diameter of a dent.
    With the rockwell you don't measure the depth directly after finishing, you would measure the displacement of the shaft containing the indenter.

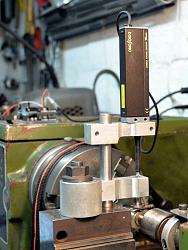
    I am just about to build a heat treatment oven and in line with the sentiment expressed here: http://www.homemadetools.net/forum/n...ilosophy-64856 , I had been thinking about how to improve my hardness measurements. I was mentally oscillating between buying a chinese Leeb tester and adding some magnets, copper, Arduino and software to make my bouncing ball device more like a Leeb. However since you started this thread my thoughts have drifted towards making a Rockwell device, in fact this afternoon I ordered some indenters. I have a 1 micron linear encoder so I have the means to measure penetration accurately.

    Shop Press Brinell test-encoder.jpg
    Attached Thumbnails Attached Thumbnails Shop Press Brinell test-encoder.jpg  

  19. The Following 2 Users Say Thank You to tonyfoale For This Useful Post:

    Cascao (Nov 24, 2017), MeJasonT (Apr 30, 2019)

Thread Information

Users Browsing this Thread

There are currently 1 users browsing this thread. (0 members and 1 guests)

Tags for this Thread

Bookmarks

Posting Permissions

  • You may not post new threads
  • You may not post replies
  • You may not post attachments
  • You may not edit your posts
  •