Free 186 More Best Homemade Tools eBook:  
Get 2,500+ tool plans, full site access, and more.

User Tag List

Page 2 of 3 FirstFirst 1 2 3 LastLast
Results 11 to 20 of 22

Thread: Sheetmetal Brake full set plans & materias

  1. #11
    Supporting Member
    Join Date
    Feb 2016
    Posts
    126
    Thanks
    22
    Thanked 21 Times in 19 Posts
    Oh forgot. If this brake can bend 5mm that's 3/16 that should do me

    186 More Best Homemade Tools eBook

  2. #12
    Supporting Member kess's Avatar
    Join Date
    Dec 2015
    Location
    Thessaloniki Greece
    Posts
    161
    Thanks
    83
    Thanked 316 Times in 82 Posts

    kess's Tools
    Hi G.Paul,

    You can see 2 of my post here at HomemadeTools.net
    a. Ring Roller Bender with Hydraulic Assist (DIY)
    http://www.homemadetools.net/forum/r...sist-diy-37027
    b. DIY Metal Bender
    http://www.homemadetools.net/forum/d...l-bender-37753

    Hope to help.

    Regards
    Bill

    2,500+ Tool Plans

  3. #13
    Supporting Member kess's Avatar
    Join Date
    Dec 2015
    Location
    Thessaloniki Greece
    Posts
    161
    Thanks
    83
    Thanked 316 Times in 82 Posts

    kess's Tools
    Hi G.Paul,

    You can see 2 of my posts here at HomemadeTools.net that can be helpfoull to you

    http://www.homemadetools.net/forum/d...l-bender-37753

    http://www.homemadetools.net/forum/r...sist-diy-37027

    Regards
    Bill

  4. #14
    Supporting Member kess's Avatar
    Join Date
    Dec 2015
    Location
    Thessaloniki Greece
    Posts
    161
    Thanks
    83
    Thanked 316 Times in 82 Posts

    kess's Tools
    No, 5mm is to mucth for this brake.
    You need a Hydraulic sheetmetal brake.

  5. #15
    Supporting Member kess's Avatar
    Join Date
    Dec 2015
    Location
    Thessaloniki Greece
    Posts
    161
    Thanks
    83
    Thanked 316 Times in 82 Posts

    kess's Tools
    Quote Originally Posted by kess View Post
    SheetMetal Brake Free full set Plans and materials.
    The basic plan is the same for the simple and the modified version.


    You can view the whole step by step building process at the previus three video parts.
    Part1
    Sheet Metal Bender Brake The Make (DIY) & First Use Stainless Steel BBQ


    Part2
    Sheet Metal Bender Brake Part2 (DIY) Sharpening the Edges of Brake Clamp


    Part3
    Sheet Metal Bender Brake Part3 (DIY) Fully Modified
    These are some photos with bends that have made it by this brake.
    The sheet metal is Stainless steel AISI 304 at 0.70mm thickness.
    Sheetmetal Brake full set plans & materias-20160521_201132.jpg Sheetmetal Brake full set plans & materias-20160521_201228.jpg
    Sheetmetal Brake full set plans & materias-20160521_201251.jpg Sheetmetal Brake full set plans & materias-20160521_211803.jpg
    Sheetmetal Brake full set plans & materias-20160521_211821.jpg Sheetmetal Brake full set plans & materias-20160522_104539.jpg
    Sheetmetal Brake full set plans & materias-20160522_172404.jpg Sheetmetal Brake full set plans & materias-20160522_172425.jpg
    Sheetmetal Brake full set plans & materias-20160522_172439.jpg Sheetmetal Brake full set plans & materias-20160522_172511.jpg

    Also you can watch the brake in action on this video:


  6. #16
    dwbachor's Avatar
    Join Date
    May 2017
    Posts
    10
    Thanks
    12
    Thanked 1 Time in 1 Post
    10 gauge is pretty ambitious for a standard style brake, you might want to consider a press brake. Many plans around for hydraulic press add on ones
    .

  7. #17
    Supporting Member
    Join Date
    Feb 2016
    Posts
    126
    Thanks
    22
    Thanked 21 Times in 19 Posts
    Quote Originally Posted by dwbachor View Post
    10 gauge is pretty ambitious for a standard style brake, you might want to consider a press brake. Many plans around for hydraulic press add on ones
    .
    One more. How did you grind the bending edge

  8. #18
    Supporting Member kess's Avatar
    Join Date
    Dec 2015
    Location
    Thessaloniki Greece
    Posts
    161
    Thanks
    83
    Thanked 316 Times in 82 Posts

    kess's Tools
    Hi G.Paul,

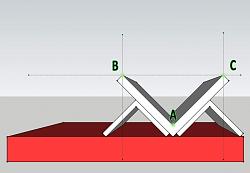
    Mount the clamp onto a flat and stable metal surface (I had use my hydraulic portable table) using two pieces of angle-iron (e.g. 30x30mm or 35x35mm.
    Sheetmetal Brake full set plans & materias-4.jpg Sheetmetal Brake full set plans & materias-3.jpg

    Be sure that the hypotenuse (BC) of the triangle (ABC) of your clamp is absolute parallel with the surface of your base and do welds to keep it all in place.
    Clean up the paint or the rust at the inner sides of angle iron about 10-15mm from corner. Paint with Aniline paint and wait for a while to dry.
    Using a caliper or a Vernier, mark a straight line at the entire length on both inner sides at 4mm from the corner.

    Sheetmetal Brake full set plans & materias-7.jpg

    (Aniline paint is a very thin paint that used for clean and easy to view marks at metal treatment. You can make it, using 400ml Alcohol, 50ml Shellac, 18~20ml Aniline and very good shake.)
    Place a square tube and lock it with clamps so as to using it as slide-base for grinder.
    Place a flat bar 3mm thick onto the tube.

    Sheetmetal Brake full set plans & materias-8.jpg

    According to dimensions of your grinder the height of the slider (tube+flat bar 3mm) must be so as the grinding disk to be absolutely parallel to surface of base and be adjacent to both sides of angle-iron.
    Don’t use a flat bar thicker than 3mm, but you can use a combination of bars one over the other, (the top bar must be the 3mm thick bar).
    The total height of grinding is 3mm but we need to make only 2.8mm leaving the rest 0.2mm for the final sharpening by file.
    So when start the grinding, watch the lines, and be careful, to not exceed the limits.
    The use of a new unused 180mm grinding disk is required for best performance.
    Start grinding sliding the grinder gently from one end to other.
    At starting do not use any pressure on the grinder, let it work with its own weight, and then push it very gently and with the same pressure from one end to other.
    If you are not sure that you can control your pressure just slide and let it to work alone. May be take little more time but we need a very good grinding without gaps.
    After some passes and when the grinding sides, start to have different width or have already grind about 1.5mm of the height, remove the (3mm) flat bar and continue to slide the grinder direct up to the tube.
    Sheetmetal Brake full set plans & materias-8-2.jpg
    According to setup (main base, clamp, and grinder slide-base) the grinding axis is parallel to main base.
    The more grinding, the most offset of the grinding axis to downwards,
    (The center is: at the point that the grinders handle, be adjacent to the slider).
    The side of angle iron that is closer to slider has less grind (or more height) from the far away side.
    But we need 3mm grind at the both sides.
    Removing from the height of slider 3mmt (the flat bar), the grinding axis will move upwards creating an opposite offset that equate the grinding height on both sides.
    When the grinding axis becomes parallel to main base, then the height will be the same at both sides of angle-iron.
    Using a flat file refine the last 0.2mm.


    Regards

  9. The Following User Says Thank You to kess For This Useful Post:

    Jon (Dec 15, 2017)

  10. #19
    Supporting Member
    Join Date
    Feb 2016
    Posts
    126
    Thanks
    22
    Thanked 21 Times in 19 Posts
    Thank you Kess

  11. #20
    Supporting Member
    Join Date
    Mar 2021
    Posts
    1
    Thanks
    6
    Thanked 0 Times in 0 Posts
    Hi, Such great work Thank you .

Thread Information

Users Browsing this Thread

There are currently 2 users browsing this thread. (0 members and 2 guests)

Tags for this Thread

Bookmarks

Posting Permissions

  • You may not post new threads
  • You may not post replies
  • You may not post attachments
  • You may not edit your posts
  •