Free 186 More Best Homemade Tools eBook:  
Get tool plans

User Tag List

Page 1 of 2 1 2 LastLast
Results 1 to 10 of 13

Thread: Sensitive drilling platform

  1. #1
    Supporting Member mklotz's Avatar
    Join Date
    Aug 2015
    Location
    LA, CA, USA
    Posts
    3,515
    Thanks
    362
    Thanked 6,546 Times in 2,156 Posts

    mklotz's Tools

    Sensitive drilling platform

    Making holes with tiny drills isn't easy. [For purposes of this article I'll define "tiny" as between #60 (0.04" = 1.02 mm) and #80 (0.0135" = 0.34 mm) or less. Two requirements for these near-microscopic buggers are speed and feel.

    Drills this size need to turn FAST. Assuming 200 SFPM in brass, recommended speeds are 20 KRPM (#60) TO 55 KRPM (#80). Since these tiny drills can't clear swarf easily, frequent "pecking" (pulling the drill from the work and then reinserting it in the hole) is required. Pecking frequency recommendations vary but I find that pecking every drill diameter of depth seems to work well however this can depend on the material being drilled. Pecking requires that you be able to "feel" what the drill is doing. If you peck with a 1/4" drill you can, upon reinserting it in the hole, immediately feel when the drill touches down on the bottom of the hole being drilled. With tiny drills that feel is much harder to establish. The tool described here addresses the "feel" problem.

    Numerous tiny hole drilling options exist. If you drill a lot of tiny holes, it may be worth investing in the tool designed for this job, the Cameron micro drill press...

    Cameron Micro Drill Press New 214 Series - 214-A1 - Penn Tool Co., Inc

    Having seen these demonstrated at machine tool shows, I can testify that they're superb machines and can drill tiny holes on a production basis. Trouble is, at $1200 a copy for a machine that has only a 5/32" chuck, there's few of us amateur machinists who can justify buying one.

    Many of us have Unimats. They can't reach the speeds mentioned above but they can go fast enough to make using these tiny drills possible. The problem is that, in drill press mode, the entire motor/pulley assembly moves with the spindle when the feed handle is depressed. All this extra mass makes it very difficult to determine what the tiny drill is doing, i.e., less than perfect "feel".

    Another option is the so-called sensitive drill feed...


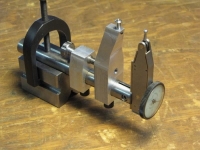
    For the benefit of folks not familiar with this tool, the shaft is gripped in whatever device is used to rotate the drill, e.g., drill press. Rotating this shaft rotates the chuck and, of course, the drill mounted in the chuck. The knurled ring is free-wheeling. The operator grabs this ring and pulls it down which causes the (spinning) chuck to descend driving the drill into the work. Peck drilling with this device is especially easy.

    While this arrangement does indeed provide a better feel, the shaft that mounts into the drill press is 0.5" in diameter. It's unlikely that any homeshop machine that can accept a 0.5" shaft will be capable of the speed needed for these tiny drills. It's a good tool but it's not the optimum for the tiny drills mentioned above. I occasionally use it for drills in the #40 - #60 range. It's especially helpful on the lathe where a massive tailstock really inhibits sensitive feel of what's happening. The spring on mine is on the strong side and makes delicate "feel" difficult.

    All of which brings me to the subject of this article...

    If we can't apply the drill delicately to the work so as to obtain good "feel", maybe the solution is to apply the work to the drill in some way that gives good "feel". Most work that needs holes this small is small itself so the idea of moving the work instead of the drill isn't likely to cause major problems as it might with larger work.

    This sensitive drilling platform consists of a small (2 x 2") table that can be moved up and down gently and precisely by rotating a large (1.25" diameter) counter-balanced knob. Work secured to the table will be pressed against the (rotating but otherwise stationary) drill to make the hole.


    This photo shows the mechanism that moves the table when the knob is turned. Two 3/8" diameter ball bearings on a shaft attached to the knob push against the table shaft to raise and lower the table. With the counterweight properly adjusted the table will remain in any position between its two limits of motion.


    A side view...


    This photo shows the individual parts. A frame, the table structure and the knob with its ball bearing actuator and counterweight and the shoulder screw that provides the pivot for the knob are all it takes.

    Every effort was taken to eliminate slop and play in constructing this tool. All bearing surfaces are reamed and the knob thickness is carefully matched to the shoulder bolt dimensions so there is no axial play. The overall feel of the device is that of a precision mechanism. (Not bragging but, given the tool's purpose, any slop would defeat its utility.)

    The total throw of the table is 1 cm (0.4"). Not much, but if you design something that requires drilling a #80 hole deeper than that you had better turn in your designer license.


    So, how well does it work? I took a scrap of 0.050" brass and tried to drill a #75 (0.021") hole through it using the Unimat in its conventional drilling mode. I purposely didn't make a pin prick to mark the hole location. Working the Unimat downfeed (including headstock and motor) as gently as possible I touched down and the drill tip promptly deflected and wound around in a circle on the brass. Surprisingly, it didn't break or bend permanently. I tried again and got about halfway through before the drill grabbed and broke; probably due to my erratic feed, compounded by the mass of the Unimat structure I was trying to move delicately.

    Using the device shown here I was able to put two #75 holes through the brass without incident. In the pictures below a bit of 0.019" copper wire is threaded through the holes. These holes were started without any initial punch mark to localize the drill. I could get away with that because I could apply the work to the drill very slowly to let the drill make its own starting mark. (This is not a recommended procedure - always make a starting mark when using tiny drills. I wanted to prove to myself that my table would work without a mark.)


    It's certainly not a tool I, or most other amateur machinists, would use frequently but it's nice to know it's in the arsenal when the need arises.

    186 More Best Homemade Tools eBook
    Last edited by mklotz; Jul 2, 2017 at 09:12 AM.
    ---
    Regards, Marv

    Experience is always far worse than pessimism

  2. The Following 14 Users Say Thank You to mklotz For This Useful Post:

    baja (Sep 21, 2024), emu roo (Oct 17, 2022), JD62 (Apr 13, 2017), kngtek (Apr 15, 2017), metric_taper (Apr 15, 2017), mr95gst (Apr 12, 2017), Paul Jones (Apr 12, 2017), Ralphxyz (May 12, 2024), rebuilder1954 (Sep 21, 2024), rendoman (Apr 14, 2017), rgsparber (Apr 1, 2020), Saltfever (Oct 19, 2022), Seedtick (Apr 13, 2017), Toolmaker51 (Jan 9, 2020)

  3. #2
    Supporting Member metric_taper's Avatar
    Join Date
    Mar 2017
    Location
    Marion, Iowa
    Posts
    599
    Thanks
    236
    Thanked 263 Times in 158 Posts

    metric_taper's Tools
    I've seen the sensitive drill chucks for many years in tool catalogs. The photo makes the shank look solid to the drill chuck. I always thought the only way they would work was to have a sliding driven spline shaft (telescoping extension), so you didn't need to overcome the spindle rack gear and return spring (and any stiction, friction, mass inertia of the drill press spindle). The photo (I think) indicates my assumption is wrong as it is a solid driven chuck with the free wheeling disk for human force, and leaves the operator to overpower the spindle forces.
    Your table is a much better alternative. Now I know why you posted the table of hex keys to thread screw size chart.

    Also your web page software has been very handy in the past, the keyway slot depth on round bar, and bolt circle calculators both came in handy. I had a computer crash and had lost your name and web link. I think I got it from RCM, but don't recall for sure.
    Thanks
    Steve

    2,000+ Tool Plans

  4. #3
    Supporting Member mklotz's Avatar
    Join Date
    Aug 2015
    Location
    LA, CA, USA
    Posts
    3,515
    Thanks
    362
    Thanked 6,546 Times in 2,156 Posts

    mklotz's Tools
    Quote Originally Posted by metric_taper View Post
    I've seen the sensitive drill chucks for many years in tool catalogs. The photo makes the shank look solid to the drill chuck. I always thought the only way they would work was to have a sliding driven spline shaft (telescoping extension), so you didn't need to overcome the spindle rack gear and return spring (and any stiction, friction, mass inertia of the drill press spindle). The photo (I think) indicates my assumption is wrong as it is a solid driven chuck with the free wheeling disk for human force, and leaves the operator to overpower the spindle forces.
    Your table is a much better alternative. Now I know why you posted the table of hex keys to thread screw size chart.

    Also your web page software has been very handy in the past, the keyway slot depth on round bar, and bolt circle calculators both came in handy. I had a computer crash and had lost your name and web link. I think I got it from RCM, but don't recall for sure.
    Thanks
    Steve
    Steve, your original assumption was correct. The chuck is connected to a splined shaft, retained by a spring, and is rotated by whatever is gripping the 0.5" shaft visible in the photograph. When the free-wheeling knurled knob is pulled, the splined shaft is pulled out of the visible shaft. Thus, the only inertia the operator has to overcome is that of the splined shaft and chuck plus, of course, the resistance of the spring. It's a good system but, IMO, still a bit too clunky for the tiny drills I described.

    I'm pleased to hear that you're using the software. RCM, now that really brings back memories. Do you remember "Gunner"? I was sorry to see that devolve into a contentious political rant outlet. Modern fora such as this excellent one are so much better than that unmoderated verbal cat fight.
    ---
    Regards, Marv

    Experience is always far worse than pessimism

  5. #4
    Supporting Member
    Join Date
    Feb 2017
    Posts
    126
    Thanks
    15
    Thanked 67 Times in 45 Posts
    Marv - Your fixture looks very nice for someoe who is already committed to the small drill press in their shop. For those not at that point Sherline has a sensiitive drill accessory that works similar to the common milling machine accessory you refer to and fits their spindle. It ought to work nicely when the spindle is set up in a milling machine configuration. Nice thing about the Sherline spindle is that it gets up to a pretty good speed approaching 5000 rpm. They have a 10,000 rpm pulley set as an accessory. Tiny drills like high speeds as long as they are used in a decent quality spindle and headstock. I have seen accessory adapters for both the Sherline and the Taig spindles with a female 3/4-16 thread on one side and a female .500 diameter hole and set screw on the other for holding a 1/2 dia endmill. This would also hold the common sensitive drill accessory although it's overhang would be troublesome if the .500 diameter hole in the adapter isn exactly made.
    Years ago Dumore made small drill presses with lifting tables. I have one I like a lot and another one waiting for me to set up the new switch/speed controlling dimmer/light. I use the small jacobs 5/32 chucks on them. Albrecht chucks are an overkill for most model work and putting a tiny drill into one of them in close quarters is a difficult 3 hand operation.
    Dumore drill presses have fine quality motors but you are likely to find ridiculous prices on eBay. I found both of mine at swap meets for less than $100; but they are rare in such venues. Even piecing together a rusty used Cameron from eBay sources is likely to be $300-400 venture. Cameron sells parts but they have made design changes over the years and their folks at the parts sales desk are almost as likely to send you the wrong part as the right one. Servo is another brand of mini drill press of similar quality to the Cameron mostly available on the West Coast where they were manufactured and sold into the Aerospace industry.
    I've heard good and bad things about the cheap tiny Chinese drill presses for model building. They are popular with the jewelry making hobbyists for diamond drilling holes in ceramic beads. Another point worth mentioning is the super cheap (like $60) small drill presses from Harbor Freight. I can't comment about their quality or whether they have usable high speeds or chucks sized for small drills. But they seem to have space for Marv's lifting table design and are short and light weight enough to store on the floor under a work bench in a cramped workshop.
    Ed Weldon

  6. The Following 2 Users Say Thank You to Ed Weldon For This Useful Post:

    Paul Jones (Apr 12, 2017), Toolmaker51 (Jan 9, 2020)

  7. #5
    Content Editor
    Supporting Member
    DIYer's Avatar
    Join Date
    Aug 2013
    Posts
    3,055
    Thanks
    791
    Thanked 1,880 Times in 1,677 Posts


    Thanks mklotz! We've added your Sensitive Drilling Platform to our Drilling and Drill Presses category,
    as well as to your builder page: mklotz's Homemade Tools. Your receipt:


  8. #6
    Jon
    Jon is offline Jon has agreed the Seller's Terms of Service
    Administrator
    Supporting Member
    Jon's Avatar
    Join Date
    Jan 2012
    Location
    Colorado, USA
    Posts
    26,365
    Thanks
    8,085
    Thanked 40,130 Times in 11,738 Posts
    Congratulations mklotz - your Sensitive Drilling Platform is the Homemade Tool of the Week!

    This is an interesting and rare alternative to an expensive store-bought tool, and also a clever application of the concept of bringing the work to the tool, rather than the tool to the work.

    Big week here. Some other nice builds: a Plasma Torch Cutting Guide from a Drafting Machine by Peat, a Dremel Plunge Router Base by jjr2001, a Precision Drill Press by editor@glue-it.com, Embroidery Hoops by backyard_cnc, a Cross Dowel Jig by morsa, a Mega Headlamp by adachsoft_com, a Bearing Ball Holder by Frank S, a Mill Tramming Setup by astroracer, and a Boring Bar Adapter by Frank S.

    mklotz - you'll be receiving a $25 online gift card, in your choice of Amazon, PayPal, Giftrocket, or bitcoin. Please PM me your current email address and gift card choice and I'll get it sent over right away.

    More importantly, this is your 10th Homemade Tool of the Week win! I've just added the golden wrench-on-pedestal graphic to the awards showcase in your postbit, visible underneath your avatar.


    This is a very challenging award to win, and there's really nothing like it on the hundreds of DIY forums we know. You join rossbotics as one of our only two winners. Each of you guys took about a year and a half to earn it. The 25-Time Tool of the Week award is still unclaimed.

    Here are all of your wins. Congrats again and nice job


  9. #7
    Supporting Member metric_taper's Avatar
    Join Date
    Mar 2017
    Location
    Marion, Iowa
    Posts
    599
    Thanks
    236
    Thanked 263 Times in 158 Posts

    metric_taper's Tools
    Quote Originally Posted by mklotz View Post
    RCM, now that really brings back memories. Do you remember "Gunner"? I was sorry to see that devolve into a contentious political rant outlet. Modern fora such as this excellent one are so much better than that unmoderated verbal cat fight.
    RCM lost all it's fun after T-nut died of cancer. At least there were more folks that talked metalworking then. After all the heavy political BS started being 95% of the newsgroup, and Google hosting it (I never could see paying a monthly fee for usenet access, as my ISP dropped it), I found better things to do with time. That Gunner guy purposely cross posted bringing in the 'survivalists' and the fringe of the 'alt weird'. It morphed into partisan hate.

    I think I can reverse engr. your table from the photos. I don't see any key to prevent the table from rotating, so it I assume it can spin 360 on the table central sliding support post, or did I not read or see that correctly?
    Steve

  10. #8
    Supporting Member mklotz's Avatar
    Join Date
    Aug 2015
    Location
    LA, CA, USA
    Posts
    3,515
    Thanks
    362
    Thanked 6,546 Times in 2,156 Posts

    mklotz's Tools
    Quote Originally Posted by metric_taper View Post
    RCM lost all it's fun after T-nut died of cancer. At least there were more folks that talked metalworking then. After all the heavy political BS started being 95% of the newsgroup, and Google hosting it (I never could see paying a monthly fee for usenet access, as my ISP dropped it), I found better things to do with time. That Gunner guy purposely cross posted bringing in the 'survivalists' and the fringe of the 'alt weird'. It morphed into partisan hate.

    I think I can reverse engr. your table from the photos. I don't see any key to prevent the table from rotating, so it I assume it can spin 360 on the table central sliding support post, or did I not read or see that correctly?
    Steve
    When I first set out to build it I decided to not key the table because I was concerned that keying might induce friction, or more properly, stiction, that would interfere with the "feel" I was seeking. In retrospect I think I was overcautious; a pin riding in a groove on the table rod, well lubricated, probably wouldn't affect the feel unduly.

    It's really not a requirement though. It's not that the drill is going to grab and rip your finger off if you're using it to restrain the table. Put one in and, if it turns out that you don't like it, simply remove the pin and you're back to the original design.

    I miss T-nut. Somewhere in my computer files I still have his instructions for hand sharpening drills. I met Gunner at one of the Men, Metal, and Machines shows in Visalia. Let's just say he didn't quite live up to the persona he portrayed on RCM. Somewhere on the web I read a meticulously compiled list of all the self-contradictions Gunner posted over the years.
    ---
    Regards, Marv

    Experience is always far worse than pessimism

  11. #9
    Supporting Member metric_taper's Avatar
    Join Date
    Mar 2017
    Location
    Marion, Iowa
    Posts
    599
    Thanks
    236
    Thanked 263 Times in 158 Posts

    metric_taper's Tools
    Quote Originally Posted by mklotz View Post
    When I first set out to build it I decided to not key the table because I was concerned that keying might induce friction, or more properly, stiction, that would interfere with the "feel" I was seeking. In retrospect I think I was overcautious; a pin riding in a groove on the table rod, well lubricated, probably wouldn't affect the feel unduly.

    It's really not a requirement though. It's not that the drill is going to grab and rip your finger off if you're using it to restrain the table. Put one in and, if it turns out that you don't like it, simply remove the pin and you're back to the original design.

    I miss T-nut. Somewhere in my computer files I still have his instructions for hand sharpening drills. I met Gunner at one of the Men, Metal, and Machines shows in Visalia. Let's just say he didn't quite live up to the persona he portrayed on RCM. Somewhere on the web I read a meticulously compiled list of all the self-contradictions Gunner posted over the years.
    As the table is hand held, and I assume the drill press spindle is locked and then the table with work is moved under and the operator is 'floating' it under the spinning drill, having a non-keyed table may make alignment easier. It is clearly under operator control (or your back to a broken dill bit).

    I to, captured Tee-Nut's drill sharpening procedure. I wish I had his experience, and writing talent. He mentioned how he broke a very large lathe bed, but I never saw that he told that story. That's one of many memories he left. I wonder how his widow is doing, as for a few years she would stop in on the anniversary of his passing.

  12. #10
    kngtek's Avatar
    Join Date
    Dec 2016
    Posts
    18
    Thanks
    47
    Thanked 15 Times in 8 Posts
    Hi Marv,
    Very clever device!

    I use the Sherline sensitive drilling attachment on my old Sherline 5000 Mill for tiny drills at maximum speed (~3000 rpm) - Current price is only usd115, and fits on a 3/4"-16 spindle. I never found the need to retrofit the 10,000 rpm option. This device operates silky smooth i.e. provides very fine hand control. Mind you I always touch-off first with a tiny centre drill and use a new, split point drill. Having said that, I haven't tried drills smaller than #60 (even though the 5/32" chuck is advertised to hold drills down to #80 - And the whole point of your new device is to drill in the #60 to #80 range.

    What level of spindle runout do you get with your Unimat Mill? What drill mounting technique do you use to minimize drill runout? The Sherline threaded 5/32" Jacobs chuck is advertised at 0.003" runout, although they do offer a Morse arbour spindle chuck option which would reduce runout.

    Regards,

    Gary (kngtek)
    Calgary, AB

Thread Information

Users Browsing this Thread

There are currently 1 users browsing this thread. (0 members and 1 guests)

Bookmarks

Posting Permissions

  • You may not post new threads
  • You may not post replies
  • You may not post attachments
  • You may not edit your posts
  •