Free 186 More Best Homemade Tools eBook:  
Get tool plans

User Tag List

Page 2 of 3 FirstFirst 1 2 3 LastLast
Results 11 to 20 of 25

Thread: Self Locking Lathe Tool Height Adjustment

  1. #11
    Jon
    Jon is online now Jon has agreed the Seller's Terms of Service
    Administrator
    Supporting Member
    Jon's Avatar
    Join Date
    Jan 2012
    Location
    Colorado, USA
    Posts
    26,422
    Thanks
    8,097
    Thanked 40,217 Times in 11,765 Posts
    Congratulations hersch_tool - your Lathe Tool Height Adjuster is the Homemade Tool of the Week!

    Another clever solution for getting rid of a wrench, and an excellent instructional video too.

    Some more good builds from this week:

    Bench Vise S-Hooks by rgsparber
    Electric Lifter Table by Kwandotechnic
    Helical Milling Clamps by Occasional machinist
    Adjustable Bender by orioncons36
    Bandsaw Roller Base by Frank S

    hersch_tool - we've added your tool entry to our All Homemade Tool of the Week winners post. And, you'll now notice the wrench-on-pedestal award in the awards showcase in your postbit, visible beneath your username:


    I've cancelled your paid membership and granted you free lifetime membership, so you'll never have to pay for membership again.

    And, you'll be receiving a $100 cash prize, in your choice of Amazon (US-only), PayPal, or bitcoin. Please PM me your current email address and prize choice and I'll get it sent over right away.

    Nice work!
    Download plans for lathes.

  2. #12
    Supporting Member
    Join Date
    Jan 2022
    Posts
    3
    Thanks
    0
    Thanked 2 Times in 1 Post

    retirand19's Tools
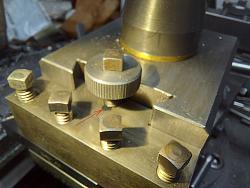
    I'm the fellow who suggested a friction element rather than a lock in the YT comments. FWIW here's a photo of my solution. On my shop-built QCTP I used a screw with a knurled nut affixed in place rather than a stud and knurled adjusting nut. I drilled a hole that overlaps the threads, and inserted a piece of o-ring to serve as a friction element. It works adequately. (I left the square head on the screw so I can use a wrench if the friction is too stiff.) I had to experiment to find a suitable amount of overlap. I don't remember where I got the idea. I think it was a commercial QCTP brochure, maybe KDK. Just another approach to the problem that's worth considering.

    Self Locking Lathe Tool Height Adjustment-qc.jpg
    Download plans for lathes.

  3. The Following 2 Users Say Thank You to retirand19 For This Useful Post:

    Jon (Dec 23, 2023), uv8452 (Dec 23, 2023)

  4. #13
    Supporting Member
    Join Date
    Oct 2019
    Posts
    5
    Thanks
    3
    Thanked 0 Times in 0 Posts
    nlce piece of workmanship

  5. #14
    Supporting Member hersch_tool's Avatar
    Join Date
    Nov 2023
    Posts
    21
    Thanks
    2
    Thanked 46 Times in 9 Posts

    hersch_tool's Tools
    Quote Originally Posted by uv8452 View Post
    Nice and impeccable workmanship. Permissible is what likes.
    But I would be annoyed by the nut's dead angle the allen key requires.
    Why not (e.g.) slit a larger ø nut laterally and clamp/brace it with an axial allen screw?
    We know this principle from 'playless' spindle nuts.
    That's certainly not a bad idea!
    My initial design definitely has some weaknesses, I'll likely make a V2.0 at some point in the future where I'll address the locking screw issue and any other issues that I come across while using it.
    Thanks!

  6. #15
    Supporting Member hersch_tool's Avatar
    Join Date
    Nov 2023
    Posts
    21
    Thanks
    2
    Thanked 46 Times in 9 Posts

    hersch_tool's Tools
    HOLY SMOKES!!!!
    Thank you so much!
    This is a HUGE honor!
    I can't believe it, I can't say that I deserve it over all of the other amazing designs and incredibly skilled craftsman on this site, but I definitely appreciate it!!!
    Thank you!!!!!

    Quote Originally Posted by Jon View Post
    Congratulations hersch_tool - your Lathe Tool Height Adjuster is the Homemade Tool of the Week!

    Another clever solution for getting rid of a wrench, and an excellent instructional video too.

    Some more good builds from this week:

    Bench Vise S-Hooks by rgsparber
    Electric Lifter Table by Kwandotechnic
    Helical Milling Clamps by Occasional machinist
    Adjustable Bender by orioncons36
    Bandsaw Roller Base by Frank S

    hersch_tool - we've added your tool entry to our All Homemade Tool of the Week winners post. And, you'll now notice the wrench-on-pedestal award in the awards showcase in your postbit, visible beneath your username:


    I've cancelled your paid membership and granted you free lifetime membership, so you'll never have to pay for membership again.

    And, you'll be receiving a $100 cash prize, in your choice of Amazon (US-only), PayPal, or bitcoin. Please PM me your current email address and prize choice and I'll get it sent over right away.

    Nice work!

  7. #16
    Supporting Member hersch_tool's Avatar
    Join Date
    Nov 2023
    Posts
    21
    Thanks
    2
    Thanked 46 Times in 9 Posts

    hersch_tool's Tools
    Quote Originally Posted by johnreich View Post
    nlce piece of workmanship
    Thank you!

  8. #17
    Supporting Member hersch_tool's Avatar
    Join Date
    Nov 2023
    Posts
    21
    Thanks
    2
    Thanked 46 Times in 9 Posts

    hersch_tool's Tools
    Thanks very much, that's a very clever solution.
    I am kicking around ideas for V2.0.
    I'm thinking that I'll likely do a completely new design, at some point.... hahaha
    Thanks again, I love your tool post btw, SLICK looking in brass!

    Quote Originally Posted by retirand19 View Post
    I'm the fellow who suggested a friction element rather than a lock in the YT comments. FWIW here's a photo of my solution. On my shop-built QCTP I used a screw with a knurled nut affixed in place rather than a stud and knurled adjusting nut. I drilled a hole that overlaps the threads, and inserted a piece of o-ring to serve as a friction element. It works adequately. (I left the square head on the screw so I can use a wrench if the friction is too stiff.) I had to experiment to find a suitable amount of overlap. I don't remember where I got the idea. I think it was a commercial QCTP brochure, maybe KDK. Just another approach to the problem that's worth considering.

    Click image for larger version. 

Name:	qc.jpg 
Views:	110 
Size:	680.6 KB 
ID:	46813

  9. #18
    Supporting Member hersch_tool's Avatar
    Join Date
    Nov 2023
    Posts
    21
    Thanks
    2
    Thanked 46 Times in 9 Posts

    hersch_tool's Tools
    You are very welcome!
    Thank YOU for taking the time to watch my vid, and good luck with the project.

    Quote Originally Posted by mbshop View Post
    I to am frustrated by the current jam nut version. Seems to fiddly. So I hope to make a few of these for my most commonly used holder and see how it goes. Bet it goes much better than what is currently used. Basically, it's the answer to my problem. Thanks.

  10. #19
    Supporting Member hersch_tool's Avatar
    Join Date
    Nov 2023
    Posts
    21
    Thanks
    2
    Thanked 46 Times in 9 Posts

    hersch_tool's Tools
    Lol, check some of the other comments, this question has been covered A LOT...
    short version is, you can slide a washer underneath to re-clock the screw, or just lift the tool holder off the tool post to tighten it.
    cheers!

    Quote Originally Posted by albertq View Post
    Hi Hersch, Thanks for sharing your tool height adjuster.
    With your tool height set precisely, how do you lock the adjusting ring if position of hex lock screw is hidden by tool-post lock handle?
    Or do you set the height to the closest 1/2 turn?

  11. #20
    Supporting Member hersch_tool's Avatar
    Join Date
    Nov 2023
    Posts
    21
    Thanks
    2
    Thanked 46 Times in 9 Posts

    hersch_tool's Tools
    Quote Originally Posted by tonyfoale View Post
    Maybe I the odd one out here (it does seem to happen) but I see no problem with the as supplied version that can't be fixed by the removal of the washer between the two nuts. Lock nuts should jam together, a washer in between destroys that. Remove the washer and the system works fine.
    Unfortunately, this isn't the reality in my experience.
    Removing the washer only seems to exacerbate the issue of the entire assembly spinning together instead of locking, and it doesn't address any of the other common annoyances.
    The addition of a washer appears to not be an arbitrary choice on the part of the designers, it "helps" a bit lol, but I still think the entire solution is a compromise to mass manufacturing and price.

Thread Information

Users Browsing this Thread

There are currently 1 users browsing this thread. (0 members and 1 guests)

Bookmarks

Posting Permissions

  • You may not post new threads
  • You may not post replies
  • You may not post attachments
  • You may not edit your posts
  •