Free 186 More Best Homemade Tools eBook:  
Get 2,500+ tool plans, full site access, and more.

User Tag List

Page 1 of 2 1 2 LastLast
Results 1 to 10 of 17

Thread: Rifling Machine

  1. #1
    Supporting Member LMMasterMariner's Avatar
    Join Date
    Jan 2016
    Location
    Dubrovnik - Croatia
    Posts
    234
    Thanks
    588
    Thanked 582 Times in 132 Posts

    LMMasterMariner's Tools

    Rifling Machine

    This is my first post ever.

    RIFLING MACHINE

    10 years ago I made rifling machine of very simple design and later on when I had
    internet access, found that some more clever people did it using much better design
    and they did it in 1853. Just google '1853 rifling machine' and you will find it.

    Must say that I am seaman and at that time I didn’t have internet access on board.
    When ashore I didn’t have time for internet café. I was younger and I was spending
    most of my free time in bars, pubs, night clubs and discoteques.
    Life is much easier nowadays. Have internet on board and I no longer make bars.

    At that time I was aboard brand new cargo vessel with brand new professional
    grade lathe and milling machine. Once when I was in Hong Kong, I found Canton
    Road, the street with so many shops for all kind of tools, bearings, gears, v-belts, etc.
    You name it, they have it there. (picture 01) The street next to Canton Road is
    Reclamation street and there I found aluminum shop where they cut aluminum to
    required size and they do it immediately for additional small fee.

    As I already had idea what to do, I decided to buy parts in order to build rifling
    machine, so I spent approx. 400 US Dollars for 6 bearing housings with ball bearings,
    8 pieces linear bearings dia 20mm, 3 meters of 20mm shaft, 50cm geared rack
    2 gears (one for 9mm Luger and another for .22 LR calibers), couple of aluminum
    plates and whole bunch of bolts and nuts. Gear sizes were determined in the shop by
    turning the gear on the rack for one complete turn and measuring distance.

    Design is very simple. Changing direction from longitudinal to rotational by
    means of gear and pinion. That came for free as I took it from vessel's spares.
    These were gears and pinions of Nitto Kohki angle grinders. Extremely accurate and
    also extremely expensive, but as I said that came for free. Took me couple of months
    to complete the job. In the meantime stopped with machining aboard vessels, as at
    home I have 11 x 26 cutmaster lathe and 6 x 26 mini knee mill (harbour freight 40939).
    Both made in China but not so bad. Can’t afford any good quality machines (read heavy),
    as I have more than one hundred stairs from the street to my house. From 10 attached
    pictures it can be seen what machine looks like and pictures 09 and 10 show recent
    condition of rifling machine. These last 2 pictures were taken when I was rearranging
    my workshop. Machine is not in use anymore and I am planning to use sliding parts
    (linear bearings and shafts) to convert it to cut off saw.

    Hope that this article will help someone to build his own rifling machine.

    LMMasterMariner
    Attached Thumbnails Attached Thumbnails Rifling Machine-01.jpg   Rifling Machine-02.jpg   Rifling Machine-03.jpg   Rifling Machine-04.jpg   Rifling Machine-05.jpg  

    Rifling Machine-06.jpg   Rifling Machine-07.jpg   Rifling Machine-08.jpg   Rifling Machine-09.jpg   Rifling Machine-10.jpg  


    186 More Best Homemade Tools eBook

  2. The Following 26 Users Say Thank You to LMMasterMariner For This Useful Post:

    albertq (Feb 12, 2024), baja (Sep 25, 2019), clydeman (Jul 23, 2022), correntinos (Apr 29, 2020), darkoford (Aug 9, 2017), DaveInPA (Jan 12, 2016), EnginePaul (Jul 22, 2022), Gromet (Sep 25, 2019), high-side (Sep 26, 2019), Jon (Jan 8, 2016), kbalch (Jan 8, 2016), Mike65 (Mar 28, 2021), nova_robotics (Jul 22, 2022), ntaryl (Feb 9, 2016), Okapi (Sep 25, 2019), old fogey (Jan 13, 2016), Oroblanco (Feb 26, 2017), Paul Jones (Jan 9, 2016), PJs (Jan 10, 2016), Ralphxyz (Feb 18, 2024), rendoman (Jan 12, 2016), Resident114 (Jul 24, 2022), Saxon Violence (Jan 13, 2016), sking0369 (Jan 8, 2016), txrascal (Feb 22, 2016), Vyacheslav.Nevolya (Mar 4, 2017)

  3. #2
    kbalch's Avatar
    Join Date
    Jun 2012
    Location
    Clermont, FL
    Posts
    5,034
    Thanks
    2,275
    Thanked 532 Times in 384 Posts
    Hi LMMasterMariner,

    Welcome!

    Wow, what a neat solution to the rifling challenge - and a great first post!

    What are you working on currently?

    Ken

    2,500+ Tool Plans

  4. The Following User Says Thank You to kbalch For This Useful Post:

    Sprig1 (Jan 12, 2016)

  5. #3
    Supporting Member LMMasterMariner's Avatar
    Join Date
    Jan 2016
    Location
    Dubrovnik - Croatia
    Posts
    234
    Thanks
    588
    Thanked 582 Times in 132 Posts

    LMMasterMariner's Tools
    I am presently in China. Bought some descent quality tools.
    Paid USD 170 for all that tools on the table.
    Would pay much more at home.
    Attached Thumbnails Attached Thumbnails Rifling Machine-made-china-tools.jpg  

  6. The Following 2 Users Say Thank You to LMMasterMariner For This Useful Post:

    Badge171 (Jul 19, 2016), baja (Sep 25, 2019)

  7. #4

    Join Date
    Dec 2015
    Location
    North central Missouri
    Posts
    10
    Thanks
    1
    Thanked 10 Times in 8 Posts

    sking0369's Tools
    Thanks for your post. I have been searching and trying to get ideas for a rifling machine myself and appreciate you post. Tell me- how did you do your cutter, assuming you did cut rifling?
    Sean

  8. #5
    Supporting Member LMMasterMariner's Avatar
    Join Date
    Jan 2016
    Location
    Dubrovnik - Croatia
    Posts
    234
    Thanks
    588
    Thanked 582 Times in 132 Posts

    LMMasterMariner's Tools
    Hello sking0369,

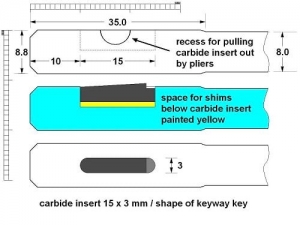
    Yes, I did cut rifling as machine is made for cut rifling. Rifling cutter is carbide
    insert which is placed inside slotted keyway in the head of rifling rod.
    Rifling rod is made of 416 stainless steel and one keyway is slotted near the end
    of the rod. The keyway dimensions are 15 x 3 mm and carbide insert is also
    15 x 3 mm. Slot is approx. 4 mm deep. The end of the rod is turned to 8.8 mm in
    length of approx. 35 mm. and polished. The rest of the rod is turned to 8 mm.
    I never hardened rifling head and it worked fine. I made less than 20 barrels and
    all of them were drilled with 11/32” drills and reamed with with 8.85 mm reamer.
    That reamer was made by grinding tapered 9 mm reamer down after 8.85 mm
    diameter using plenty of water for cooling.
    The recess at the top of rifling head is cut with 6 mm end mill at the middle of the
    slot and it’s only purpose is to enable pulling carbide insert out with pliers.
    I didn’t make lift mechanism to raise the cutter. I was taking cutter out by pliers and
    always added one more shim underneath the cutter. Used very thin paper strips as
    shims for lifting the cutter. After several passes at every groove I removed both,
    the cutter and all paper strips. Afterwards placed one more paper strip than before and
    little by little job was done. It was an easy job with bronze barrels for muzzle loading
    pistols, but with 4140 steel it was never ending story. Must also say that my barrels
    were not very accurate. The best 5 shot group with 9mm Luger ammo from bench
    rest (read: bench vise) was about 20 cm at 25 meters distance. That result was with
    my most accurate 25 cm long barrel Also forgot to mention that weight of rifling
    machine is just little below 40 kilograms including cranking handle which can’t be
    seen on the pictures. I even don’t know where it is now. Didn’t see it for long time.

    Here below is the drawing of the rod end which some people call rifling head.

    More can be found at making a cutter for rifling

    LMMasterMariner
    Attached Thumbnails Attached Thumbnails Rifling Machine-rifling-cutter.jpg  

  9. The Following 2 Users Say Thank You to LMMasterMariner For This Useful Post:

    darkoford (Aug 9, 2017), PJs (Jan 10, 2016)

  10. #6
    Supporting Member Paul Jones's Avatar
    Join Date
    May 2014
    Location
    Del Mar, California
    Posts
    1,231
    Thanks
    5,810
    Thanked 1,463 Times in 657 Posts

    Paul Jones's Tools
    Thank you for the wonderful history and detailed photos. I will have to check out the Internet reference.

  11. The Following User Says Thank You to Paul Jones For This Useful Post:

    PJs (Jan 10, 2016)

  12. #7
    Content Editor
    Supporting Member
    DIYer's Avatar
    Join Date
    Aug 2013
    Posts
    3,055
    Thanks
    798
    Thanked 1,897 Times in 1,692 Posts
    Thanks LMMasterMariner! We've added your Rifling Machine to our Firearm and Weaponry category, as well as to your builder page: LMMasterMariner's Homemade Tools. Your receipt:

    Last edited by Jon; Oct 22, 2021 at 11:11 PM.

  13. #8
    Content Editor
    Supporting Member
    DIYer's Avatar
    Join Date
    Aug 2013
    Posts
    3,055
    Thanks
    798
    Thanked 1,897 Times in 1,692 Posts
    Thanks LMMasterMariner! We've added your Rifling Machine Cutter to our Firearm and Weaponry category, as well as to your builder page: LMMasterMariner's Homemade Tools. Your receipt:

    Last edited by Jon; Oct 22, 2021 at 11:11 PM.

  14. #9

    Join Date
    Jan 2016
    Posts
    4
    Thanks
    0
    Thanked 2 Times in 1 Post
    Would you have a set of prints for the machine? Would you be willing to share them?

  15. #10
    Supporting Member LMMasterMariner's Avatar
    Join Date
    Jan 2016
    Location
    Dubrovnik - Croatia
    Posts
    234
    Thanks
    588
    Thanked 582 Times in 132 Posts

    LMMasterMariner's Tools
    Hello Shade,

    Unfortunately I don’t have those drawings anymore. Lost them during
    numerous files transferring from one external hard drive to another.
    So many other things were lost during the years. I made drawing of
    rifling cutter couple of days ago. It was an easy job, but drawing of
    whole machine again would be mission impossible. I can’t remember
    what were dimensions of shafts, bearings, gears, aluminum plates, etc….
    The only thing I can do is to dismantle machine and take pictures
    with measuring tape next to parts and post them. Even that I can’t do
    right now, as I am not home. Expect to be home again end April.

    LMMasterMariner

Thread Information

Users Browsing this Thread

There are currently 1 users browsing this thread. (0 members and 1 guests)

Tags for this Thread

Bookmarks

Posting Permissions

  • You may not post new threads
  • You may not post replies
  • You may not post attachments
  • You may not edit your posts
  •