Free 186 More Best Homemade Tools eBook:  
Get tool plans

User Tag List

Page 1 of 3 1 2 3 LastLast
Results 1 to 10 of 24

Thread: Resistors for current measurement

  1. #1
    Supporting Member mklotz's Avatar
    Join Date
    Aug 2015
    Location
    LA, CA, USA
    Posts
    3,525
    Thanks
    362
    Thanked 6,559 Times in 2,161 Posts

    mklotz's Tools

    Resistors for current measurement

    I'm always nervous wiring my good VOM in series into a circuit to measure current. Another way to measure current is to measure voltage across a resistor that is series wired into the circuit in question. This way the VOM remains in high impedance mode and so is less susceptible to damage.

    Most circuits will not be adversely affected if the series resistor is very small in comparison to the circuit resistance itself. OTOH, the resistor must be large enough to produce an easily measured voltage when the current is flowing through it.

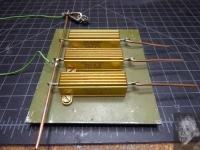
    I acquired three 50 watt, 1% resistors in resistances of 0.1, 1.0, and 10.0 ohms and attached them to a large aluminum plate to act as a heat sink.

    Given 50 watt capability, the maximum current and associated voltage for each resistor is...

    ohms amps volts
    0.1 22.4 2.24
    1.0 7.1 7.1
    10.0 2.24 22.4


    186 More Best Homemade Tools eBook
    ---
    Regards, Marv

    Failure is just success in progress
    That looks about right - Mediocrates

  2. The Following 4 Users Say Thank You to mklotz For This Useful Post:

    Paul Jones (Feb 19, 2019), ranald (Feb 18, 2019), Scotsman Hosie (Feb 19, 2019), Seedtick (Feb 18, 2019)

  3. #2
    Supporting Member ranald's Avatar
    Join Date
    Jan 2018
    Location
    Black Mountain Queensland
    Posts
    1,326
    Thanks
    992
    Thanked 367 Times in 256 Posts

    ranald's Tools
    I'll never do it but it is interesting. Thanks for sharing Marv.

    2,000+ Tool Plans

  4. #3

    Join Date
    Nov 2015
    Posts
    11
    Thanks
    0
    Thanked 0 Times in 0 Posts
    Marv i may be wrong but i think an unpainted aluminum surface, better even with a little thermal compound should work better
    Ariscats

  5. #4
    Supporting Member mklotz's Avatar
    Join Date
    Aug 2015
    Location
    LA, CA, USA
    Posts
    3,525
    Thanks
    362
    Thanked 6,559 Times in 2,161 Posts

    mklotz's Tools
    Quote Originally Posted by Ariscats View Post
    Marv i may be wrong but i think an unpainted aluminum surface, better even with a little thermal compound should work better
    You're correct, of course, but that bit of aluminum was lying around, I was in a rush, and all my applications involve currents far below the 50 watt limitation.
    ---
    Regards, Marv

    Failure is just success in progress
    That looks about right - Mediocrates

  6. #5

    Join Date
    Nov 2015
    Posts
    11
    Thanks
    0
    Thanked 0 Times in 0 Posts
    Quote Originally Posted by mklotz View Post
    You're correct, of course, but that bit of aluminum was lying around, I was in a rush, and all my applications involve currents far below the 50 watt limitation.
    O.K. Marv. I just made a comment.
    Ariscats

  7. #6
    Supporting Member mklotz's Avatar
    Join Date
    Aug 2015
    Location
    LA, CA, USA
    Posts
    3,525
    Thanks
    362
    Thanked 6,559 Times in 2,161 Posts

    mklotz's Tools
    You made me feel guilty (and I deserve to be) so a few minutes with a sanding drum and we have some nice bare radiative surfaces...


    ---
    Regards, Marv

    Failure is just success in progress
    That looks about right - Mediocrates

  8. #7
    Supporting Member
    Join Date
    Sep 2012
    Location
    Hinchinbrook QLD
    Posts
    324
    Thanks
    44
    Thanked 139 Times in 85 Posts
    The use of resistors in this situation is called a "shunt"
    Another method for measuring high current draw is to measure across the supply lead that oft times goes from the power source directly to the load. Disconnect, and, accurately measure the resistance of that lead, and you have a "known" shunt value. Reconnect, and then measure the current draw and you achieve the same result

    Cheers Phil

  9. #8

    Join Date
    Nov 2015
    Posts
    11
    Thanks
    0
    Thanked 0 Times in 0 Posts
    Quote Originally Posted by mklotz View Post
    You made me feel guilty (and I deserve to be) so a few minutes with a sanding drum and we have some nice bare radiative surfaces...


    Don't forget the compound. Otherwise! LOL
    Ariscats

  10. #9
    Content Editor
    Supporting Member
    DIYer's Avatar
    Join Date
    Aug 2013
    Posts
    3,055
    Thanks
    793
    Thanked 1,888 Times in 1,683 Posts


    Thanks mklotz! We've added your Current Measuring Method to our Measuring and Marking category,
    as well as to your builder page: mklotz's Homemade Tools. Your receipt:


  11. #10
    Supporting Member Scotsman Hosie's Avatar
    Join Date
    Apr 2017
    Location
    Salt Lake City, UTAH
    Posts
    359
    Thanks
    4,937
    Thanked 85 Times in 60 Posts

    Scotsman Hosie's Tools
    After the 1st number of years — and easily as many blown up meters — I discovered I could blow up a $5.oo meter, with about the same efficacy as I could a more expensive model. And since, truth be told, I rarely needed the kind of sensitivity of either a Simpson or a Fluke, I defaulted to always having an extra meter handy. Kinda like having an extra truck key. (And I probably saved a couple thousand dollars, over the last 40 years.)

    On another note, I did a helluva lot better, when I started marking the damned dials. So I could clearly tell what settings I had them on.

  12. The Following 2 Users Say Thank You to Scotsman Hosie For This Useful Post:

    Toolmaker51 (Feb 20, 2023), WmRMeyers (Feb 20, 2023)

Thread Information

Users Browsing this Thread

There are currently 1 users browsing this thread. (0 members and 1 guests)

Bookmarks

Posting Permissions

  • You may not post new threads
  • You may not post replies
  • You may not post attachments
  • You may not edit your posts
  •