Free 186 More Best Homemade Tools eBook:  
Get tool plans

User Tag List

Page 1 of 2 1 2 LastLast
Results 1 to 10 of 15

Thread: Repeat Reading Gage - DIYSwede's "Cheap-O-Meter"

  1. #1
    Supporting Member DIYSwede's Avatar
    Join Date
    May 2019
    Location
    Stockholm, Sweden...
    Posts
    634
    Thanks
    416
    Thanked 805 Times in 319 Posts

    DIYSwede's Tools

    Repeat Reading Gage - DIYSwede's "Cheap-O-Meter"

    Found a used, unbranded and uncertified but free Diabase surface plate of the oddest dimensions: 413 x 266 x 72 mm.
    As to its flatness there wasn't any markings whatsoever, so for a fast check I winged together a quick and cheap "Spherometer" as per suggestions on: http://bobmay.astronomy.net/spherometer/spherometer.htm

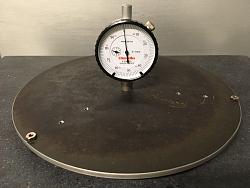
    Repeat Reading Gage - DIYSwede's "Cheap-O-Meter"-diy-spherometer.jpg

    My 1 micron/ div indicator sitting in the middle of the Spherical Comparator (bottom of a former IKEA frying pan, hence the faded Teflon), together with 3 M4 x 0.7 mm SHCS bolts with silver soldered 1/10" ball bearings as a point against the surface to be measured. Variable radii (110, 82,5 & 55 mm) to get into the corners/ measure smaller items. The snag is: I don't have a calibrated surface plate to zero the thing on - it'll only measure the surface's deviations of the plane - and even a perfect sphere (of a few miles' radius) would read zero deviation though not being "flat" at all.

    So, armed with straight edges, 1-2-3-blocks and indicators I tried to get some figures of its flatness, but didn't get consistent readings.
    Checking around the web, finding that the Rahn "Repeat-o-Meter" was the second best to have, short of an auto-collimator :
    The Rahn would set me back over 1600 bucks + shipping (even without the indicator), and as I personally think their "meter" is pretty badly conceived and machined even worse - these two traits I could manage myself for free from scrap pieces and perhaps improve the design on-the-go:
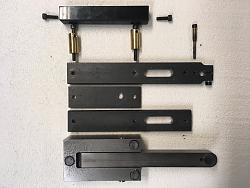
    Repeat Reading Gage - DIYSwede's "Cheap-O-Meter"-r_o_m-exploview.jpg
    Top-down: Thermoplastics handle from an old door, cut & drilled to accept the side bolts into the brass standoffs. Long bolts hold the drilled and turned standoffs (former electric plug pins) and the 3 pieces of hot rolled steel to the base plate. The two 30 x 10 (205 & 170mm long) pieces are slot milled for less springiness with full parallellism. Fine adjust differential screw: M4 x 0.7 & M6 x 0.75 (equals 0,05mm pitch). Spacer flat a mere 30 x 5 x 105. Base plate (100 x 54 x 32 mm) and arm from a cut, milled & faced old stage weight of lo-grade and porous Cast iron. Arm pivots on two side mounted hollow point grub screws pinching (by 4 mm ball bearings) a 2 mm thru-hole in the arm, Feet outta 12 mm ball bearings (HRC 60-64) pressed into base, ground and honed flat. Footprint/dia 11 and c-c; 190 x 38 mm. (The Rahn original boasts an overall length of 10" - which is absolutely unwieldy on my small plate.) M5 & M6 Allen and hex bolts 12.9 throughout. - The tool's dimensions isn't crucial as long as the feet are parallell. Barely visible is the arm's "Travel Lock" made from yet another turned and tapped electrical 8 mm plug pin. Hallmarks of DIYSwede's Workshop: simple, rough, operational and free, as well as positively accurate and absolutely repeatable. Approximately 20 hours of work went into it.
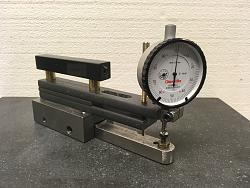
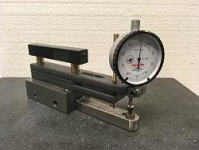
    Repeat Reading Gage - DIYSwede's "Cheap-O-Meter"-img_1449.jpg
    So, as you all might ask: -How did it do? -Better than I thought it would, for this POS. Repeatable, consistent readings showed the plate to be <1,5 mu-meter in deviation, and would thus render an "AA" grade, had it been sitting in a climate controlled room (which it really isn't). Took me some 20 minutes to crosscheck the plate on all axes and diagonals from both directions. Perhaps the measures xls file could print out a snazzy 3d plot of it - we'll see about that - as of now I'll just want to stash the meter away for a coupla years and use the "DIYSwede cralibated" labeled plate for my projects.
    Add'l pics & info: DIYSwede's Repeat-O-Meter - Meccano Gallery

    186 More Best Homemade Tools eBook
    Last edited by DIYSwede; Dec 14, 2019 at 06:38 AM. Reason: misspelling & added link

  2. The Following 10 Users Say Thank You to DIYSwede For This Useful Post:

    Home-PC (Aug 7, 2021), Inner (May 21, 2019), Jon (May 19, 2019), mklotz (Feb 1, 2021), mwmkravchenko (Jul 30, 2022), Paul Jones (May 19, 2020), Philip Davies (Feb 4, 2022), Scotsman Hosie (May 20, 2019), tonyfoale (Feb 1, 2021), Toolmaker51 (May 17, 2020)

  3. #2
    Content Editor
    Supporting Member
    DIYer's Avatar
    Join Date
    Aug 2013
    Posts
    3,055
    Thanks
    793
    Thanked 1,885 Times in 1,682 Posts


    Thanks DIYSwede! We've added your Repeat Meter to our Measuring and Marking category,
    as well as to your builder page: DIYSwede's Homemade Tools. Your receipt:


    2,000+ Tool Plans

  4. #3
    Supporting Member DIYSwede's Avatar
    Join Date
    May 2019
    Location
    Stockholm, Sweden...
    Posts
    634
    Thanks
    416
    Thanked 805 Times in 319 Posts

    DIYSwede's Tools

  5. The Following 2 Users Say Thank You to DIYSwede For This Useful Post:

    Jon (Oct 4, 2019), Toolmaker51 (May 17, 2020)

  6. #4
    Supporting Member Toolmaker51's Avatar
    Join Date
    Feb 2016
    Location
    Midwest USA
    Posts
    5,334
    Thanks
    7,044
    Thanked 3,011 Times in 1,900 Posts

    Toolmaker51's Tools
    Yeah, I'm pretty much a sucker for anything0'meter too, long as it applies to accomplishing work.

    Occurs to me frying pan version can be 'zeroed' or nearly so by rotating either more or less than 120° around the indicator.
    Then, what ever diameter, divide available plate area by that; into 'zones', that could overlap.
    Comparison with the Repeat-O-Meter should agree if perfect flat; because pan is a footprint, and the ROM is rather linear. Perfect flat
    not much an issue unless checking a large array of small items. That's a good job for the smaller surface plates; less area = less potential deviation.
    Very few times did I require supreme accuracy. It was not controlled environment, a high grade plate, or all that clean. So with three ~4mm bearing balls, three drops of Super Glue and a 50 millionths indicator...We made a slew of valve plates for high pressure air valves. When high pressures erode ports, leaks ensue.
    Last edited by Toolmaker51; May 17, 2020 at 11:42 PM. Reason: ps. "Occurs to me..."...more than once't
    Sincerely,
    Toolmaker51
    ...we'll learn more by wandering than searching...

  7. The Following 2 Users Say Thank You to Toolmaker51 For This Useful Post:

    Home-PC (Aug 7, 2021), mwmkravchenko (Jul 18, 2023)

  8. #5
    Supporting Member DIYSwede's Avatar
    Join Date
    May 2019
    Location
    Stockholm, Sweden...
    Posts
    634
    Thanks
    416
    Thanked 805 Times in 319 Posts

    DIYSwede's Tools
    Thanks, TM51 - pardon me for not noticing your post earlier.

    The Spherical comparator and DIYed Spherometer I did were inspired from:
    Spherometer Construction

    I started with the comparator, whilst doing the 3 plate grind, needing to check which one was concave/ convex.
    It was very easy-to-use and trim to get very fine results (albeit not quantifiable in any units).
    The differences/ deviations of the three plates were "really low", but by how much?

    Then adding the 0,001 indicator on the frying pan remedied that lack a bit,
    giving "measures" though the surface/ DI tip noise was terrible for consistency.

    The ROM averaging out the surface noise is fast and reliable for my purposes (as of now, at least).

    Cheers

    Johan

  9. The Following 2 Users Say Thank You to DIYSwede For This Useful Post:

    Home-PC (Aug 7, 2021), Toolmaker51 (May 25, 2020)

  10. #6
    Supporting Member Toolmaker51's Avatar
    Join Date
    Feb 2016
    Location
    Midwest USA
    Posts
    5,334
    Thanks
    7,044
    Thanked 3,011 Times in 1,900 Posts

    Toolmaker51's Tools
    Until moments ago, unaware base purpose of the sphereometer by name, that link opened my eyes. The existing connection was to straight bar version. 'We' don't check radii, we're all about flat. Tony Foale introduced an indicator based radius guage [2 plane] and formulae awhile back; admittedly I didn't recognize they are one and the same, differing in range. His interest was producing billet copies of engine castings.
    Sincerely,
    Toolmaker51
    ...we'll learn more by wandering than searching...

  11. The Following User Says Thank You to Toolmaker51 For This Useful Post:

    mwmkravchenko (Jul 18, 2023)

  12. #7
    Supporting Member DIYSwede's Avatar
    Join Date
    May 2019
    Location
    Stockholm, Sweden...
    Posts
    634
    Thanks
    416
    Thanked 805 Times in 319 Posts

    DIYSwede's Tools
    Thanks, TM51!

    Tony Foale's excellent 2-legged radius gauges and his thorough writeup:
    https://motochassis.com/FileDump/Rad...adiusGauge.pdf,
    is a clear example of gauging deviations from, and radiuses along a straight line.
    Problem is that it has some "wiggle room", you have to check for a minimum reading while slowly rocking it back and forth.
    (Another theoretical problem is that the distance between the two balls also gets smaller as the measured radius gets smaller.)

    Many ways to skin a cat, as:
    I actually used a simpler version for checking warpage of, say a "pretty flat" surface plate in the making,
    by having a 20 mm square steel tube app 2" shorter as the plate's diagonals,
    bottom feet (20 mm dia for it to stand up w/o wiggling) at each end and a ground measuring flat anvil central on the top side.

    Place it along one diagonal of the thoroughly cleaned plate,
    put the DI stand to take a reference zero point on the central anvil.
    Lift the DI tip carefully and twist the bar along the other diagonal,
    release the DI tip to the same place of the anvil as in the previous check.
    Any deviation from the reference zero point indicates warpage.
    (Certainly NOT my invention - boldly plagiarized from Wayne R. Moores book "Foundations of Mechanical Accuracy"-
    the FAST lane to lunacy for any aspiring HMT:er!)


    That was initially all fine and dandy - I managed to get the three surface plates "almost perfect" only by using
    the quick and dirty "spherical comparator", the "Fast-Warp" check, and the gauge above.
    Pic at: DIY Surface Plates: Joseph Whitworth 3 Plate Method - Meccano Gallery
    But then this "almost flat" state wasn't good enough for me, I needed some units of their deviation from "the Ideal World".

    So I figured the comparator upgrade to "Spherometer" might suffice (which it didn't partly due to its triangular footprint),
    then, as I found the free (25 kg real but unmarked & uncertified) surface plate,
    I gave up totally and winged the Cheap-o-Meter together,
    being again nearly linear with its non-wide Footprint: dia 11 and c-c; 190 x 38 mm.

    Most of the development of these can be seen/ read at: Workshop Metrology - Meccano Gallery,
    by clicking the rightmost pic, then one step to the left for each pic of my "evolutionary leap" thru this!

    Sorry for this probably tedious read, but it just might help someone out there avoiding the same frustrations.
    Morale of the story: Reading "Foundations..." above could also be detrimental to your Peace of Mind!

    Johan
    Last edited by DIYSwede; May 25, 2020 at 10:18 AM.

  13. The Following User Says Thank You to DIYSwede For This Useful Post:

    Home-PC (Aug 7, 2021)

  14. #8
    Supporting Member Toolmaker51's Avatar
    Join Date
    Feb 2016
    Location
    Midwest USA
    Posts
    5,334
    Thanks
    7,044
    Thanked 3,011 Times in 1,900 Posts

    Toolmaker51's Tools
    Tedious read? Vote's are in;; DIYSwede one of our most entertaining post-men. I mean, few can summarize W.R. Moore's "Foundations..." tome so clearly. His statement is the Cliff Notes of Cliff Notes, "FAST lane to lunacy for any aspiring HMT:er!".
    I'm still laughing.
    Sincerely,
    Toolmaker51
    ...we'll learn more by wandering than searching...

  15. #9
    Supporting Member DIYSwede's Avatar
    Join Date
    May 2019
    Location
    Stockholm, Sweden...
    Posts
    634
    Thanks
    416
    Thanked 805 Times in 319 Posts

    DIYSwede's Tools
    Ahem... [:blush] Thanks for those kind words, TM51.
    I'm not intentionally breaking my back to be funny-
    I'm trying to focus on "conveying content": Short, crisp and hopefully relevant - but still fail a little too often to my own taste.

    I'm also (ab-)using the postings here as a means to avoid getting even more bored with myself, with about the same meagre result.
    I simply cannot write what I'd detest reading. If anyone, like you, appreciate it somewhat, that's a pure bonus!

    Through the years I've used this motto professionally to rather successfully un-promote my career:
    -"People without humor shan't be taken seriously - but be seen as pure threats!"

    Cheers
    Johan, ( "Ex-Whiz Kid, previously "young and talented")

  16. The Following User Says Thank You to DIYSwede For This Useful Post:

    Home-PC (Aug 7, 2021)

  17. #10
    Supporting Member DIYSwede's Avatar
    Join Date
    May 2019
    Location
    Stockholm, Sweden...
    Posts
    634
    Thanks
    416
    Thanked 805 Times in 319 Posts

    DIYSwede's Tools
    "Probably a lot more than you ever really wanted to know about the Repeat-O-Meter" (35:40 long)

    Keith Rucker at Vintage Machinery, on surface plate calibration thru a collimator and a R-O-M.


  18. The Following 3 Users Say Thank You to DIYSwede For This Useful Post:

    Home-PC (Aug 7, 2021), johncg (Feb 2, 2021), Toolmaker51 (Feb 1, 2021)

Thread Information

Users Browsing this Thread

There are currently 1 users browsing this thread. (0 members and 1 guests)

Tags for this Thread

Bookmarks

Posting Permissions

  • You may not post new threads
  • You may not post replies
  • You may not post attachments
  • You may not edit your posts
  •