Free 186 More Best Homemade Tools eBook:  
Get tool plans

User Tag List

Page 2 of 3 FirstFirst 1 2 3 LastLast
Results 11 to 20 of 27

Thread: Quick Change Tool Post for Lathe

  1. #11
    Supporting Member Paul Alciatore's Avatar
    Join Date
    Mar 2014
    Location
    Beaumont, TX
    Posts
    304
    Thanks
    9
    Thanked 157 Times in 83 Posts

    Paul Alciatore's Tools
    By radial position I must assume you mean the horizontal angle of holder around the tool post. I assume this because "radial position", strictly speaking, would be the distance from a center point and that is trivial to hold constant.

    Anyway, the horizontal angle of the holder is very well controlled by a generous flat on the tool post and a matching, "D" shaped hole in the tool holder. I have found this to be far superior to the common use of a key on other QC tool posts that are based on a round post. In use I have found the repeat-ability of the position of the tool to be well better than 0.001" in all three dimensions, no matter what set of coordinates that you use to measure it (Cartesian or Polar). Unlike a key which will become less accurate as it wears, this "D" design of the post provides a self compensation for any long term wear so it should be equally repeat-able after years of use. When the holder is tightened on the post, it comes into intimate, 360 degree contact with it every time it is mounted: there are no gaps. This is also why it is extremely sturdy: there is just no where the holder can move to. It is locked solidly on the post as if the two were one piece of metal. I believe it is THE sturdiest QC tool holder system of them all. Far better than any of the dovetail designs or any others.


    Quote Originally Posted by old_toolmaker View Post
    Paul,

    How is radial position controlled? Is radial position repeatable?

    Dick

    186 More Best Homemade Tools eBook
    Last edited by Paul Alciatore; Dec 4, 2017 at 12:54 AM.
    Paul A.

  2. #12
    Charron63's Avatar
    Join Date
    Oct 2017
    Location
    Tidewater VA
    Posts
    20
    Thanks
    33
    Thanked 8 Times in 5 Posts
    Hi Paul
    Quick question. I am a very new machinist and am wondering if it is within my skillset to make this qctp of yours, I bought a rerasonably priced bxa set and low and behold it is way to big, and axa is too small I am on a grizzly 0602 10x22 manual lathe without dro etc.
    Thanx for your time...
    J

    2,000+ Tool Plans

  3. #13
    Supporting Member Paul Alciatore's Avatar
    Join Date
    Mar 2014
    Location
    Beaumont, TX
    Posts
    304
    Thanks
    9
    Thanked 157 Times in 83 Posts

    Paul Alciatore's Tools
    Charron63,

    While this is not a "first project", it is not beyond the skill level of a beginner. I am not a professional machinist so I was also a beginner at one time and I remember the feeling. This project was one that I conceived and constructed when I purchased my South Bend 9" lathe. I was then and now still am very aware of the problems and needs of beginners. And I addressed this when I wrote the instructions that accompany the drawings for these QCTP plans. They are not just drawings: they include a complete and comprehensive description of each and every step.

    At the top of this topic, Jon has described my plans as a 25 page manual that includes "Full, detailed, step-by-step construction procedure". In it I tried to give enough construction details for each part so that even a beginner can build it. Where there is a critical measurement, I show the manner in which I accomplished it with the needed precision. There are only about four or five dimensions that are critical and those and, where needed, the methods of achieving them are discussed.

    I deliberately avoided the use of dovetails which are common on other QC tool posts. I have cut dovetails but it is more complicated, requires dedicated cutters, and are not, in my opinion, the best way to mount the holders. My design is not only easier to machine, but, in my humble opinion AND EXPERIENCE, just as accurate in tool location as the dovetail designs. And it is far more rigid.

    As for your 10 x 22 Grizzly lathe, I do not know the distance from the top of the compound to the center line of the lathe, but it is probably similar to or somewhat more than my SB-9. The basic size of the machines is very comparable so most of the dimensions will not need to be changed. On my lathe this dimension is about 1.140". The tool post, as designed, allows for distances between 1.10" and 1.61" without any changes. It can be easily adjusted in this range with a built in height adjustment screw. If your lathe exceeds this range, you may need to extend the thickness of the base section of the post to bring it up enough to meet your centerline. This can be with a change in one dimension on that post or it could be done with a separate spacer ring. We can discuss that here if you wish.

    Anyway, I can not guarantee anything, but I see no reason why a beginner can not build this tool post. And, if you have any problems, I am here. I monitor this discussion every day, including most weekends and holidays. If you have any problems I will promptly answer any questions that you post. You are not alone.

    I believe that Jon, the owner of this board, offers a 30 day, money back guarantee so you can purchase the plans and read them to see what they entail. But we have had many sales and I do not think anyone who has purchased them has taken him up on this yet.
    Last edited by Paul Alciatore; Jan 12, 2018 at 02:44 PM.
    Paul A.

  4. #14
    Supporting Member old_toolmaker's Avatar
    Join Date
    Dec 2017
    Location
    Cape Coral, FL
    Posts
    579
    Thanks
    647
    Thanked 457 Times in 184 Posts

    old_toolmaker's Tools
    Hi Paul,

    I am assuming the "D" shaped post must be tapered. Is this correct?

    Dick

  5. #15
    Supporting Member Paul Alciatore's Avatar
    Join Date
    Mar 2014
    Location
    Beaumont, TX
    Posts
    304
    Thanks
    9
    Thanked 157 Times in 83 Posts

    Paul Alciatore's Tools
    Why would you assume that? For it's main section, the section where the alignment and locking takes place, it is not tapered.

    But at the top I did include a very generous, 45 degree chamfer to make it easy and fast to put the holders on. It is a "no fumble" design. This is part of the design that makes it the fastest quick change tool post in the business. It literally takes only one or two seconds to mount AND tighten a tool holder in place with perfect alignment to it's previous position when it was last removed. And no tools are needed for that, just your hand and a single motion. Removing the holders is equally fast, again with a single motion. If you are a professional and concerned about tool change time, this is easily the fastest QCTP design that you will find. Anywhere and at any price.


    Quote Originally Posted by old_toolmaker View Post
    Hi Paul,

    I am assuming the "D" shaped post must be tapered. Is this correct?

    Dick
    Paul A.

  6. #16
    Charron63's Avatar
    Join Date
    Oct 2017
    Location
    Tidewater VA
    Posts
    20
    Thanks
    33
    Thanked 8 Times in 5 Posts
    Quote Originally Posted by Paul Alciatore View Post
    Charron63,

    While this is not a "first project", it is not beyond the skill level of a beginner. I am not a professional machinist so I was also a beginner at one time and I remember the feeling. This project was one that I conceived and constructed when I purchased my South Bend 9" lathe. I was then and now still am very aware of the problems and needs of beginners. And I addressed this when I wrote the instructions that accompany the drawings for these QCTP plans. They are not just drawings: they include a complete and comprehensive description of each and every step.

    At the top of this topic, Jon has described my plans as a 25 page manual that includes "Full, detailed, step-by-step construction procedure". In it I tried to give enough construction details for each part so that even a beginner can build it. Where there is a critical measurement, I show the manner in which I accomplished it with the needed precision. There are only about four or five dimensions that are critical and those and, where needed, the methods of achieving them are discussed.

    I deliberately avoided the use of dovetails which are common on other QC tool posts. I have cut dovetails but it is more complicated, requires dedicated cutters, and are not, in my opinion, the best way to mount the holders. My design is not only easier to machine, but, in my humble opinion AND EXPERIENCE, just as accurate in tool location as the dovetail designs. And it is far more rigid.

    As for your 10 x 22 Grizzly lathe, I do not know the distance from the top of the compound to the center line of the lathe, but it is probably similar to or somewhat more than my SB-9. The basic size of the machines is very comparable so most of the dimensions will not need to be changed. On my lathe this dimension is about 1.140". The tool post, as designed, allows for distances between 1.10" and 1.61" without any changes. It can be easily adjusted in this range with a built in height adjustment screw. If your lathe exceeds this range, you may need to extend the thickness of the base section of the post to bring it up enough to meet your centerline. This can be with a change in one dimension on that post or it could be done with a separate spacer ring. We can discuss that here if you wish.

    Anyway, I can not guarantee anything, but I see no reason why a beginner can not build this tool post. And, if you have any problems, I am here. I monitor this discussion every day, including most weekends and holidays. If you have any problems I will promptly answer any questions that you post. You are not alone.

    I believe that Jon, the owner of this board, offers a 30 day, money back guarantee so you can purchase the plans and read them to see what they entail. But we have had many sales and I do not think anyone who has purchased them has taken him up on this yet.
    PAUL
    I am in no way concerned with the $ for the plans, Right now I have been pulling my hair out trying to make the Chinese POS that came with my lathe work and have had them send two different compound slides and three tool holders trying to find one that is even square for the T-slot. You cannot believe how many hours I have spent at the lathe trying desperately to figure out why my lathe tooling was eating 20$ carbide inserts like jujubee's. Unbelievable! Anyhow I will order the plans in the next couple of days to be certain. right now the Classwork alone is drowning me!
    Thanx for the detailed response and look forward to working more with you in the future.

    Appreciatively
    Josef

  7. #17
    Supporting Member old_toolmaker's Avatar
    Join Date
    Dec 2017
    Location
    Cape Coral, FL
    Posts
    579
    Thanks
    647
    Thanked 457 Times in 184 Posts

    old_toolmaker's Tools
    Hi Paul,

    I am just getting back to this post. It is unclear to me how tool tip height is set and held constant. Could you clear that up for me?
    Dick


    Links to some of my plans:

    https://www.homemadetools.net/forum/...965#post105972 OFF-SET TAILSTOCK CENTER PLANS
    http://www.homemadetools.net/forum/s...995#post112113 SMALL TURRET TOOL POST PLANS
    http://www.homemadetools.net/forum/l...994#post112111 LARGE TURRET TOOL POST PLANS
    http://www.homemadetools.net/forum/m...383#post110340 MINI-LATHE CARRIAGE LOCK PLANS
    http://www.homemadetools.net/forum/s...191#post106483 SMALL QC TOOL POST PLANS
    http://www.homemadetools.net/forum/q...849#post119345 QUICK CHANGE LATHE TURRET
    http://www.homemadetools.net/forum/m...949#post119893 MINI LATHE COMPOUND PIVOT MODIFICATION

  8. #18
    Supporting Member Paul Alciatore's Avatar
    Join Date
    Mar 2014
    Location
    Beaumont, TX
    Posts
    304
    Thanks
    9
    Thanked 157 Times in 83 Posts

    Paul Alciatore's Tools
    I guess I have to give away all the secrets. There is a hole drilled vertically through the body of the holders which is counterbored for about half the distance and tapped to hold a SHCS. That screw goes out the bottom and rests on the base flange of the post. That provides the adjustment. Then I have a trick to hold it instead of using a lock nut or set screw. This provides enough friction to hold it against any unwanted changes, but allows for easy adjustment as needed. This is a very inexpensive trick and it is explained in the text of the plans. I have never had any problems with this feature.

    I have been told that this screw, sitting in the counterbore, would be a place where chips would collect. I have not had that problem as I have few tools with chip breakers, but if it became a problem I would just stuff a cotton ball on top of it.


    Quote Originally Posted by old_toolmaker View Post
    Hi Paul,

    I am just getting back to this post. It is unclear to me how tool tip height is set and held constant. Could you clear that up for me?
    Paul A.

  9. #19
    Supporting Member old_toolmaker's Avatar
    Join Date
    Dec 2017
    Location
    Cape Coral, FL
    Posts
    579
    Thanks
    647
    Thanked 457 Times in 184 Posts

    old_toolmaker's Tools
    Hi Paul,

    Thank you for the explanation. You have been very helpful. Now I have a better understanding of what you have designed.
    If I decide to build your tool post I will purchase the plans.
    Dick


    Links to some of my plans:

    https://www.homemadetools.net/forum/...965#post105972 OFF-SET TAILSTOCK CENTER PLANS
    http://www.homemadetools.net/forum/s...995#post112113 SMALL TURRET TOOL POST PLANS
    http://www.homemadetools.net/forum/l...994#post112111 LARGE TURRET TOOL POST PLANS
    http://www.homemadetools.net/forum/m...383#post110340 MINI-LATHE CARRIAGE LOCK PLANS
    http://www.homemadetools.net/forum/s...191#post106483 SMALL QC TOOL POST PLANS
    http://www.homemadetools.net/forum/q...849#post119345 QUICK CHANGE LATHE TURRET
    http://www.homemadetools.net/forum/m...949#post119893 MINI LATHE COMPOUND PIVOT MODIFICATION

  10. #20

    Join Date
    Dec 2018
    Posts
    1
    Thanks
    0
    Thanked 1 Time in 1 Post
    Paul,
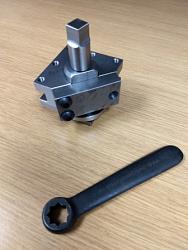
    Thank you for sharing your design. I recently completed building mine and all worked out well. I changed the post nut to be able to use an old wrench that came with my SB lathe. Otherwise it was made per the plans which were very clear and easily understood. Below is an image of the finished product less the handle which is currently on order.

    Quick Change Tool Post for Lathe-qtp.jpg

  11. The Following User Says Thank You to 2gr8kids For This Useful Post:

    Jon (Dec 5, 2018)

Thread Information

Users Browsing this Thread

There are currently 1 users browsing this thread. (0 members and 1 guests)

Bookmarks

Posting Permissions

  • You may not post new threads
  • You may not post replies
  • You may not post attachments
  • You may not edit your posts
  •