Free 186 More Best Homemade Tools eBook:  
Get 2,500+ tool plans, full site access, and more.

User Tag List

Results 1 to 10 of 10

Thread: Printed circuit board repair

  1. #1
    Supporting Member Frank S's Avatar
    Join Date
    Aug 2015
    Location
    Peacock TX
    Posts
    11,716
    Thanks
    2,228
    Thanked 9,208 Times in 4,399 Posts

    Frank S's Tools

    Printed circuit board repair

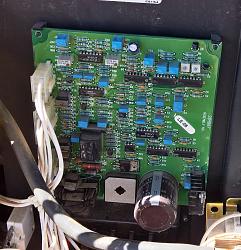
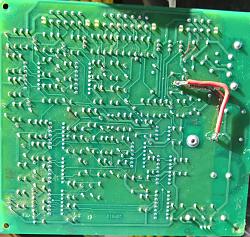
    last week while attempting to re attach my spool gun to my mig welder I shorted a couple of wires resulting in burning one of the traces on the pcb.
    upon checking for a replacement or a repair faciality the prices were all over ranging from $400.00 and up a refurbished replacement board sells for $700.00 And I didn't even want to know what Miller wanted for a new one but it turns out a brand new one from Miller would have only been an additional $75.00. However neither option is something that I was willing to dig into my piggy bank for.
    So here was the problem I could tell by looking that on the surface it appeared to be only a single trace which was burned and the board was not heavily populated in the nearby region. Now you have to understand a soldering iron in my hands is a lethal weapon mostly because I normally use a 160 or 200 watt gun or heat up a 1 lb copper iron to solder with, and for me to solder any wire smaller than 14 ga is like sending a 20 kiloton bomb to wipe out an ant hill.
    Na just kidding as long as a board is not heavily populated and the connections are spaced far enough apart for me to be able to distinguish one from another I'll work on something simple like replacing a trace with a piece of insulated wire.
    I wanted to use 18 or 20 ga wire for the bypass surgery but failing to have any wire that small I pulled 5 or 6 wires out of a 16 ga stranded wire then tinned up the ends and joined them to the board Had the welder going in a few minutes the piggy bank is safe from the hammer for yet another day.
    Printed circuit board repair-wp_20200604_16_35_37_propb.jpg

    Printed circuit board repair-wp_20200604_16_34_12_propb.jpg
    By the way I do have a small 4o watt iron just for these times

    186 More Best Homemade Tools eBook
    Never try to tell me it can't be done
    When I have to paint I use KBS products

  2. The Following 3 Users Say Thank You to Frank S For This Useful Post:

    baja (Jun 7, 2020), mwmkravchenko (Jun 5, 2020), Seedtick (Jun 5, 2020)

  3. #2
    Supporting Member mwmkravchenko's Avatar
    Join Date
    Nov 2017
    Location
    Perth Ontario Canada
    Posts
    1,044
    Thanks
    5,312
    Thanked 397 Times in 282 Posts
    Never say never. I like it! Good to see you get this up and running again Frank!

    2,500+ Tool Plans

  4. #3
    Supporting Member Frank S's Avatar
    Join Date
    Aug 2015
    Location
    Peacock TX
    Posts
    11,716
    Thanks
    2,228
    Thanked 9,208 Times in 4,399 Posts

    Frank S's Tools
    Quote Originally Posted by mwmkravchenko View Post
    Never say never. I like it! Good to see you get this up and running again Frank!
    What was the worst that could happen, hammer a hole in the piggy bank?
    I called Miller talked to a tech guy we decided that there most likely was not any other damage to the board, He said if I sent it to them they send everything out to innovat for repairs so I called them their guy said much the same as the Miller guy, then said hey it wont cost you any more for repairs if you try it and that fails to fix the problem then send it to us may even have a few bucks knocked off the final bill since you will have already repaired the trace assuming you didn't do more damage in making the initial repair.
    If the bridge rectifier had ben toast I would have de soldered it and replaced it as well. I'm fine with things I can see but when I have to use a microscope or powerful loop to see something then I'm not the one, as I am electronically challenged for the most part.
    Never try to tell me it can't be done
    When I have to paint I use KBS products

  5. #4
    earz's Avatar
    Join Date
    May 2014
    Posts
    21
    Thanks
    2
    Thanked 89 Times in 12 Posts

    earz's Tools
    Nice work. I’ve used that same technique to fix many circuit boards over the years. This was the one I was the most proud of, mostly because the issue was hidden under a capacitor. Almost seems as if it was designed to fail in that particular spot.


  6. The Following User Says Thank You to earz For This Useful Post:

    Frank S (Jun 6, 2020)

  7. #5
    Supporting Member Frank S's Avatar
    Join Date
    Aug 2015
    Location
    Peacock TX
    Posts
    11,716
    Thanks
    2,228
    Thanked 9,208 Times in 4,399 Posts

    Frank S's Tools
    earz I had almost the identical same radio mine had docking for charging the tool batteries Actually more of a flaming piece of junk than anything else as a radio it had a poor receiving range FM was a complete no go out where I live and since all of the AM stations have cut their output power to nothing it would only receive 1 AM station and that one was in Spanish I could sometimes pick up an FM station but one day the thing just stopped working no radio and no charging. After removing the 10,000 screws holding the thing together and the 5 million useless decorative parts I found everything inside so badly corroded I just hucked in trash bin
    Never try to tell me it can't be done
    When I have to paint I use KBS products

  8. #6
    Supporting Member jdurand's Avatar
    Join Date
    May 2019
    Location
    Krasnodar Krai, Russian Federation
    Posts
    1,469
    Thanks
    127
    Thanked 769 Times in 427 Posts

    jdurand's Tools
    Oh, for the days of simple PC boards.

    Here's one we did years ago. I designed the electronics on it, my wife did the layout, and we both did some of the soldering.

    The area circled in red is a batch of termination resistors in 0201 (inch) size. That's pretty big by modern cell phone standards, but is the low limit of what I can solder by hand.

    0201 = 0.020" x 0.010"


  9. #7
    Supporting Member
    Join Date
    Feb 2018
    Posts
    363
    Thanks
    237
    Thanked 47 Times in 40 Posts
    does anybody know somebody who repairs electric fencer pcbs? Typical repair cost is 100$ around here.

  10. #8
    Supporting Member jdurand's Avatar
    Join Date
    May 2019
    Location
    Krasnodar Krai, Russian Federation
    Posts
    1,469
    Thanks
    127
    Thanked 769 Times in 427 Posts

    jdurand's Tools
    Sounds expensive, are they potted (the board, not the person fixing them)? If I wasn't preparing to move I'd offer.

  11. #9
    Supporting Member
    Join Date
    Feb 2018
    Posts
    363
    Thanks
    237
    Thanked 47 Times in 40 Posts
    Quote Originally Posted by jdurand View Post
    Sounds expensive, are they potted (the board, not the person fixing them)? If I wasn't preparing to move I'd offer.
    no they are about 3'' square with about a dozen components total. A friend of a friend repaired a couple for me 30 years ago, less than one dollar material. I used to be able to buy used ones but it has been so long now since anybody else has kept cattle that they are few and far between. I spent a long time searching you tube but to no avail. I have a marine battery charger that I blew by connecting backwards to a battery, it is fully potted, can the epoxy be dissolved? I also have three Champion mag drills that no longer magnetize, the magnets are potted and I can only assume a bad contact is the only thing that could be wrong with them?
    Thanks, Rob

  12. #10
    Supporting Member jdurand's Avatar
    Join Date
    May 2019
    Location
    Krasnodar Krai, Russian Federation
    Posts
    1,469
    Thanks
    127
    Thanked 769 Times in 427 Posts

    jdurand's Tools
    Removing potting compound is a definite maybe. Depends on what it is, if it goes all the way to the board, and how much effort it's worth.

    I worked one place where to save money (potting compound isn't cheap) we vibrated sand down around the PC board to within a short distance from the top of the enclosure, then poured the potting on top. That's pretty easy to get off.

    I've seen Asian products where they were supposed to be potted solid but they filled them, then poured it back out so there's just a coating on everything. That's a maybe to remove.

    If it's thick potted with quality two part stuff, you may need to blast.

    If the board was dipped or spayed with a clear coating, that's probably a standard conformal coating. Some are designed to be removable for board repair, some are a tad more trouble.

    When I worked in semiconductors, we would unencapsulate ICs from competitors. That's a very good, strong potting compound on ICs so we dripped boiling sulfuric acid on it for hours to expose the chip. The chip wasn't hurt other then the contact pads since it's covered in vapox (glass). Once we had the black compound off then it was a matter of photograph it with an electron microscope, strip a layer, another photograph, .... Not exactly a weekend project.


    2,500+ Tool Plans

Thread Information

Users Browsing this Thread

There are currently 1 users browsing this thread. (0 members and 1 guests)

Bookmarks

Posting Permissions

  • You may not post new threads
  • You may not post replies
  • You may not post attachments
  • You may not edit your posts
  •