Free 186 More Best Homemade Tools eBook:  
Get 2,500+ tool plans, full site access, and more.

User Tag List

Page 1 of 3 1 2 3 LastLast
Results 1 to 10 of 22

Thread: Piston Ring Locator

  1. #1
    Rikk's Avatar
    Join Date
    Nov 2018
    Posts
    115
    Thanks
    248
    Thanked 80 Times in 42 Posts

    Rikk's Tools

    Piston Ring Locator

    My first homemade tool post!

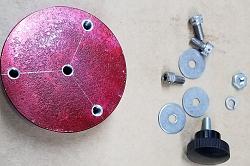
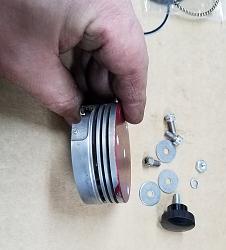
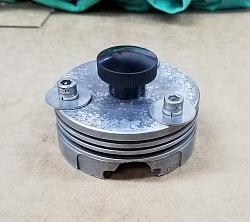
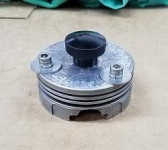
    As a side job, I rebuild engines for a local golf cart business. I generally see the same types of engines over and over, so making a tool to help speed things up is a benefit.

    When I build the engines, I always check the piston ring end gaps to make sure they aren't too tight. I have found some that are and would have been catastrophic had I installed them. Anyway, I have to push the ring down into the bore to a specified depth and measure the gap with feeler gages. Normally, I use a new piston held upside down to square the ring in the bore, but it's not exactly accurate and it is somewhat cumbersome.

    So I whipped up this little tool from a used piston to make it easier. The length between the top and bottom of the tool is within .003" all the way around, so much more accurate.

    As I get in other engine types for rebuild, I will make the same tool for each.
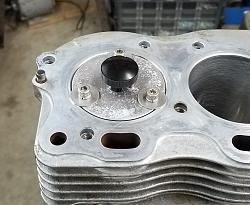

    Piston Ring Locator-20200111_172227-1.jpgPiston Ring Locator-20200111_172234-1.jpgPiston Ring Locator-20200111_172704-1.jpgPiston Ring Locator-20200111_172715-1.jpg

    186 More Best Homemade Tools eBook

  2. The Following 19 Users Say Thank You to Rikk For This Useful Post:

    baja (Jan 15, 2020), charles scozzari (Dec 11, 2023), clydeman (Jan 14, 2020), DIYSwede (Jan 15, 2020), Drew1966 (Jan 19, 2020), emu roo (Jan 29, 2022), freddo4 (Jan 14, 2020), Jon (Jan 13, 2020), katy (Jul 19, 2022), Little Rabbit (Jan 29, 2020), mr mikey (Jul 19, 2022), olderdan (Jan 15, 2020), Paul Jones (Jan 15, 2020), Scotty12 (Jan 19, 2020), Sleykin (Jan 15, 2020), tonyfoale (Jan 15, 2020), Tonyg (Jan 16, 2020), Toolmaker51 (Jan 15, 2020), Tule (Jan 20, 2020)

  3. #2
    Content Editor
    Supporting Member
    DIYer's Avatar
    Join Date
    Aug 2013
    Posts
    3,055
    Thanks
    796
    Thanked 1,895 Times in 1,690 Posts


    Thanks Rikk! We've added your Piston Ring Locator to our Piston category,
    as well as to your builder page: Rikk's Homemade Tools. Your receipt:


    2,500+ Tool Plans
    New plans added on 01/08/2025: Click here for 2,690 plans for homemade tools.

  4. The Following User Says Thank You to DIYer For This Useful Post:

    Rikk (Jan 14, 2020)

  5. #3

    Join Date
    Jul 2019
    Posts
    236
    Thanks
    143
    Thanked 54 Times in 41 Posts
    Needs a little explanation? I’m presuming that you milled the bottom of the piston square to the top & now you are just pushing the rings down the cylinder equidistant & then measuring the gap after the piston is removed?

  6. #4
    Supporting Member tonyfoale's Avatar
    Join Date
    Nov 2016
    Location
    Spain
    Posts
    1,626
    Thanks
    734
    Thanked 2,737 Times in 733 Posts

    tonyfoale's Tools
    Rikk,

    The best ideas are usually the simplest. Great idea fully explained.

  7. The Following 3 Users Say Thank You to tonyfoale For This Useful Post:

    bigtrev8xl (Jan 29, 2022), Paul Jones (Jan 15, 2020), Rikk (Jan 15, 2020)

  8. #5
    Rikk's Avatar
    Join Date
    Nov 2018
    Posts
    115
    Thanks
    248
    Thanked 80 Times in 42 Posts

    Rikk's Tools
    Quote Originally Posted by Wildwilly View Post
    Needs a little explanation? I’m presuming that you milled the bottom of the piston square to the top & now you are just pushing the rings down the cylinder equidistant & then measuring the gap after the piston is removed?
    Yes sir that is it exactly!

    I'm sorry, I guess I should have explained, I was just thinking that anyone who knows how to rebuild an engine, would understand. I've attached an image to help explain. I thought I had taken a photo of the ring in the cylinder, but I didn't.

    Why this tool is useful:
    To measure the end gap of a piston ring, the manufacturer will generally specify a depth into the cylinder that the ring must be placed. In this case 1" from the top.

    The usual way of doing it, in lieu of a special tool, is to turn the piston upside down and use the crown of the piston to square up the ring. I would just put a couple marks with a sharpie around the piston to establish the correct depth. The cylindricity of the piston gets the ring somewhat square to the bore, but because there is a lack of a positive stop, the piston can still rock a little in the bore and leave the ring cocked. With this tool, the ring is quite square in the bore, thus giving me a more accurate measurement of the ring end gap.
    Attached Thumbnails Attached Thumbnails Piston Ring Locator-imageswlinks.gif  

  9. The Following 4 Users Say Thank You to Rikk For This Useful Post:

    olderdan (Jan 15, 2020), Paul Jones (Jan 15, 2020), Sleykin (Jan 15, 2020), Toolmaker51 (Jan 28, 2022)

  10. #6
    Rikk's Avatar
    Join Date
    Nov 2018
    Posts
    115
    Thanks
    248
    Thanked 80 Times in 42 Posts

    Rikk's Tools
    Quote Originally Posted by tonyfoale View Post
    Rikk,

    The best ideas are usually the simplest. Great idea fully explained.
    Thank you Tony!! Coming from you, that means A LOT.

    I've secretly followed you here for some time, your work on bikes is amazing. I've been into old bikes my entire life and gave AHRMA a try years ago on a friends CB350.
    Thanks again!

  11. #7
    katy's Avatar
    Join Date
    Jul 2019
    Location
    Red Deer Alberta
    Posts
    190
    Thanks
    89
    Thanked 106 Times in 58 Posts

    katy's Tools
    When I build the engines, I always check the piston ring end gaps to make sure they aren't too tight.
    It's nice to hear that you check the ring's end gap. I've seen several engines where that wasn't done and then the "mechanic" wonders why there's a problem w/the engine. In fact I once had a mechanic tell me that it wasn't necessary to check the end gap on new rings as they were manufactured to fit w/out having to check them. This was by a mechanic that worked at a authorized Ford engine rebuilder.

  12. The Following User Says Thank You to katy For This Useful Post:

    Rikk (Jan 15, 2020)

  13. #8
    Supporting Member tonyfoale's Avatar
    Join Date
    Nov 2016
    Location
    Spain
    Posts
    1,626
    Thanks
    734
    Thanked 2,737 Times in 733 Posts

    tonyfoale's Tools
    Quote Originally Posted by Rikk View Post
    Thank you Tony!! ..... your work on bikes is amazing. I've been into old bikes my entire life and gave AHRMA a try years ago on a friends CB350.
    Thanks again!
    After a long layoff from racing I started again and for a couple of years it was with AHRMA but then I came to live in NH in the US for a while and then did most of my racing with the USCRA at Loudon. Insurance got impossible and so in the future I'll be racing here in Spain and other euro countries.

    My comeback ride was at Daytona in 2006, I was only 62 then.

    Piston Ring Locator-aermacchi_on_track_10b.jpg Piston Ring Locator-aermacchi_finishline_01b.jpg Click images for full size.

  14. The Following 4 Users Say Thank You to tonyfoale For This Useful Post:

    lawncutter (Jan 19, 2020), olderdan (Jan 15, 2020), Rikk (Jan 15, 2020), Scotty1 (Sep 2, 2023)

  15. #9
    Rikk's Avatar
    Join Date
    Nov 2018
    Posts
    115
    Thanks
    248
    Thanked 80 Times in 42 Posts

    Rikk's Tools
    Quote Originally Posted by katy View Post
    It's nice to hear that you check the ring's end gap. I've seen several engines where that wasn't done and then the "mechanic" wonders why there's a problem w/the engine. In fact I once had a mechanic tell me that it wasn't necessary to check the end gap on new rings as they were manufactured to fit w/out having to check them. This was by a mechanic that worked at a authorized Ford engine rebuilder.
    Thank you!

    I've been turning wrenches since I was a boy, 49 now, when I was young, my uncles showed me a lot (lost my father when I was little) and when I didn't know how to do something, I bought a manual or found one at the library and actually read it, not just referred to it. I needed the help to learn. My thought then and now is, if there is a spec in the book for something, then it should be verified and made correct.

    I have spent my life as a tool room machinist and manufacturing engineer, I understand that things sometimes make it thorough inspection and might need some tweaking.

    These are just golf carts, but my and my friends business names are on it. Everything gets the same level of attention to detail, be it a golf cart or one of my son's dirt kart racing engines. To me, it provides a mental satisfaction to know I have made it as close to perfect as I can.

  16. The Following 2 Users Say Thank You to Rikk For This Useful Post:

    Paul Jones (Jan 15, 2020), Toolmaker51 (Jan 15, 2020)

  17. #10
    Rikk's Avatar
    Join Date
    Nov 2018
    Posts
    115
    Thanks
    248
    Thanked 80 Times in 42 Posts

    Rikk's Tools
    Quote Originally Posted by tonyfoale View Post
    After a long layoff from racing I started again and for a couple of years it was with AHRMA but then I came to live in NH in the US for a while and then did most of my racing with the USCRA at Loudon. Insurance got impossible and so in the future I'll be racing here in Spain and other euro countries.

    My comeback ride was at Daytona in 2006, I was only 62 then.
    62? Just a pup in racing years. As long as you can crouch and lean, you can still ride.

    I originally did some laps on my friends bike in a parking lot and loved it. He knows I've ridden my entire life and told me if I got my racing license he would let me campaign his bike for a day. So I did and loved it. When time and life permit, I would love to build a bike to run now and again.

Thread Information

Users Browsing this Thread

There are currently 1 users browsing this thread. (0 members and 1 guests)

Bookmarks

Posting Permissions

  • You may not post new threads
  • You may not post replies
  • You may not post attachments
  • You may not edit your posts
  •