Free 186 More Best Homemade Tools eBook:  
Get 2,500+ tool plans, full site access, and more.

User Tag List

Page 1 of 2 1 2 LastLast
Results 1 to 10 of 11

Thread: Pantograph

  1. #1
    Supporting Member mklotz's Avatar
    Join Date
    Aug 2015
    Location
    LA, CA, USA
    Posts
    3,550
    Thanks
    363
    Thanked 6,586 Times in 2,166 Posts

    mklotz's Tools

    Pantograph

    In the dark days before computers, if you wanted to rescale a drawing you had to do it by hand. For small drawings or working from a prototype, a set of proportional dividers were useful. The first photo shows a commercial pair of these neat tools.

    Basically they are a double-ended set of dividers with a pivot point that is movable. By setting the pivot in the right location you can set the ratio between the openings of the two ends of the dividers. The second photo shows detail of the pivot mechanism and the ratio scales engraved on the arms of the tool.


    This tool is still made and sold. You can buy one from MicroMark for a staggering $95.00 ...

    https://www.micromark.com/Proportional-Divider

    (If you want to buy one, search for a better price; MicroMark is notoriously overpriced.)

    They're a great tool but using one to rescale an entire drawing can be very tedious. The tool for that job is the pantograph.

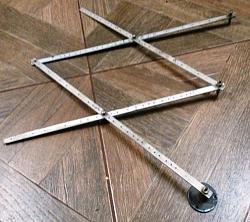
    One of the reasons we have shops is so we can build the toys we couldn't afford when we were kids. As soon as I got some tools capable of working metal I set out to build a pantograph as a good way to teach me how to use those tools. The tool that resulted looks like this...


    The arms are 21" long and made of 3/4 x 1/8" aluminum to keep the weight low. A variety of pivot holes allows the unit to be set to ratios between 1.25:1 to 10:1, roughly the same ratios the proportional dividers can manage.

    This picture...


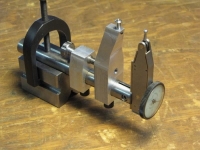
    shows the working end of the tool. On the left is the hold-down which is clamped to the work table while the tool is in use. Attached in the middle to two of the arms is the tracer point with which one traces lines in the source drawing. On the right arm is fixed the pencil lead holder that marks the scaled drawing. If you build one, a better choice for the marker is a felt-tip pen since the pencil can glide and not leave a clear mark on occasion. A weight on the right arm can overcome that but the felt-tip is a better solution. The tracer point and pencil lead holders were salvaged from an old set of drafting instruments.

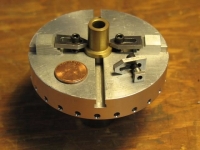
    The junction of the two central arms at the other end of the tool has a gliding foot that rides on the worktable...


    This foot is needed to keep the arms from twisting and binding when the tool is in use.

    All in all, it was a good learning project for a young metalworker and, once done, was actually used in anger on a few occasions to rescale drawings. Of course, today it's as outmoded as a drafting machine but I still hang on to it just to confuse my heirs when they encounter it while throwing out all the rest of the stuff in the shop.

    186 More Best Homemade Tools eBook
    ---
    Regards, Marv

    Failure is just success in progress
    That looks about right - Mediocrates

  2. The Following 17 Users Say Thank You to mklotz For This Useful Post:

    baja (Aug 1, 2020), bobs409 (Jun 19, 2018), DIYer (Jun 19, 2018), emu roo (Jun 8, 2024), Frank S (Jun 16, 2018), Jon (Jun 16, 2018), n9dug (Aug 4, 2020), NortonDommi (Jun 16, 2018), oldcaptainrusty (Jun 16, 2018), philipUsesWood&Brass (Jun 17, 2018), PJs (Jun 16, 2018), Ralphxyz (Aug 6, 2023), Seedtick (Jun 17, 2018), Sleykin (Jun 8, 2022), Toolmaker51 (Jun 18, 2018), vasavoir kikela (Jun 17, 2018), volodar (Jun 17, 2018)

  3. #2
    PJs
    PJs is offline
    Supporting Member PJs's Avatar
    Join Date
    Sep 2014
    Location
    Northern CA
    Posts
    1,844
    Thanks
    8,431
    Thanked 1,129 Times in 725 Posts

    PJs's Tools
    One of the reasons we have shops is so we can build the toys we couldn't afford when we were kids. As soon as I got some tools capable of working metal I set out to build a pantograph as a good way to teach me how to use those tools.
    Nice write up, pics and build.

    and enjoyed the last paragraph...so true.

    All in all, it was a good learning project for a young metalworker and, once done, was actually used in anger on a few occasions to rescale drawings. Of course, today it's as outmoded as a drafting machine but I still hang on to it just to confuse my heirs when they encounter it while throwing out all the rest of the stuff in the shop.
    Told my son awhile back, in the end take what you want and sell or toss the rest and finished with; "When the ship lifts, all debts are paid, No Regrets"...Robert Heinlein.

    Thanks Marv.

    2,500+ Tool Plans
    ‘‘Always do right. This will gratify some people and astonish the rest.’’
    Mark Twain

  4. #3
    Supporting Member ncollar's Avatar
    Join Date
    Oct 2012
    Posts
    354
    Thanks
    23
    Thanked 181 Times in 126 Posts
    Marv
    Love the pantograph and it has enough holes to come up with any ratio.
    I still have my drafting table, my wife wants me to get rid of it because I do not use it anymore.
    Nelson

  5. #4
    Supporting Member Frank S's Avatar
    Join Date
    Aug 2015
    Location
    Peacock TX
    Posts
    11,723
    Thanks
    2,234
    Thanked 9,226 Times in 4,403 Posts

    Frank S's Tools
    Mine is very similar to Marv's A little smaller 2 arms @ 18" 2 @ 20 1/2 by 1/8" aluminum Just about everything else could be taken right out of his eloquent description of how to use it. I lightly stamped letters next to the holes to assist me in determining which hole I wanted from a chart that I made up and is now long gone. Can't remember the last time I used mine.
    Pantograph-20180616_203112.jpgpp.jpg
    Never try to tell me it can't be done
    When I have to paint I use KBS products

  6. #5
    Supporting Member Frank S's Avatar
    Join Date
    Aug 2015
    Location
    Peacock TX
    Posts
    11,723
    Thanks
    2,234
    Thanked 9,226 Times in 4,403 Posts

    Frank S's Tools
    Like I said I can't remember the last time I used mine but if you can get 1 for that price the 1 time you really need it it will be well worth the cost even if you are only transposing at a 1 to 1 ratio using it on an existing part to lay out another one it still has its uses today
    Never try to tell me it can't be done
    When I have to paint I use KBS products

  7. #6
    Supporting Member mklotz's Avatar
    Join Date
    Aug 2015
    Location
    LA, CA, USA
    Posts
    3,550
    Thanks
    363
    Thanked 6,586 Times in 2,166 Posts

    mklotz's Tools
    I couldn't find my notes describing how to calculate the spacing of the holes on the arms of the pantograph so I had to rethink the problem. (That doesn't bother me; frequently, on the second go-around, you'll see simplifications you missed the first time.) I decided to document the process here. That way someone who wants to build one can do it himself and I'll be able to find the derivation the next time I need it. :-)


    The attached diagram shows a pantograph set up for a roughly three to one enlargement. The notation is as follows:

    F = Fixed point
    T = Tracer point
    M = Marker point
    S = Slider point
    P, Q = Pivot points whose locations we wish to calculate

    In the computations, we'll let:

    R = pantograph Ratio

    If R>1, the drawing traced will be enlarged, if R<1 the final drawing will be smaller. In the diagram, R is approximately 3, so a three to one enlargement. The ratio allows us to relate FT and TM thusly...

    FM = R * FT
    TM = FM - FT = FT * (R - 1)

    Whatever, the spacings of the pivot hole P are, they must remain constant as the angle FPT changes; as we trace, we don't move pivot points around as that angle changes. Therefore, if we can calculate them for FPT = a right angle, we'll know them for all angles. Thus, for convenience, the diagram is drawn with FPT as a right angle.

    Now, FPT = 90, then SPT = 90 and, since PSQT is a parallelogram (it must be for the pantograph to work) , all its interior angles are right angles.

    By design, the length of the pantograph arms are equal so FS = SM. This implies that the angles SFM and SMF are equal. Since FSM = 90, it follows that FSM = 45 = FTP and FP = PT.

    Applying Pythagoras to the FPT triangle we now have:

    FP^2 + PT^2 = FT^2

    but FP = PT so:

    2 * FP^2 = FT^2

    or:

    FP = FT/sqrt(2).

    and

    PS = FS - FP = TQ

    So, once you've picked a convenient length for FT based on your maximum value of R and the chosen stick length, FS, you can find FP from FT/sqrt(2) and PS from the latter equation.

    Isn't geometry wonderful?
    Attached Thumbnails Attached Thumbnails Pantograph-001.jpg  
    Last edited by mklotz; Jun 18, 2018 at 03:38 PM.
    ---
    Regards, Marv

    Failure is just success in progress
    That looks about right - Mediocrates

  8. The Following 5 Users Say Thank You to mklotz For This Useful Post:

    baja (Aug 1, 2020), Frank S (Jun 18, 2018), PJs (Jun 18, 2018), Sleykin (Jun 8, 2022), Toolmaker51 (Jun 18, 2018)

  9. #7
    Supporting Member Toolmaker51's Avatar
    Join Date
    Feb 2016
    Location
    Midwest USA
    Posts
    5,338
    Thanks
    7,048
    Thanked 3,020 Times in 1,905 Posts

    Toolmaker51's Tools
    Quote Originally Posted by mklotz View Post
    Isn't geometry wonderful?
    Of all the mathematical techniques, geometry is my true friend, probably from it's visualization of solutions. I'm no wizard...so any process that helps solve itself is better than just useful.
    That it's [mathematics in general] been digitized is more counterproductive than teaching methods of the 60-70's where theory over-rode practical application. I applaud those retaining manual instruments; developing patterns this way is elemental, therefore stimulating. Sketching, bend allowances, webs, fillets and radii, etc become aesthetic considerations, not mere functional requirements.
    If I ever connect with CAD ware, maybe the integration will be smoothed.
    Sincerely,
    Toolmaker51
    ...we'll learn more by wandering than searching...

  10. #8
    Content Editor
    Supporting Member
    DIYer's Avatar
    Join Date
    Aug 2013
    Posts
    3,055
    Thanks
    798
    Thanked 1,897 Times in 1,692 Posts


    Thanks mklotz! We've added your Pantograph to our Measuring and Marking category,
    as well as to your builder page: mklotz's Homemade Tools. Your receipt:


    New plans added on 01/15/2025: Click here for 2,702 plans for homemade tools.

  11. #9
    Jon
    Jon is online now Jon has agreed the Seller's Terms of Service
    Administrator
    Supporting Member
    Jon's Avatar
    Join Date
    Jan 2012
    Location
    Colorado, USA
    Posts
    26,630
    Thanks
    8,157
    Thanked 40,579 Times in 11,860 Posts
    Congratulations mklotz - your Pantograph is the Homemade Tool of the Week!

    This was yet another excellent week around here, with some good tools from both oldtimers and newcomers alike.

    Some nice entries this week:

    Bevel Tool by Stevohdee
    Vise Stop by ruxu
    Wooden Hand Wheel by vasovoir kikela
    Lathe Tool Height Setter by natie123
    Third Hand Clamp Modification by mklotz
    Spin Indexer by vasovoir kikela
    Tap Wrench by Stevohdee
    Lathe Coil Winding Setup by Cascao
    Improvised Tangent Bar by mklotz
    Socket Head Screw Reference Bar by rgsparber
    Hoist by Carlos B
    Solar Panel Bracket by Captainleeward
    Motorcycle Clutch Holding Tool by Cascao
    Plate Weld Test Stand by Frank S
    Mack Transmission Repair Setup by Frank S
    Soft Jaw Parts Holder by Hemi
    Lathe Pipe Center by xynudu
    X Carve V Wheel Adjustment Screw by Downeast Thunder


    mklotz - we've added your tool entry to our All Homemade Tool of the Week winners post. And, you'll be receiving a $25 online gift card, in your choice of Amazon, PayPal, or bitcoin. Please PM me your current email address and gift card choice and I'll get it sent over right away.

    This is your 12th Homemade Tool of the Week win. Here are all of your winning homemade tools:

    New plans added on 01/15/2025: Click here for 2,702 plans for homemade tools.

  12. #10
    Supporting Member ncollar's Avatar
    Join Date
    Oct 2012
    Posts
    354
    Thanks
    23
    Thanked 181 Times in 126 Posts
    Marv
    Congratulation on Tool of the Week
    Nelson

Thread Information

Users Browsing this Thread

There are currently 2 users browsing this thread. (0 members and 2 guests)

Bookmarks

Posting Permissions

  • You may not post new threads
  • You may not post replies
  • You may not post attachments
  • You may not edit your posts
  •