Free 186 More Best Homemade Tools eBook:  
Get 2,500+ tool plans, full site access, and more.

User Tag List

Results 1 to 9 of 9

Thread: Overly complicated vise stop

  1. #1
    Supporting Member
    Join Date
    Jan 2018
    Posts
    73
    Thanks
    0
    Thanked 171 Times in 41 Posts

    petertha's Tools

    Overly complicated vise stop

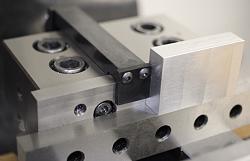
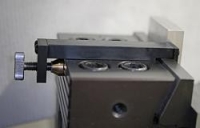
    One advantage of the Kurt mill vises & their lookalikes is that they they have rectangular jaws. They lend themselves to jaw replacement, sacrificial jaws and those clamp-on work stops. I'm a big fan of stops. They help a lot with accuracy as the part can go in & out as often as you like & preserve the same position. Unfortunately my (Bison 5") mill vise has prismatic jaws. I shouldn't complain because its super accurate. But you cant use the typical rectangular clamp on stop due to the taper on the back face & also there is very little lip. I have a stop that comes in from the side but it takes a little longer to set up. When you have little parts around the middle of the jaw, the clamp-on kind of stops are easier.

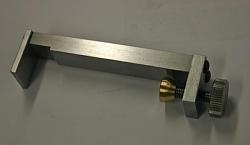
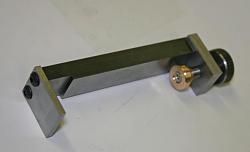
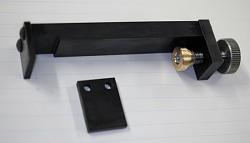
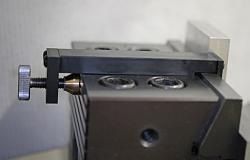
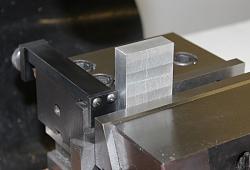
    So I came up with this arrangement. Its basically a steel bar with a bolt on front lip stop. It saved me milling away a bunch of material from solid & gives me flexibility to attach different thicknesses or custom shapes of stop plates if I choose. I had to relieve a notch in the top bar so it would clear the jaw protrusion. The rest lies flat on the top of the vise block. My vise also has big cap screw heads protruding proud on the block but I decided to not relieve for those or there would be little left of the bar to lay flat on. So my range is just a bit limited between the socket heads but it will be fine.

    186 More Best Homemade Tools eBook
    Last edited by petertha; Apr 8, 2019 at 10:36 PM.

  2. The Following 4 Users Say Thank You to petertha For This Useful Post:

    jjr2001 (Apr 9, 2019), Jon (Apr 11, 2019), Paul Jones (Apr 9, 2019), zarembak (Apr 14, 2019)

  3. #2
    Supporting Member
    Join Date
    Jan 2018
    Posts
    73
    Thanks
    0
    Thanked 171 Times in 41 Posts

    petertha's Tools
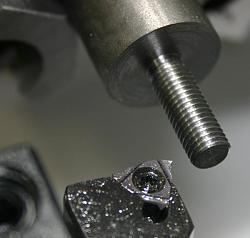
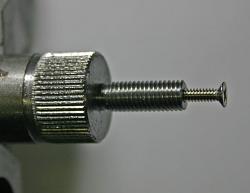
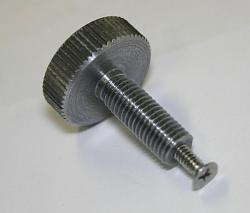
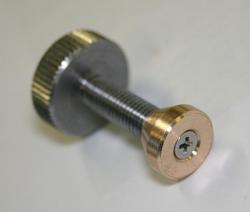
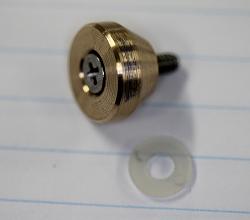
    The overly complicated part comes with the clamping mechanism. Its funny how you take a POS hardware store C-clamp for granted. I wanted a shoe that would clamp tightly, accurately & in-line as much as possible with the stop area. That means the foot has to be able to free rotate about the threaded screw. If its fixed to the screw the whole assembly skates sideways as the shoe makes contacts & torques against the surface. There is a reason why clamp feet are designed this way. Many commercial clamp shoes have a ball in socket which nice, but not easy to replicate. Some are just an open cup with a peened over end on the screw.

    I machined what looks like a big thumbscrew with 1/4-28 TPI threads from 12L14. The end is tapped 4-40 for a flathead 4-40 screw which retains the brass shoe and a nylon spacer washer. It gets blue Loctite so it retains the right clearance fit. The shoe is countersink so the bolt head sits slightly inside.

    Overly complicated vise stop-img_8093_edited-1.jpg
    Overly complicated vise stop-img_8094_edited-1.jpg
    Overly complicated vise stop-img_8095_edited-1.jpg
    Overly complicated vise stop-img_8096_edited-1.jpg
    Overly complicated vise stop-img_1694_edited-1.jpg
    Overly complicated vise stop-img_1695_edited-1.jpg

    2,500+ Tool Plans

  4. The Following 5 Users Say Thank You to petertha For This Useful Post:

    aussie (Jul 22, 2020), Home-PC (Jun 7, 2021), Paul Jones (Apr 9, 2019), Seedtick (Apr 10, 2019), zarembak (Apr 14, 2019)

  5. #3
    Supporting Member
    Join Date
    Jan 2018
    Posts
    73
    Thanks
    0
    Thanked 171 Times in 41 Posts

    petertha's Tools
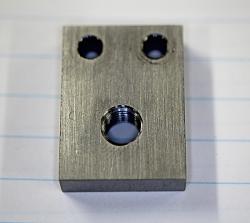
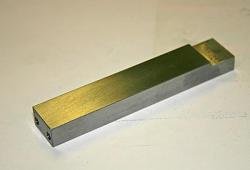
    Clamp body parts. Plain 1018 mild steel. I probably should have machined the surfaces flat but just a bit of hand filing & wet/dry on a glass plate made it acceptable.
    Overly complicated vise stop-img_8097_edited-1.jpg
    Overly complicated vise stop-img_8098_edited-1.jpg
    Overly complicated vise stop-img_8099_edited-1.jpg
    Overly complicated vise stop-img_8100_edited-1.jpg
    Overly complicated vise stop-img_8101_edited-1.jpg

  6. The Following 5 Users Say Thank You to petertha For This Useful Post:

    aussie (Jul 22, 2020), Home-PC (Jun 7, 2021), Paul Jones (Apr 9, 2019), Seedtick (Apr 10, 2019), zarembak (Apr 14, 2019)

  7. #4
    Supporting Member
    Join Date
    Jan 2018
    Posts
    73
    Thanks
    0
    Thanked 171 Times in 41 Posts

    petertha's Tools
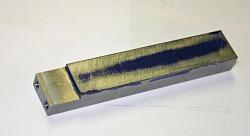
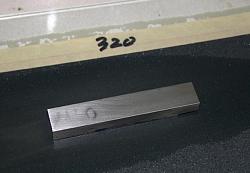
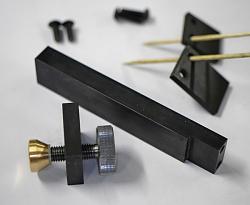
    I made a shorter length stop finger just to give me more options around different parallel heights. And finally the blackening treatment on the bar parts which came out blotch free this time. I think there is something beneficial to those scuff pads as a surface treatment, methanol wipe to remove any oils, handle with rubber gloves etc.

    The more I play with this stop, the more I like it. Its so quick to set up. And it stays put with a very positive grip.

    Overly complicated vise stop-img_1698_edited-1.jpg
    Overly complicated vise stop-img_1699_edited-1.jpg
    Overly complicated vise stop-img_1700_edited-1.jpg
    Overly complicated vise stop-img_1701_edited-1.jpg
    Overly complicated vise stop-img_1714_edited-1.jpg
    Last edited by petertha; Apr 8, 2019 at 10:37 PM.

  8. The Following 14 Users Say Thank You to petertha For This Useful Post:

    123pugsy (Apr 9, 2019), Alan Purdy (Apr 10, 2019), aussie (Jul 22, 2020), bobs409 (Apr 9, 2019), bruce.desertrat (Apr 9, 2019), Harvey Melvin Richards (Apr 9, 2019), high-side (May 16, 2019), Home-PC (Jun 7, 2021), Paul Jones (Apr 9, 2019), Saltfever (Apr 9, 2019), Seedtick (Apr 10, 2019), threesixesinarow (Apr 11, 2019), Toolmaker51 (Apr 10, 2019), zarembak (Apr 14, 2019)

  9. #5
    Supporting Member jjr2001's Avatar
    Join Date
    Jun 2016
    Posts
    945
    Thanks
    1,191
    Thanked 2,134 Times in 570 Posts

    jjr2001's Tools
    Very good looking vise stop. Easy on. Easy off and great for small parts.

    Cheers, JR
    Back to the shop.

  10. #6
    Supporting Member bruce.desertrat's Avatar
    Join Date
    Nov 2017
    Posts
    813
    Thanks
    601
    Thanked 694 Times in 373 Posts

    bruce.desertrat's Tools
    Very nicely done.

  11. The Following User Says Thank You to bruce.desertrat For This Useful Post:

    Paul Jones (Apr 9, 2019)

  12. #7
    Content Editor
    Supporting Member
    DIYer's Avatar
    Join Date
    Aug 2013
    Posts
    3,055
    Thanks
    798
    Thanked 1,897 Times in 1,692 Posts


    Thanks petertha! We've added your Vise Stop to our Vises category,
    as well as to your builder page: petertha's Homemade Tools. Your receipt:


    New plans added on 01/15/2025: Click here for 2,702 plans for homemade tools.

  13. #8
    Supporting Member Toolmaker51's Avatar
    Join Date
    Feb 2016
    Location
    Midwest USA
    Posts
    5,338
    Thanks
    7,048
    Thanked 3,021 Times in 1,905 Posts

    Toolmaker51's Tools
    It's not a "Overly complicated vise stop", you worked around their design to accommodate a needed feature. It [the frame] might have been made one piece; no fun in that. Proof's in the pudding, that it remains in place. Rather critical function for a stop.
    I notice at least one side of the body is drilled and tapped, opening a new opportunity for an extended stop.
    Sincerely,
    Toolmaker51
    ...we'll learn more by wandering than searching...

  14. #9
    Supporting Member
    Join Date
    Jan 2018
    Posts
    73
    Thanks
    0
    Thanked 171 Times in 41 Posts

    petertha's Tools
    Thanks.
    Yes both ends of the top bar are tapped 6-32, same pattern for consistent setup. The front side (with the notch) is intended to accommodate different sized/shaped stops. I just made 2 for now of different depths. For example if I have a thin part, then the appropriate parallel will also be high. So the stop must have a shorter overhang without conflicting with the parallel. The other end of the top bar has the end plate bolted on. I tried to get the center of the clamp foot aligned close to the jaw corner as possible so tightening minimizes any coupling moment. Endless fun for a couple bucks of materials LOL.


    2,500+ Tool Plans

Thread Information

Users Browsing this Thread

There are currently 1 users browsing this thread. (0 members and 1 guests)

Bookmarks

Posting Permissions

  • You may not post new threads
  • You may not post replies
  • You may not post attachments
  • You may not edit your posts
  •