Free 186 More Best Homemade Tools eBook:  
Get 2,500+ tool plans, full site access, and more.

User Tag List

Results 1 to 10 of 10

Thread: Outboard Support; Horizontal Bandsaw

  1. #1
    Supporting Member Toolmaker51's Avatar
    Join Date
    Feb 2016
    Location
    Midwest USA
    Posts
    5,338
    Thanks
    7,048
    Thanked 3,020 Times in 1,905 Posts

    Toolmaker51's Tools

    Outboard Support; Horizontal Bandsaw

    My employer builds machinery for baking industry on weldments of .180 wall 1.5 x 3 rectangular tubing. Our machine tools are on modest side. The builders/ mechanics are good on projects; on shop machinery not so inclined. 16 gauge hydraulic shear reportedly wouldn't cut square over it's 48" width, I hadn't used it yet. Now, I needed a smaller 2' x 3' of stainless, a good time for a test. Pulled out a larger remnant with a factory edge on the long side, and did a narrow trim with that edge on fence. Yep, not square. Helllooo, thrust washers aren't snug to blade carrier with the holddown OR wide enough for the slots. Literally scooted away from shear edge with descent of blade, pulling material along with it...So made a couple aluminum spacers, flanked by hard washers under new bolts and a bronze thrust washers riding the holddown. No lightning, thunderclap, apparition, not even fairy dust. IT'S SQUARE NOW! Easy visual check; material against fence, is cut is plumb to shear edge? Check both sides that there isn't some wacky parallelogram going on.
    Or the horizontal bandsaw. [shop hand] "...that saw can't cut square". [me] Sure, stand for long material isn't level and parallel with table. [shop hand] "Oh". [me]....and the roller's bearings fall out, there are four flat legs on the floor, and the upright isn't vertical, wanna bet on what is wrong?
    Yes, that description is copied from my "Miter Datumizer" of a couple days prior. A new company, I spend a lot of time shaking out illogical conditions. I'll never understand how whatever verbal exchanges are made at hiring; some people don't practice what they've learned over the years for tasks, only used as ammunition to land a job.

    I use definite, tactical methods to get things done; not fast, maybe not best, but right. "Right" has a lot of leeway. Looked over our material, visualizing combinations offering a solid solution.
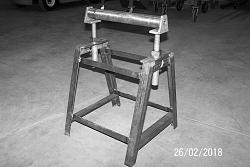
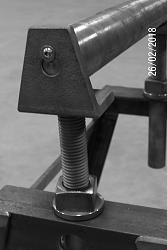
    Here is the result. Frame is 1/8" x 1 3/4" x 1 3/4" angle, spreaders 1/4" x 1", roller is .187 wall x 2" x 16" tubing plugged with cold rolled steel about a 1 1/2" deep, bronze bushings on 5/8" shaft, vertical adjustment by 2 lengths of 1"-8 TPI all-thread and square nuts, attached to roller supports of 2" x 3" angle. This shown in the extended position, before leveling. Angles cut are all 15 or 90, the feet contact floor 100%. Roller and supports built first, to gauge final height and adjustment desired, before cutting legs. We handle some rather heavy stock, wimpy yoke style support was NOT my goal.
    Outboard Support; Horizontal Bandsaw-outboard-support_1.jpg
    Shaft is captive by 10-32 machine screws at each end. One plug is press fit, slip fit on the other to make bushing replacement easier, as entire roller assembly slips free from the frame. Using two nuts on washers allow leveling in the Y axis after X is corrected.
    Outboard Support; Horizontal Bandsaw-outboard-support_2.jpg
    After setting, I dropped a chalkline to represent fixed jaw of saw, so as distance from saw varies, the flat and level planes remain close to correct. It's hidden by shadow in pic, visible by operator though.
    Outboard Support; Horizontal Bandsaw-outboard-support_3.jpg
    This all makes repeated cuts dependable; all pieces now so square, facing or profile milling is eliminated or reduced.

    186 More Best Homemade Tools eBook
    Sincerely,
    Toolmaker51
    ...we'll learn more by wandering than searching...

  2. The Following 5 Users Say Thank You to Toolmaker51 For This Useful Post:

    Frank S (Feb 27, 2018), Jon (Feb 27, 2018), PJs (Feb 27, 2018), rlm98253 (Feb 27, 2018), Seedtick (Feb 27, 2018)

  3. #2
    PJs
    PJs is offline
    Supporting Member PJs's Avatar
    Join Date
    Sep 2014
    Location
    Northern CA
    Posts
    1,844
    Thanks
    8,431
    Thanked 1,129 Times in 725 Posts

    PJs's Tools
    Nicely built and heavy duty TM51. That won't be walking away soon and be able to forever make square cuts on both tools. Seems to me like you take seriously my buddy Mark Twain below. Hopefully the Boss appreciates that kind of work! Thanks TM, Real nice story too.

    2,500+ Tool Plans
    ‘‘Always do right. This will gratify some people and astonish the rest.’’
    Mark Twain

  4. #3
    Content Editor
    Supporting Member
    DIYer's Avatar
    Join Date
    Aug 2013
    Posts
    3,055
    Thanks
    796
    Thanked 1,895 Times in 1,690 Posts


    Thanks Toolmaker51! We've added your Horizontal Bandsaw Support Stand to our Metalworking category,
    as well as to your builder page: Toolmaker51's Homemade Tools. Your receipt:


    New plans added on 01/06/2025: Click here for 2,686 plans for homemade tools.

  5. #4
    Supporting Member Toolmaker51's Avatar
    Join Date
    Feb 2016
    Location
    Midwest USA
    Posts
    5,338
    Thanks
    7,048
    Thanked 3,020 Times in 1,905 Posts

    Toolmaker51's Tools

    The saga continues. Horizontal Bandsaw Support, chapter II

    Horizontal Bandsaw Support; Part II.
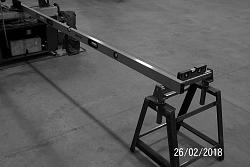
    As described above, our cutting operation needed attention. The heavy support came to be in use immediately, on project that triggered design and build of it. Knew a secondary stand would be important for feeding long stock and/ or those on the cut side. Existing spare support used to be of HFT design and manufacture, all know how long [short] that continues. HMT.net holds plenty of our re-engineering creations for that company.
    At 26" minimum it was still too high for the import horizontal bandsaw. Not any more!
    Outboard Support; Horizontal Bandsaw-base-finito.jpg
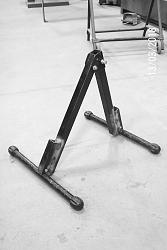
    By sectioning both legs, it's now about 20" minimum, with roller in place.
    Outboard Support; Horizontal Bandsaw-foot-leg.jpg Of thin square tubing, re-machining didn't look promising or all that worthwhile. The sections were welded back on; alongside the outer face of the legs, almost no effort expended.
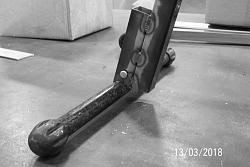
    Outboard Support; Horizontal Bandsaw-closeup-1-.jpg 'Feet' re-attached in same manner as before. You might mock up first, and find amount to bevel legs.
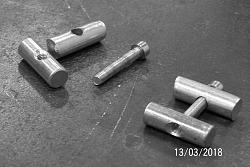
    Their design has a 'clever' [?] accommodation, connecting down tube legs with crossed tube 'feet'. 2 small lengths of 10mm round stock are used in both joints. 1 is drilled through 6mm, the other tapped likewise. Drilled one creates a seat for cap screw, when placed in round tube 'foot', which is drilled through clearance size of cap screw head. Tapped one sits in a cross drilled hole of square tube above a radiused seat for round side. Sorry; picture's worth 1000 words, but none of us have X-ray vision.
    Outboard Support; Horizontal Bandsaw-connectors.jpg
    Tip 1. Tack tubes assembled and with stand upright; insure all four rubber caps will actually touch floor. I only did so partially tightened, had to massage positions afterward.
    Once welds were complete, that showed excess of the roller post adjustment that could be removed to get below deck height of saw.
    Tip 2. Be prepared to modify saw base now too; very light weight and entirely inadequate leveling hardware.
    I'll post that next, in this thread. It's 2300, I'm up at 0440.
    Sincerely,
    Toolmaker51
    ...we'll learn more by wandering than searching...

  6. The Following 5 Users Say Thank You to Toolmaker51 For This Useful Post:

    Jon (Mar 15, 2018), PJs (Mar 15, 2018), Seedtick (Mar 15, 2018), thehomeengineer (Mar 15, 2018), will52100 (Mar 15, 2018)

  7. #5
    Supporting Member thehomeengineer's Avatar
    Join Date
    Nov 2017
    Location
    Berkshire UK
    Posts
    742
    Thanks
    751
    Thanked 2,204 Times in 431 Posts

    thehomeengineer's Tools
    Hi Toolmaker51

    Really like the clamp arrangement can see myself using this great idea. Ideal for taken things apart for storage and very quick to reassemble when needed
    Thank you for sharing

    The Home Engineer

  8. The Following User Says Thank You to thehomeengineer For This Useful Post:

    Toolmaker51 (Mar 15, 2018)

  9. #6
    Supporting Member will52100's Avatar
    Join Date
    Oct 2015
    Location
    Bassfield, MS
    Posts
    122
    Thanks
    748
    Thanked 72 Times in 37 Posts

    will52100's Tools
    Neat idea. I've modified 4 of those exact stands, I cut the legs shorter and drilled a hole and ground a half round to match the original foot attachment, why I didn't think of doing it the way you did I have no idea, would have been faster and easier.
    courtneyknives.net

  10. #7
    Supporting Member Toolmaker51's Avatar
    Join Date
    Feb 2016
    Location
    Midwest USA
    Posts
    5,338
    Thanks
    7,048
    Thanked 3,020 Times in 1,905 Posts

    Toolmaker51's Tools

    As if I & II weren't enough; Horizontal Bandsaw Support, chapter III

    Continued, Horizontal Bandsaw Support; Part II.
    Tip 2. Be prepared to modify saw base also; very light weight and entirely inadequate leveling hardware.

    The saw department, of which all of you are now intimately familiar, machine has a cast table and saw frame, bolted to a formed sheet metal stand. While I've presented this out of order, they depend on each other to produce cuts that satisfy me.
    This all started, trying to manipulate heavy material into the saw and get a square cut.
    Well, it wasn't leveling out.
    Well, I'll level it. Combined weight of saw [300 lbs.] and material wouldn't have it! The nerve!
    Despite careful work with accurate bubble level and wrenches, changes were not registering......not well at all.
    Shouldn't 4 individual leveling pads threaded 3/8-16, be sufficient to lift combined weight, yes? Yeah, if threaded portion of the base is sturdy, which decidedly is NOT! It looks like 16 gauge....[maybe 18 gauge material and 2 equivalent gauges of textured paint, lol]. The so called threads were pierced into the sheetmetal, not even a welded nut! So, jacking the levelers only deformed the lower structure, nice.
    So job went on hold whilst fixing what should have been built into a "Professional Series" machine. Maybe they'd best spend on a decent cabinet instead of a fancy plaque. An embossed raging bear doesn't impress me at all; proper design/ hardware does.

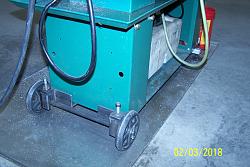
    My solution isn't going to make the machinery company jealous, but might direct a little extra profit towards my employer with efficiency and better utilized materials. As with most smaller horizontal bandsaws, there are 2 wheels, 2 leveling pads, and a handle for trundling it around. Sometimes we get big machines in and have to adjust the floor plan for room to work; meaning the wheels should be retained. They're on a solid axle and no means of leveling, countering ability of 2 leveling pads in front.
    So this now has a 'suspension' for lack of a better term, not sprung, but can be leveled.
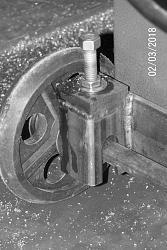
    Outboard Support; Horizontal Bandsaw-wheels-levelers.jpg The vertical square tube is slotted, the hex bolt bears on a slug of round stock [fitted inside square tube] drilled to admit the axle. After bolting assembly to underside, I sat front end on a short heavy pipe laying on it's side. That allowed getting the plane level across the saw table [perpendicular to blade] front being able to rock right or left.
    Outboard Support; Horizontal Bandsaw-jack-closeup.jpg
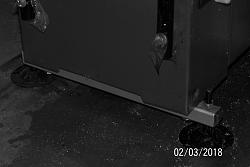
    Next, attached spreader to underside with leveling pads and finished leveling long wise. Outboard Support; Horizontal Bandsaw-levelers.jpg
    Now I had a measurable height and 2 level axis to produce outboard supports.

    The End

    Speaking of embossed plaques and such nonsense.
    When machine tools [and companies in general] carried names of people, that signaled confidence, endurance and well earned pride. Some still do. LeBlond, Lodge & Shipley, DeVleig, Pratt & Whitney, Cleereman, Gisholt, Gray, Peck-Stow-Wilcox, Sundstrand, Kearney & Trecker, Moore, Hardinge, Brown & Sharpe, Taft & Peirce, Niles, Bennett, Pond, Bullard, A. Herbert, Warner & Swazey...warning! rabbit hole! https://en.wikipedia.org/wiki/Catego..._tool_builders
    One more treat, HMT.net friends, little bit of Johnny Cash. Heavy Metal (Don't Mean Rock and Roll to Me) Google that phrase.
    Sincerely,
    Toolmaker51
    ...we'll learn more by wandering than searching...

  11. The Following 2 Users Say Thank You to Toolmaker51 For This Useful Post:

    Frank S (Mar 16, 2018), PJs (Mar 16, 2018)

  12. #8
    Supporting Member Frank S's Avatar
    Join Date
    Aug 2015
    Location
    Peacock TX
    Posts
    11,716
    Thanks
    2,228
    Thanked 9,207 Times in 4,399 Posts

    Frank S's Tools
    undersized machine bases have always mystified me. I know of many very well built high quality machines with horribly inadequate bases under them it is almost as if the base was an after thought.. I have a Syracuse Engelburg 3 x 120" belt sander which can not stand alone on its own base when switched on the machine is well over 6 ft tall with a single triangle shaped foot that only measures around 18" by 15" to cap that off someone added a huge dust collector duct to the shroud making it even more unstable. Before I got the machine the cast iron base had either been broken off or probably sawed of and brazed back on 90° to original placement. someday when I get around to needing it I will have to address the situation before I can use it.
    Never try to tell me it can't be done
    When I have to paint I use KBS products

  13. #9
    Supporting Member
    Join Date
    Mar 2013
    Location
    Perth Western Australia
    Posts
    78
    Thanks
    25
    Thanked 73 Times in 29 Posts

    Peter Sanders's Tools
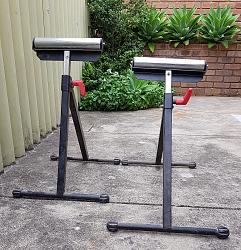
    I just cut a different angle at the top of the square tube that swings out. This allows the base to spread out further and lowers the overall height of the support roller. This suited my horizontal bandsaw height, the support was lowered about 75mm/3", that was all I needed.Outboard Support; Horizontal Bandsaw-20180317_094144.jpg

  14. The Following 3 Users Say Thank You to Peter Sanders For This Useful Post:

    Jon (Mar 17, 2018), PJs (Mar 18, 2018), Toolmaker51 (Mar 16, 2018)

  15. #10
    Supporting Member Toolmaker51's Avatar
    Join Date
    Feb 2016
    Location
    Midwest USA
    Posts
    5,338
    Thanks
    7,048
    Thanked 3,020 Times in 1,905 Posts

    Toolmaker51's Tools
    Quote Originally Posted by Peter Sanders View Post
    I just cut a different angle at the top of the square tube that swings out. This allows the base to spread out further and lowers the overall height of the support roller. This suited my horizontal bandsaw height, the support was lowered about 75mm/3", that was all I needed.Click image for larger version. 

Name:	20180317_094144.jpg 
Views:	302 
Size:	483.0 KB 
ID:	22751
    When leveling project started, parts I,II, & III, splaying the angle came to mind. Our height is 22.5''. Looking at materials we stock, concern of weight vs how thin folding stand's tubing of is, made choice in favor of safety. Most times, any support bears a load before the saw does.
    Folding stand works on either side, wanted some beef on cut-off side. Besides the rectangular tubing, we cut 6 & 8 " C-channel, 1/2" wall 3" pipe, 1/2" x 6" plate, 3/8" angle...Round stock has greatest potential of losing control, and all the weight is concentrated on a single contact point. The heavy stand can take it without indenting, and short guards at roller ends.


    2,500+ Tool Plans
    Last edited by Toolmaker51; Mar 16, 2018 at 09:47 PM.
    Sincerely,
    Toolmaker51
    ...we'll learn more by wandering than searching...

  16. The Following User Says Thank You to Toolmaker51 For This Useful Post:

    PJs (Mar 18, 2018)

Thread Information

Users Browsing this Thread

There are currently 1 users browsing this thread. (0 members and 1 guests)

Tags for this Thread

Bookmarks

Posting Permissions

  • You may not post new threads
  • You may not post replies
  • You may not post attachments
  • You may not edit your posts
  •