Free 186 More Best Homemade Tools eBook:  
Get 2,500+ tool plans, full site access, and more.

User Tag List

Page 2 of 3 FirstFirst 1 2 3 LastLast
Results 11 to 20 of 29

Thread: Optical Center Punch Self Holding Punch

  1. #11
    Supporting Member Saltfever's Avatar
    Join Date
    Apr 2012
    Location
    NorCal
    Posts
    412
    Thanks
    406
    Thanked 146 Times in 104 Posts

    Saltfever's Tools
    Thanks for the link. Yes, the suggested Mini LED would make for a much nicer and compact device. Although I am not fond of any button style battery since they tend to be more expensive than your garden variety AAA. Good idea about reducing brightness on the HF light. The HF light is about .995" diameter which I assume is a bit less than the loupe. I'm not sure which light I will use. Also, ambient light, through an empty hole(s) may be enough. I would aim the hole(s) at the cross-hair area. Anyway, a nice project and your great idea I will get to eventually.

    186 More Best Homemade Tools eBook

  2. #12
    Supporting Member jjr2001's Avatar
    Join Date
    Jun 2016
    Posts
    939
    Thanks
    1,190
    Thanked 2,128 Times in 566 Posts

    jjr2001's Tools

    Optical Punch Version 2.1

    Another minor mod to the optical center punch. I removed a small rectangle from the bottom of the punch. I thought the acrylic line at the bottom was interfering with the sighting in of the center punch. Just used a 3/8 emd mill and put in a slot down the back side and across the bottom. Left the base nice and solid so it does not tip over.

    Cheers, JR
    Attached Thumbnails Attached Thumbnails Optical Center Punch Self Holding Punch-optical_2_1.jpg  

    2,500+ Tool Plans

  3. #13
    Supporting Member jjr2001's Avatar
    Join Date
    Jun 2016
    Posts
    939
    Thanks
    1,190
    Thanked 2,128 Times in 566 Posts

    jjr2001's Tools

    Great Little Lite for the Optical Center Punch

    I just received my quite small, pocketable or keychain, led flashlight from here:

    Useful Stream Light Micro Mini LED Super Bright Flashlights Keychain EDC Tool | eBay

    It works very well as is for a bright spot lite to see small details in your work. Have not used it long enough to judge the quality but hey for 1 buck including shipping it is worth a try.

    Cheers, JR

  4. The Following User Says Thank You to jjr2001 For This Useful Post:

    Paul Jones (Oct 1, 2016)

  5. #14
    YOUCARS's Avatar
    Join Date
    May 2016
    Posts
    13
    Thanks
    87
    Thanked 1 Time in 1 Post
    Thanks, I will make one of these.

  6. The Following User Says Thank You to YOUCARS For This Useful Post:

    jjr2001 (Dec 29, 2017)

  7. #15
    Supporting Member jjr2001's Avatar
    Join Date
    Jun 2016
    Posts
    939
    Thanks
    1,190
    Thanked 2,128 Times in 566 Posts

    jjr2001's Tools
    Thanks, for checking in. I think you will find it very useful.
    Cheers, JR

  8. #16
    Supporting Member garage nut's Avatar
    Join Date
    Jul 2017
    Location
    Port Elizabet, SA
    Posts
    246
    Thanks
    92
    Thanked 443 Times in 109 Posts

    garage nut's Tools
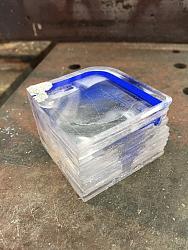
    I also had no ways of getting a block like that, but I have lots of old number plates I have gathered over the years, so I peeled back the sticky backing with the numbers and glued about 20 off 50 x 50 pieces that I cut from the number plates together and this is the result.
    I take it it needs a fairly fast speed in the mill. I have never worked with is stuff.

    Optical Center Punch Self Holding Punch-number-plate-block.jpg

  9. #17
    Supporting Member jjr2001's Avatar
    Join Date
    Jun 2016
    Posts
    939
    Thanks
    1,190
    Thanked 2,128 Times in 566 Posts

    jjr2001's Tools
    Now that is a great way to get a block of plastic.
    I don't remember the speed I used but it was not real fast.
    In my case I step drilled to 5/8" and then bored it to eyepiece diameter.
    I would start out slow and increase the speed until it starts to melt!
    Then back it off a bit to prevent the plastic from melting.
    A few formulas from the net. SFM for plastic about 100
    R.P.M. = (3.8197 / Drill Diameter) x S.F.M.
    S.F.M. = 0.2618 x Drill Diameter x R.P.M.
    I.P.M. = I.P.R. (feed) x R.P.M. (speed)

    I found this chart on the net which has drilling speeds for different types of material.
    Drill Bit Speed

    Cheers, JR
    Last edited by jjr2001; Dec 31, 2017 at 06:40 AM.

  10. The Following User Says Thank You to jjr2001 For This Useful Post:

    garage nut (Dec 31, 2017)

  11. #18
    Supporting Member garage nut's Avatar
    Join Date
    Jul 2017
    Location
    Port Elizabet, SA
    Posts
    246
    Thanks
    92
    Thanked 443 Times in 109 Posts

    garage nut's Tools
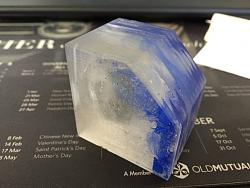
    Chose a brand new 10mm end mill and the mill was still set on 900 rpm. finish was good so stuck to it. According to that chart it was smack on.

    Optical Center Punch Self Holding Punch-number-plate-block-machined.jpg

    Reading my mind... my next question was going to be how to get a 20mm diameter hole for the optic. Biggest I have is a 16.
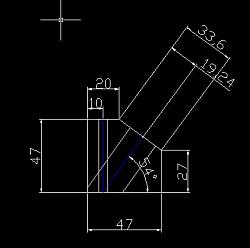
    Optical Center Punch Self Holding Punch-punch-block-my-sizes.jpg

    Just my sizes seeing I started with 50mm rough. It cleaned up at 47mm.

  12. #19
    Supporting Member jjr2001's Avatar
    Join Date
    Jun 2016
    Posts
    939
    Thanks
    1,190
    Thanked 2,128 Times in 566 Posts

    jjr2001's Tools
    Looks good. Keep us posted.

    Cheers

  13. #20
    Supporting Member mklotz's Avatar
    Join Date
    Aug 2015
    Location
    LA, CA, USA
    Posts
    3,549
    Thanks
    363
    Thanked 6,582 Times in 2,166 Posts

    mklotz's Tools
    I don't do much accurate center-punching anymore; coordinate drilling is easier and more accurate. But, when I was starting out, I did enough of it to learn a few things that I'd like to pass along here. These are just observations that others may find useful. PLEASE DO NOT CONSTRUE ANYTHING I WRITE HERE AS CRITICISM OF JR'S DESIGN. With that said (and hopefully taken to heart by all), let me proceed.

    Looking at the location of the punch tip from an angle never worked well for me. I decided that a more vertical, magnified view of the location would make things easier to see. To that end, I attached the magnifier close to the punch axis and above the punch tip.


    This worked a bit better but was a bit tricky to hold; I knew there must be something better.

    I realized that magnification wasn't really necessary in most cases. Almost all the prick punching was done at the intersection of layout lines. If we could locate the punch using the lines themselves rather than trying to hit their intersection, everything would be easier. So, when I ran across this commercial product...


    I knew I had found the holy grail of punch locating. :-) The punch is spring-loaded and resides permanently in the base. [Thus avoiding the major complaint associated with the devices that have magnifiers and punches that must be interchanged in a single hole. A major feature of JR's design is eliminating that undesirable design feature.] Scribed in a recess in the base (see next photo) are two lines. When these lines are aligned to the scribe lines, the punch sits directly over their intersection point. A slight tap with a small hammer marks the point well enough to be found by touch with a center punch.

    The recess in the base in which the lines are scribed is important. The base will become scratched from contact with metal but the lines in the recess are immune to that scratching so they will remain very visible.


    I no longer remember where I bought this device so I took a photo of its box top; that's all the information I have on it.


    Later I realized that, while four lines pointing at the intersection are helpful, you really only need two. This observation makes it simple to machine your own version of the device from more durable metal as I did in the photos below...


    ---
    Regards, Marv

    Failure is just success in progress
    That looks about right - Mediocrates

  14. The Following 3 Users Say Thank You to mklotz For This Useful Post:

    blkadder (Feb 25, 2024), jjr2001 (Jan 1, 2018), Ralphxyz (Feb 25, 2024)

Thread Information

Users Browsing this Thread

There are currently 1 users browsing this thread. (0 members and 1 guests)

Tags for this Thread

Bookmarks

Posting Permissions

  • You may not post new threads
  • You may not post replies
  • You may not post attachments
  • You may not edit your posts
  •