Free 186 More Best Homemade Tools eBook:  
Get tool plans

User Tag List

Page 1 of 2 1 2 LastLast
Results 1 to 10 of 14

Thread: One liners

  1. #1
    Supporting Member mklotz's Avatar
    Join Date
    Aug 2015
    Location
    LA, CA, USA
    Posts
    3,527
    Thanks
    362
    Thanked 6,559 Times in 2,161 Posts

    mklotz's Tools

    One liners

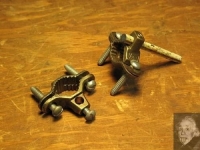
    This style of electrical grounding clamps make good lathe dogs. All you need to do is add a short driver rod to fit against the chuck jaw.


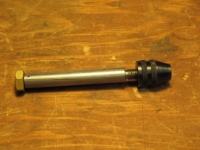
    One of those small adjustable Dremel chucks fitted to a length of tube with a spinner makes a neat little pin vise.


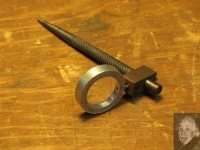
    A small magnifying lens mounted to your prick punch will make marking out a bit easier. Use a bit of heavy copper wire as the mount to allow for fine tuning the focus.


    A sawed-off toothbrush head held to the carriage with a magnet will keep the lead screw free of swarf.


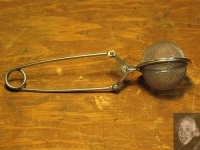
    A tea ball makes a great constrainer for cleaning small parts in solvent.


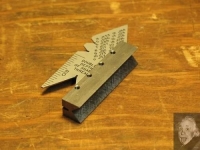
    Fitting your fishtail gage with a tiny V-block will make holding it square to the workpiece much easier.


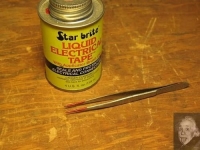
    Liquid electrical "tape" applied to tweezer ends will make them tacky and prevent small parts going "sproing".


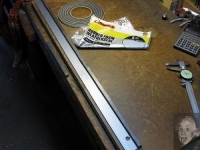
    Soft, self-adhesive foam weather stripping applied at the edge of the workbench will make a forearm-friendly fence to prevent small parts rolling off.


    Download plans for lathes.
    Last edited by mklotz; Jul 10, 2017 at 05:36 PM.
    ---
    Regards, Marv

    Failure is just success in progress
    That looks about right - Mediocrates

  2. The Following 45 Users Say Thank You to mklotz For This Useful Post:

    almarghi (Oct 25, 2022), astroscuba (Oct 18, 2023), baja (Jul 12, 2019), BuffaloJohn (Nov 5, 2023), Christophe Mineau (Oct 26, 2022), clavius (Jul 18, 2022), clydeman (Jun 28, 2024), dgbreggin (Jul 27, 2022), drivermark (Nov 4, 2023), durrelltn (Nov 6, 2022), emu roo (Nov 3, 2022), freddo4 (Apr 21, 2023), guitwar (Jul 20, 2024), HobieDave (Mar 12, 2020), Home-PC (Mar 8, 2023), j.bickley (Apr 27, 2024), jjr2001 (Nov 1, 2018), Jon (Sep 1, 2015), kbalch (Sep 1, 2015), lassab999 (Oct 26, 2020), lavern s (Mar 8, 2023), Make Everything (Nov 5, 2017), Moby Duck (Nov 2, 2023), mr mikey (Nov 2, 2023), mwmkravchenko (Oct 25, 2022), neilbourjaily (Jul 15, 2022), odd one (Jul 26, 2022), oldcaptainrusty (Oct 18, 2017), papa bill2 (Jun 20, 2024), PJs (Sep 2, 2015), rendoman (Aug 6, 2016), rlm98253 (Nov 2, 2017), Scotsman Hosie (Jul 13, 2019), Sleykin (Dec 27, 2023), stubb (Jul 10, 2019), that_other_guy (Nov 18, 2022), thevillageinn (Jul 16, 2022), Tonyg (Jul 10, 2019), Toolmaker51 (Mar 14, 2017), trevor_60_r (Nov 18, 2022), uv8452 (Jul 15, 2022), whitebear (May 5, 2024), will52100 (Jul 9, 2019), WmRMeyers (Mar 10, 2024), yvonf (Nov 18, 2022)

  3. #2
    kbalch's Avatar
    Join Date
    Jun 2012
    Location
    Clermont, FL
    Posts
    5,034
    Thanks
    2,275
    Thanked 532 Times in 384 Posts
    Thanks Marv! I've added your Lathe Dogs, Lead Screw Cleaner, Pin Vise, and Punch Magnifier to, respectively, our Lathe Accessories, Vises, and Measuring and Marking categories, as well as to your builder page: mklotz's Homemade Tools. Your receipt:

    Download plans for lathes.

  4. The Following User Says Thank You to kbalch For This Useful Post:

    boggybud (Nov 4, 2022)

  5. #3
    kbalch's Avatar
    Join Date
    Jun 2012
    Location
    Clermont, FL
    Posts
    5,034
    Thanks
    2,275
    Thanked 532 Times in 384 Posts
    Thanks Marv! I've added your Small Parts Cleaner, Fishtail Gauge, Tweezer Modification, and Workbench Modification to, respectively, our Cleaning, Measuring and Marking, Workholding, and Workbenches categories, as well as to your builder page: mklotz's Homemade Tools. Your receipt:


  6. #4
    Supporting Member
    Join Date
    Aug 2020
    Posts
    236
    Thanks
    3
    Thanked 25 Times in 22 Posts
    great ideas here

  7. #5
    Supporting Member mwmkravchenko's Avatar
    Join Date
    Nov 2017
    Location
    Perth Ontario Canada
    Posts
    1,042
    Thanks
    5,272
    Thanked 394 Times in 280 Posts
    Pictures don't do the ideas enough justice. Thanks Marv!

  8. The Following User Says Thank You to mwmkravchenko For This Useful Post:

    stanb0101 (Aug 12, 2024)

  9. #6
    Supporting Member mklotz's Avatar
    Join Date
    Aug 2015
    Location
    LA, CA, USA
    Posts
    3,527
    Thanks
    362
    Thanked 6,559 Times in 2,161 Posts

    mklotz's Tools
    Quote Originally Posted by mwmkravchenko View Post
    Pictures don't do the ideas enough justice. Thanks Marv!
    If you would like me to expound on anything, just indicate which ideas and what further explanation you would like. I'll try to answer your questions.
    ---
    Regards, Marv

    Failure is just success in progress
    That looks about right - Mediocrates

  10. #7
    Supporting Member mwmkravchenko's Avatar
    Join Date
    Nov 2017
    Location
    Perth Ontario Canada
    Posts
    1,042
    Thanks
    5,272
    Thanked 394 Times in 280 Posts
    I think I understand them all well enough. The drive dog I had to think about a little. Are you holding a centre in the chuck and then clamping the ground clamp onto the object you wish to drive?

  11. #8
    Supporting Member mklotz's Avatar
    Join Date
    Aug 2015
    Location
    LA, CA, USA
    Posts
    3,527
    Thanks
    362
    Thanked 6,559 Times in 2,161 Posts

    mklotz's Tools
    Quote Originally Posted by mwmkravchenko View Post
    I think I understand them all well enough. The drive dog I had to think about a little. Are you holding a centre in the chuck and then clamping the ground clamp onto the object you wish to drive?
    Yes, exactly. With the work held between centers, there are a number of ways to drive the work. Most "dogs" consist of something that clamps to the work; drive force can come from a pin projecting from a face plate mounted behind the center. Sometimes the pin is integral to the dog and fits into a slot in the face plate.

    When I need to work between centers I like to have the 3jaw mounted. A piece of steel clamped in the chuck is turned to a 60 degree point. This approach guarantees that the center is perfectly aligned with the rotation axis of the lathe spindle. If the stock I'm turning permits, the chuck end of the stock is drilled to accept a Loctited pin that is driven by the chuck jaws. With no projecting dog bits spinning about this approach is much safer than the conventional dog. Of course, if that technique isn't possible, I use the dog shown in the picture.
    ---
    Regards, Marv

    Failure is just success in progress
    That looks about right - Mediocrates

  12. The Following User Says Thank You to mklotz For This Useful Post:

    mwmkravchenko (Oct 26, 2022)

  13. #9
    Supporting Member drivermark's Avatar
    Join Date
    Nov 2016
    Location
    Oregon City, Or. USA
    Posts
    281
    Thanks
    154
    Thanked 102 Times in 73 Posts
    Quote Originally Posted by mwmkravchenko View Post
    Pictures don't do the ideas enough justice. Thanks Marv!
    +1

    Had to add at least 10 characters to post.

  14. #10
    Supporting Member
    Join Date
    Feb 2017
    Posts
    126
    Thanks
    15
    Thanked 67 Times in 45 Posts
    Quote Originally Posted by mklotz View Post
    Yes, exactly. With the work held between centers, there are a number of ways to drive the work. Most "dogs" consist of something that clamps to the work; drive force can come from a pin projecting from a face plate mounted behind the center. Sometimes the pin is integral to the dog and fits into a slot in the face plate.

    When I need to work between centers I like to have the 3jaw mounted. A piece of steel clamped in the chuck is turned to a 60 degree point. This approach guarantees that the center is perfectly aligned with the rotation axis of the lathe spindle. If the stock I'm turning permits, the chuck end of the stock is drilled to accept a Loctited pin that is driven by the chuck jaws. With no projecting dog bits spinning about this approach is much safer than the conventional dog. Of course, if that technique isn't possible, I use the dog shown in the picture.
    Pretty cool, Marv. This suggests a number of different approaches to making a whole set of lathe dogs that solve the age old problem of 3 jaw chuck runout. A given set would be custom for just that chuck and it's custome worn scroll.. But it's really just an afternoon's work of relatively simple machining. You color code each set for one specific chuck. When the price of a new Bison chuck makes that approach out of the question this approach comes to the rescue. Ed Weldon

Thread Information

Users Browsing this Thread

There are currently 1 users browsing this thread. (0 members and 1 guests)

Bookmarks

Posting Permissions

  • You may not post new threads
  • You may not post replies
  • You may not post attachments
  • You may not edit your posts
  •