Free 186 More Best Homemade Tools eBook:  
Get tool plans

User Tag List

Results 1 to 8 of 8

Thread: Moving lighter but cumbersome equipment

  1. #1
    Supporting Member Toolmaker51's Avatar
    Join Date
    Feb 2016
    Location
    Midwest USA
    Posts
    5,334
    Thanks
    7,044
    Thanked 3,011 Times in 1,900 Posts

    Toolmaker51's Tools

    Moving lighter but cumbersome equipment

    So, 48" sheetmetal brake posted in http://www.homemadetools.net/forum/i...al-brake-69323
    followed me home...By calculating material weight, gave estimate of 1200 lbs; just one apron weighs >260.

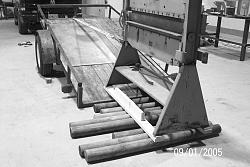
    Thought I'd introduce method of transporting this back from Great Lakes area of Illinois, and been successful in other instances too. The rolls are 'peeler cores', sold mainly to landscapers as retainers for flower beds. Normal length IIRC is 8', also known as 'landscape timbers'. I cut the lot of six into 3' and 5' lengths.

    This brake, at 6' tall, 5' long, only 22'' wide poses a high center of gravity (COG); typical of maybe 80% of machinery. Have no help available. As owner busy closing down shop, interpolated dimensions from his advertisement pics. Arrived and got to down to business by 11pm. removed the four counterweights and arms, loosened cams and blocked forming die from bed.
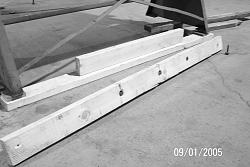
    1] Built two skidding rails, connecting right and left side feet. Lag screwed remainder of 2 x 4 vertically to stiffen them. Great job for cordless tools; if you remember bits and drive sockets. As it turned out, preferred 2x6, there was some bending, yet rib stopped any breakage.
    Moving lighter but cumbersome equipment-formall_1-1-.jpg
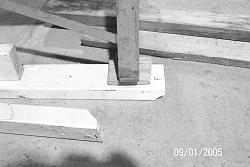
    2] Raise and block each end, place rails under feet, marking anchor holes inside leg with felt tip pen. Removed and pilot drilled 4 places for lags and XX heavy USS washers, then installed. Don't want lags protruding from skid bottom.
    Moving lighter but cumbersome equipment-formall_1-2-.jpg
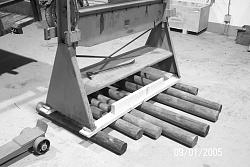
    3] Positioned truck/ trailer centered to longitudinal axis of brake at far end of room. Got brake up on rolls, and other side of room, still aligned.
    Moving lighter but cumbersome equipment-formall_1-3-.jpg
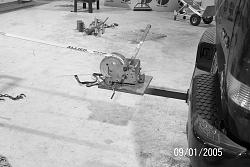
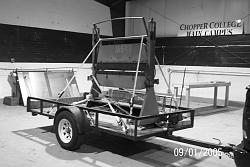
    4] Backed tilt bed trailer within 10'of 1st roll. Blocked wheels fore and aft, disconnected hitch, raised trailer. I have a two speed manual boat winch on a second hitch mount, so paid out all 30' of webbing through trailer. Wrapped length of chain in dunnage around closest machine leg and created loop with grab hook. A slip hook is on other end, so chain can be used both ways.
    Moving lighter but cumbersome equipment-formall_1-4-.jpg
    5] Hooked winch strap to chain and began taking up slack enough for tension and test everything rolls. Truck anchors the winch, chocks anchor the trailer. Two hardwood wedges help rolls make transition floor to trailer bed.
    Moving lighter but cumbersome equipment-formall_1-5-.jpg
    6] Winched onto bed, after two tries. Painted floor wouldn't allow chocks to 'bite'. Found carpet padding in empty office, did the trick. Once the trailer stayed in place, able to continue reeling onboard bed. I had measured overall length of brake and knew ahead of time when 50% of weight would be over axle. Then used that figure to position 60% forward when bed righted itself. calculation was barely an inch off..
    Moving lighter but cumbersome equipment-formall_1-6-.jpg
    7] Began tying load down. Care is needed, due high COG to arrest ANY tipping motion. Took one full turn of strap around upper shaft on a layer of print paper so they'd cinch up right to left of trailer. The machine paint made too much resistance. Longways still important, but had good rail to bed friction, so they were tied off lower and crossed front to back, each side. Pulled out of building at 630am.
    8] Stopped at first 20, then every 80-90 miles to monitor strap tension. In 540 miles, only one adjustment occurred, at first 20. That's typical as a load settles in. At half way, loosening was no concern and proceeded until just prior last few miles through town. I did flick each strap when stopping for gas. Frank S labeled this a 'text book' move. Yep, bring a lot of tiedowns; and use them all!
    9] Unloading is far easier. Positioned rolls at trailer threshold, after untying and barring load back with the wheeled Johnson truck. Trailer tilted back so gradually is was almost quiet. Barring back is a great back saver, (thank you gravity) using a ratchet strap for a brake (ha, take that gravity).

    My trailer is on the lightweight side, but have designed some attachments for whatever next exercise occurs. Tilt bed or not, a tongue jack would help. A secondary winch mount on tongue. Considering cut-off top rail of 11/2" angle iron for 2" tubing. Added anchor loops or E-track on perimeter of bed. A small manual crane. 4 rubber pads for chocks...

    On flat and level, I use 1" round stock, plenty OK machines 5,000 pounds or less. The wood rolls distinct advantage, being undeterred by floor imperfections and debris. Pulling into the trailer, one went right over an unnoticed hank of chain. Try that with metal!

    Seems like each post I make gets an edit (or 4), proofreading this time made me laugh...Didn't reset date after replacing battery? I swear this was two weeks ago, not 13 years!

    186 More Best Homemade Tools eBook
    Last edited by Toolmaker51; Sep 26, 2018 at 07:20 PM.
    Sincerely,
    Toolmaker51
    ...we'll learn more by wandering than searching...

  2. The Following 2 Users Say Thank You to Toolmaker51 For This Useful Post:

    KustomsbyKent (Sep 24, 2018), PJs (Sep 25, 2018)

  3. #2
    Supporting Member Frank S's Avatar
    Join Date
    Aug 2015
    Location
    Peacock TX
    Posts
    11,634
    Thanks
    2,186
    Thanked 9,134 Times in 4,366 Posts

    Frank S's Tools
    I see you did go ahead and buy it Judging from its looks and weight I'd say you will be pleased with it
    The duel apron thing is a little odd but will sure save a lot of handling the material when box forming.
    You move looks text book. It is always a challenge when doing these things without assistance. No matter how badly you want to just drag it on toss a few straps and go. Taking your time to skid it was your first wise decision.
    Glad you got it home safely. Next time give me a shout if there is any way possible I'll drive up and lend a hand.
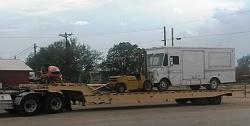
    DO you still have that big forklift you need moved? we have a trailer designed for that kind of stuff now.
    Moving lighter but cumbersome equipment-20180902_173504.jpgvvvv.jpg

    2,000+ Tool Plans
    Never try to tell me it can't be done
    When I have to paint I use KBS products

  4. #3
    Supporting Member KustomsbyKent's Avatar
    Join Date
    Dec 2014
    Location
    South Dakota
    Posts
    249
    Thanks
    2,500
    Thanked 185 Times in 110 Posts

    KustomsbyKent's Tools
    I'm glad you were able to make the purchase, and get it all loaded safely by yourself! Looks like you took the time to do it right. Too bad they didn't have a forklift available.
    Once you get it setup, it'd be great to see some pics/video of it in operation.

    Thanks
    Kent

  5. #4
    Supporting Member bimmer1980's Avatar
    Join Date
    Jan 2018
    Posts
    70
    Thanks
    96
    Thanked 38 Times in 23 Posts

    bimmer1980's Tools
    Awesome, you were able to procure it. thanks for sharing the details on how you got it home.

    Would you mind sharing what you paid for it?

    I will be curious to see it in operation with a project...

  6. #5
    PJs
    PJs is offline
    Supporting Member PJs's Avatar
    Join Date
    Sep 2014
    Location
    Northern CA
    Posts
    1,844
    Thanks
    8,427
    Thanked 1,129 Times in 725 Posts

    PJs's Tools
    Nice write up and pics (w/dates ;-D). Glad you got what you were looking for and got it home safely, no worries! Your Tie down looks exemplary!

    Thanks for sharing and looking forward to seeing what you do with it!!

    PJ
    ‘‘Always do right. This will gratify some people and astonish the rest.’’
    Mark Twain

  7. #6
    Supporting Member Toolmaker51's Avatar
    Join Date
    Feb 2016
    Location
    Midwest USA
    Posts
    5,334
    Thanks
    7,044
    Thanked 3,011 Times in 1,900 Posts

    Toolmaker51's Tools
    Kustomsbykent, bimmer1980, Frank S, and PJs;
    Thanks for the recognition guys. I only had a few days to plan and execute the trip and rigging. They sold forklift about 10 days earlier.
    It was $1150, maybe $600 to $1000 less than a used conventional brake.
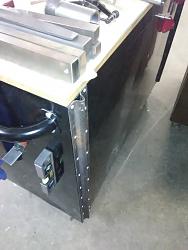
    First use wasn't very intuitive. My substitute toolbox has weak construction [thin material and few rivets], and left side was separating from cabinet. I made two flanged Vee's, tying full height of back sheet and end caps together. The Vee's were 16g x 30", little effort needed, due missing counterweight. Staggered blind rivets and rib form very rigid vertical, and 16 gauge material won't 'flatten' or stretch sideways. The Vee allowed the stronger cap to pull the back sheet into place.
    I might post how 2 pair drawer guides were replaced that became deformed. You can use those supplied by big-box stores, still have to drill rivets but fit directly. Or at half the price get those in cabinet hardware, thicker material [100lb vs 50lb] and a bit of easy modding, plus installed with some more incline to self close under load.
    Moving lighter but cumbersome equipment-box_reinforced.jpg

    One counterweight is missing and it's bar was heated and de-bent incorrectly. Front apron has a handle bar where counterweights make it's use neutral effort. The clamp over centering action is on same side. Back apron counterweights swing within space between front weights and frame, by pulling toward operator. Two adjustable arc stops control angles developed. The die is very acute, centered and maybe 15°.
    I dug up a 4" round x 7" that will get drilled through starting tomorrow. I'm waiting for the welder to reform the bent rod. Need to create some gauges to set clamp parallel, play with the gibs, grease the pillow blocks. Haven't figured out quite the sequence to get the aprons zeroed to each other, one's a little higher. Not sure shes good for 14 gauge 48" wide...we'll see.

    A work in progress.
    Last edited by Toolmaker51; Sep 26, 2018 at 07:17 PM.
    Sincerely,
    Toolmaker51
    ...we'll learn more by wandering than searching...

  8. The Following 2 Users Say Thank You to Toolmaker51 For This Useful Post:

    KustomsbyKent (Oct 1, 2018), PJs (Sep 26, 2018)

  9. #7
    Supporting Member bimmer1980's Avatar
    Join Date
    Jan 2018
    Posts
    70
    Thanks
    96
    Thanked 38 Times in 23 Posts

    bimmer1980's Tools
    Cool, I think that is a reasonable price for that!

    I'm wondering if the adjustment for the aprons is that big nut on each side towards the bottom. It looks that if that is loosened or tightened it would adjust the height of each side of the apron.

    We might need a couple of close up pictures and of the apron half swung up....

  10. #8
    Supporting Member Toolmaker51's Avatar
    Join Date
    Feb 2016
    Location
    Midwest USA
    Posts
    5,334
    Thanks
    7,044
    Thanked 3,011 Times in 1,900 Posts

    Toolmaker51's Tools
    There is no information or manual in print/ online.
    A nut is either side each apron; I think it restrains a heavy coil spring, so must be part of adjustment, sprung or not.
    There are milled angle irons bolted to each apron, they have slotted holes. Aprons have tapped holes for 'back gauge', haven't Ouija-ed them around to see how. I do NOT want having to layout runs of identical parts.
    Patent drawings indicate hydraulics in similar configuration, things look related but not as expected in patent applications. Sorting out that magic hat, way different than previous work.


    2,000+ Tool Plans
    Sincerely,
    Toolmaker51
    ...we'll learn more by wandering than searching...

  11. The Following User Says Thank You to Toolmaker51 For This Useful Post:

    PJs (Sep 27, 2018)

Thread Information

Users Browsing this Thread

There are currently 1 users browsing this thread. (0 members and 1 guests)

Tags for this Thread

Bookmarks

Posting Permissions

  • You may not post new threads
  • You may not post replies
  • You may not post attachments
  • You may not edit your posts
  •