Free 186 More Best Homemade Tools eBook:  
Get tool plans

User Tag List

Page 3 of 4 FirstFirst 1 2 3 4 LastLast
Results 21 to 30 of 40

Thread: Modifications and Improvements to a Unimat SL 1000 Lathe

  1. #21
    Supporting Member Paul Jones's Avatar
    Join Date
    May 2014
    Location
    Del Mar, California
    Posts
    1,231
    Thanks
    5,810
    Thanked 1,461 Times in 657 Posts

    Paul Jones's Tools
    C-Bag,

    Thank you for the encouragement. I like to periodically update the progress and have it in one place. As with any machine tool, once you know its limits and idiosyncrasies, it is possible to do exacting work. The problem with any 3" swing lathe is the depth of cut is much less than larger lathes so the machining takes much longer to complete. This is why I sometimes use my other lathes instead of the Unimat to make parts for the Unimat. It is just faster.

    I used this Unimat when I worked as a prototype designer and machinist at the School of Oceanography, University of Washington to help pay for my undergrad education. The shop had fantastic machine tools but the smallest lathe was a Hardinge HLV 11" swing lathe and we needed something even smaller for building some of the parts to the scientific instruments. I bought my Unimat SL 1000 lathe new in 1970 to do this work and it machined perfect parts. Everything had to be made to very exacting standards. We were building scientific equipment designed to sit remotely on the ocean floor at 10,000+ feet below sea level with extreme crushing pressures and temperatures a hair above freezing and to be command remotely and returned to the surface successfully. The most difficult problem in deep ocean equipment was accelerated and unexpected corrosion near the pressure seals designed to protect the equipment from leakage by using multiple o-rings (using two main and one backup o-ring). Most parts were made from stainless steel. Anything made with aluminum had to be soft anodized and machined with no sharp corners where corrosion might start. We discovered hard anodizing aluminum had microscopic surface cracks where the corrosion would get in and under the hard anodized surface. The equipment had to be carefully inspected for reuse because the corrosion was hidden where it was very obvious with soft anodized surface treatments (also more colorful than plain black).

    Thanks for looking,

    Paul
    Download plans for lathes.
    Last edited by Paul Jones; Feb 27, 2018 at 10:36 AM.

  2. The Following 2 Users Say Thank You to Paul Jones For This Useful Post:

    C-Bag (Apr 18, 2016), PJs (Apr 18, 2016)

  3. #22
    PJs
    PJs is offline
    Supporting Member PJs's Avatar
    Join Date
    Sep 2014
    Location
    Northern CA
    Posts
    1,844
    Thanks
    8,427
    Thanked 1,129 Times in 725 Posts

    PJs's Tools
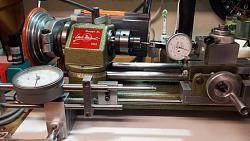
    I'm with C-Bag...Definitely thank you also for putting this all in one place!! Your pictures with descriptive names are great addition to your excellent write ups. I thought your Adj. DI holder was beauty & function at its best...with the big-O' "Reid" gauge...Nice!

    In your pictures 8, 10 & 11 there is a white base under the machine...is that a piece of marble or maybe quartz? I picked up a piece of 12x24x3/4 tile a while back at Restore for $2 and its Very flat although does have a slight dip (~.003) at one end. Though I might use it for the mini as a base maybe framed in wood. Also love the drawer right in the base cabinet with all your other storage areas.

    You have done some Amazing things with and to your Unimat over the years...My hats off to you!! Thank you for sharing all of this with us! ~PJ
    Download plans for lathes.
    ‘‘Always do right. This will gratify some people and astonish the rest.’’
    Mark Twain

  4. The Following User Says Thank You to PJs For This Useful Post:

    Paul Jones (Apr 18, 2016)

  5. #23
    Supporting Member C-Bag's Avatar
    Join Date
    Aug 2015
    Location
    California, central coast
    Posts
    720
    Thanks
    689
    Thanked 879 Times in 471 Posts

    C-Bag's Tools
    Quote Originally Posted by Paul Jones View Post
    I used this Unimat when I worked as a prototype designer and machinist at the School of Oceanography, University of Washington to help pay for my undergrad education. The shop had fantastic machine tools but the smallest lathe was a Hardinge HLV 11" swing lathe and we needed something even smaller for building some of the parts to the scientific instruments. I bought my Unimat SL 1000 lathe new in 1970 to do this work and it machined perfect parts. Everything had to be made to very exacting standards. We were building scientific equipment designed to sit remotely on the ocean floor at 10,000+ feet below sea level with extreme crushing pressures and temperatures a hair above freezing and to be command remotely and returned to the surface successfully. The most difficult problem in deep ocean equipment was accelerated and unexpected corrosion near the pressure seals designed to protect the equipment from leakage by using multiple o-rings (using two main and one backup o-ring). Most parts were made from stainless steel. Anything made with aluminum had to be soft anodized and machined with no sharp corners where corrosion might start. We discovered hard anodizing aluminum had microscopic surface cracks where the corrosion would get in and under the hard anodized surface. The equipment had to be carefully inspected for reuse because the corrosion was hidden where it was very obvious with soft anodized surface treatments (also more colorful than plain black).
    Double thanks for this Paul! I have no idea if anybody here heard this stuff before and I'm the just last to hear it, but I love hearing how people came to their present state. It's not about qualifications necessarily for me, it's how the different disciplines bring different approaches. Basically, "where the hell'd you come up with that!". Being a mechanic at heart makes me curious about cause and effect in machines and people. So hearing the how and why about the unimat puts all the pieces of the puzzle together. I've not had to do anything yet to .0001 tolerances so while it was impressive I now know why you would want to work to those tolerances.

  6. The Following 2 Users Say Thank You to C-Bag For This Useful Post:

    Paul Jones (Apr 18, 2016), PJs (Apr 18, 2016)

  7. #24
    Supporting Member Paul Jones's Avatar
    Join Date
    May 2014
    Location
    Del Mar, California
    Posts
    1,231
    Thanks
    5,810
    Thanked 1,461 Times in 657 Posts

    Paul Jones's Tools
    PJs,

    Thank you for all the compliments and new ideas.

    I knew you would notice the dial indicator with the Reid Supply Company logo (now part of Essentra Components). It is a six jewel movement DI that Reid gave away as promotional swag with your order. I like analog dial indicators. Most of the time I much prefer an analog DI over the digital DI when machining to a predetermined stop and using a power feed. It is just something about eye-hand coordination when seeing the DI hand sweeping around to its final mark. Digital displays a great for manual feeds.

    The "white" base under the lathe is a 3/4" melamine bookshelf board cut to size. I used it because I needed something oil proof and could be cut on my table saw. The next cabinet design will use a 1/2" steel plate (even better if Blanchard ground) because the DI mag bases can be placed anywhere on the steel and the extra weight keeps the cabinet from moving (the current cabinet full of Unimat tooling and the lathe/milling is very heavy and doesn't move but more weight the better).

    I think due to stress, twists, and vibration, the 3/4" marble might eventually crack near where the holes are drilled for the hold-down bolts to the machine tool. I would keep the marble slab for a lapping plate. I want to find a 3/8" or 1/2" thick section of plate glass for a lapping plate using 600 or higher grit wet-or-dry sandpaper.

    Thanks again,

    Paul

    P.S. In late 2017 the modified Unimat with its cabinet full with its tooling weighs 65 pounds and never moves around on the workbench.
    Last edited by Paul Jones; Feb 27, 2018 at 10:47 AM. Reason: Added the year 2017 weight of the fully equipped and modified Unimat SL 1000

  8. #25
    PJs
    PJs is offline
    Supporting Member PJs's Avatar
    Join Date
    Sep 2014
    Location
    Northern CA
    Posts
    1,844
    Thanks
    8,427
    Thanked 1,129 Times in 725 Posts

    PJs's Tools
    Paul,

    Thanks for the reply and answers/comments. I agree about the analog DI usage. The thing I liked about the large format dial on the Reid is it's easy to read while focusing on the work and for fine stuff you can read between the lines better. Nice Bonus to an order.

    I had the same thoughts on the tile or marble/granite cracking but am considering a wood frame with a plywood bottom and then bond the tile to it with construction adhesive. As for the holes I thought if I bored them oversize and made Delrin bushing inserts (thin "T" top, thick wall) to relieve the pressure a bit, it might work. As you know the 2 hold downs under the head stock are difficult to reach so I also intended to make some out riggers to distribute the load even more and make an easy removal for any maintenance.

    The idea of a steel (Blanchard ground) base...flat, solid and stable is excellent! Being able to stick mag bases to it may be a plus but would worry about pulling swarf to the mag base and maybe any residual magnetism in the plate.

    Also thank you very much for sharing the info on your early work on Very cool projects. Cutting edge stuff!! Almost went to work for Sperry not too long after college because deep ocean stuff fascinates me. Back in the eighties I did work in cryogenics and vacuum systems down to ~10-6 torr. It's the opposite end of the spectrum from your experience but build properties are very similar with seals, feedthru's and flanges.

    So hearing the how and why about the unimat puts all the pieces of the puzzle together.
    C-Bag is right again. Each has a unique set and directions, whence we came and going toward...but being able to help one another, share ideas and history is what make this such a great place.

    This is a probably the most comprehensive build log/post for the Unimat I have encountered. Truly a gift to us Paul! Thank You!

    ~PJ
    ‘‘Always do right. This will gratify some people and astonish the rest.’’
    Mark Twain

  9. The Following 2 Users Say Thank You to PJs For This Useful Post:

    C-Bag (Apr 19, 2016), Paul Jones (Apr 18, 2016)

  10. #26
    Supporting Member Paul Jones's Avatar
    Join Date
    May 2014
    Location
    Del Mar, California
    Posts
    1,231
    Thanks
    5,810
    Thanked 1,461 Times in 657 Posts

    Paul Jones's Tools
    PJs and C-Bag,

    Thank you and I will update this posting as more modifications are created. I use TurboCAD but in the case of the Unimat tooling, all the drawings are hand drawn to scale in pencil in a spiral bound notebook with grid paper. It is my way of relaxing. I plan to convert to CAD drawings because there have been many requests for the plans but not sure when. I have also thought about doing a YouTube series based doing this machine build all over again by buying the Unimat SL part by part from sellers on eBay, machining new parts and being the systems integrator. Definitely a project for retirement.

    Tonight, I weighed the Unimat and its single drawer cabinet with tooling and it has put on a some weight since this time last year. The whole system now weights 60.5 pounds due to all the new tooling built over the last two years and now either attached or stored in the cabinet. This explains why the machine and cabinet never moves around when in use on the bench.

    Regards,

    Paul Jones

  11. The Following 2 Users Say Thank You to Paul Jones For This Useful Post:

    C-Bag (Apr 19, 2016), PJs (Apr 19, 2016)

  12. #27
    Supporting Member Paul Jones's Avatar
    Join Date
    May 2014
    Location
    Del Mar, California
    Posts
    1,231
    Thanks
    5,810
    Thanked 1,461 Times in 657 Posts

    Paul Jones's Tools
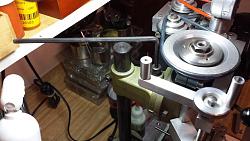
    I recently made a more accurate ER16 collet chuck for the Unimat (see Homemade Tapering Method for Homemade Collet Chuck ) and while I had the lathe setup for grinding the new chuck, I also ground the taper surface of a commercially available hardened ER16 collet chuck. Several years ago I had bought the hardened ER16 collet chuck with a M12X1 internal thread from a seller on eBay but was disappointed with the TIR of approximately 0.003" and never used the chuck. Using the Dremel tool in the QCTP and a fine grain grinding stone it was possible to grind the TIR to within 0.0001". Now the only real limitation for the collet chuck TIR is the precision of the ER16 collets.

    The 8 degree angle for grinding was determined by using a very precise old style E16 collet chuck I bought new in 1970 when I bought the Unimat SL 1000 lathe.

    Modifications and Improvements to a Unimat SL 1000 Lathe-setting-8-degree-taper-using-old-e16-collet-chuck.jpg

    Before starting the grinding operation the Dremel grinding stone was dressed with a diamond dresser.

    Modifications and Improvements to a Unimat SL 1000 Lathe-unimat-sl-setup-dressing-dremel-grinding-stone.jpg


    Next the old E16 chuck was removed and replaced with the hardened ER16 collet chuck bought on eBay but with a 0.003" TIR.

    Modifications and Improvements to a Unimat SL 1000 Lathe-dremel-grinding-er16-collet-eight-degree-angle.jpg

    Measuring the newly ground TIR of the hardened ER16 collet chuck to be within 0.0001". Now the collet chuck can be used again for precision work in the Unimat.

    Modifications and Improvements to a Unimat SL 1000 Lathe-grinding-commercial-er16-chuck-within-0.0001-inch-tir.jpg

    Thank you for looking,

    Paul Jones
    Last edited by Paul Jones; Feb 27, 2018 at 10:49 AM.

  13. The Following User Says Thank You to Paul Jones For This Useful Post:

    PJs (Jul 4, 2016)

  14. #28
    Supporting Member Paul Jones's Avatar
    Join Date
    May 2014
    Location
    Del Mar, California
    Posts
    1,231
    Thanks
    5,810
    Thanked 1,461 Times in 657 Posts

    Paul Jones's Tools
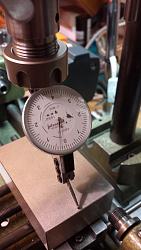
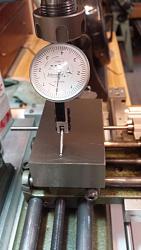
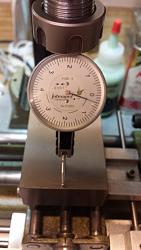
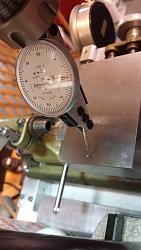
    I recently received a question from a member of Home Model Engine Machinist forum regarding the Unimat milling head moving out of tram over time. I was not aware of this happening and this morning I measured the front-to-back tram to check for any movement. I had originally added to the milling support base a 0.0015” thick shim to bring the vertical column into tram front-to-back. Today's measurement has the front-to-back tram out by 0.0003" over a 3" distance across a 1-2-3 block and much better than I expected. This may be a slight droop over a two year period but well within the tolerances of this machine because the 25 mm vertical column can flex +/- 0.0005" during milling operations with heavy cuts.

    However, I did find the side-to-side tram along the long axis of the Unimat to be out by 0.0015". This has always been a problem with the milling head because it can rotate slightly even with the locking screw and locking pin in place on the Unimat headstock assembly. It took about 15 minutes but I now have the long axis trammed to with 0.0003". This is an operation that should be done ever 3 to 6 months but I usually put it off.

    I included a few photos of the Unimat milling head tramming operation including a photo of the dividing plate removed for access to the milling headstock locking screw.

    Paul

    Modifications and Improvements to a Unimat SL 1000 Lathe-unimat-side-side-milling-head-tram-right-side-measurement.jpgModifications and Improvements to a Unimat SL 1000 Lathe-unimat-side-side-milling-head-tram-left-side-measurement.jpgModifications and Improvements to a Unimat SL 1000 Lathe-unimat-front-back-milling-head-tram-front-measurement.jpgModifications and Improvements to a Unimat SL 1000 Lathe-unimat-front-back-milling-head-tram-back-measurement.jpg
    Modifications and Improvements to a Unimat SL 1000 Lathe-unimat-milling-head-side-side-adjustment-lock-screw-without-dividing-plate.jpg
    Last edited by Paul Jones; Feb 27, 2018 at 10:51 AM.

  15. The Following User Says Thank You to Paul Jones For This Useful Post:

    PJs (Jul 18, 2016)

  16. #29
    Supporting Member morsa's Avatar
    Join Date
    Aug 2015
    Posts
    244
    Thanks
    87
    Thanked 381 Times in 140 Posts

    morsa's Tools
    Hello, Paul Jones.
    Although I joined this forum in Aug-2015, I'm sure I had seen this post long ago and was part of the inspiration for my Unimat stand and drawer. Of course, I got the link saved in one of my Pinterest boards https://es.pinterest.com/morsa00/mecanizado-de-metales/

    I know, mentioning Yahoo Unimat group or Pinterest seems impersonal, but now I can thank you for the inspiration.

  17. The Following 2 Users Say Thank You to morsa For This Useful Post:

    Paul Jones (Oct 13, 2016), PJs (Oct 13, 2016)

  18. #30
    Supporting Member morsa's Avatar
    Join Date
    Aug 2015
    Posts
    244
    Thanks
    87
    Thanked 381 Times in 140 Posts

    morsa's Tools
    Correction: there is more than one link to your posts in this board.
    Last edited by morsa; Oct 13, 2016 at 11:58 AM. Reason: duplicated

  19. The Following User Says Thank You to morsa For This Useful Post:

    Paul Jones (Oct 15, 2016)

Thread Information

Users Browsing this Thread

There are currently 2 users browsing this thread. (1 members and 1 guests)

  1. Philip Davies

Tags for this Thread

Bookmarks

Posting Permissions

  • You may not post new threads
  • You may not post replies
  • You may not post attachments
  • You may not edit your posts
  •