Free 186 More Best Homemade Tools eBook:  
Get 2,500+ tool plans, full site access, and more.

User Tag List

Page 2 of 7 FirstFirst 1 2 3 4 5 6 7 LastLast
Results 11 to 20 of 66

Thread: Mod Marv's Lantern vise

  1. #11
    Supporting Member Toolmaker51's Avatar
    Join Date
    Feb 2016
    Location
    Midwest USA
    Posts
    5,338
    Thanks
    7,048
    Thanked 3,020 Times in 1,905 Posts

    Toolmaker51's Tools
    Quote Originally Posted by C-Bag View Post
    Makes sense TM51. How would you do the relief cut? Like with a small end mill, or? Sorry, I'm a noob.
    Depends on size of Vee desired, small enough endmills are extraordinarily delicate. Many milling macines I've had access to aren't running well enough to utilize small cutters. Spindle, quill, and leadscrews need to be in good shape to provide 'feedback' that your senses use to control the operation.
    In the post, offered alternatives that are reliable. Hack saw, band saw. circular blade, cutoff wheel, end mill...all applicable.
    There are occasions where a endmill was used, after a saw cut to relieve load on a diminutive cutter. Two flutes probably better choice for chip clearance/ ejection as depth proportionately exceeds the width perhaps 3-4 times. A simple layout will illustrate size of sufficient relief in a specific Vee.

    Download plans for vises.

    Sincerely,
    Toolmaker51
    ...we'll learn more by wandering than searching...

  2. #12
    Supporting Member C-Bag's Avatar
    Join Date
    Aug 2015
    Location
    California, central coast
    Posts
    720
    Thanks
    689
    Thanked 879 Times in 471 Posts

    C-Bag's Tools
    My solution was to put a centerline for the base of the V on the end of the vise. If the old mill drill would have had a knee I think it would have been easier., would it not? Because I had only Z axis to feed and the work at 45deg in the vise I had to try and keep the edge of endmill on the centerline by fiddling with the X axis. I do have some spare endmills I could try sharpening into 90deg drill mills........

    Download plans for vises.


  3. #13
    Supporting Member Toolmaker51's Avatar
    Join Date
    Feb 2016
    Location
    Midwest USA
    Posts
    5,338
    Thanks
    7,048
    Thanked 3,020 Times in 1,905 Posts

    Toolmaker51's Tools
    Without fixturing, grinding a successful 45 degree cutter will be difficult. Almost guaranteed to run more like a single lip.
    More over, diminishing diameter towards the point offers less feet per minute of cutting ability, where it's needed most.
    In this instance, recommending a simple and re-usable solution. Mill an angle block that affixes to stationary jaw of vise. Notch it to position work piece angled to vertical cutter. Set a stop resting on outside of block, a corner is best. The two will register on corresponding surfaces and place the middle very close to actual center on successive cuts. Cut one side and then other, sans a knee, quill should suffice.
    This way an endmill cuts on the end without deflection from sides, or vice-versa. The sides [profiling] produce a 'deeper' Vee than a large diameter endmill, especially in a mill-drill. Endmill of course is the way to start, but you could bandsaw to layout lines first and profile, maintaining conventional milling, not climb milling.
    Sincerely,
    Toolmaker51
    ...we'll learn more by wandering than searching...

  4. The Following User Says Thank You to Toolmaker51 For This Useful Post:

    C-Bag (Aug 20, 2017)

  5. #14
    Supporting Member C-Bag's Avatar
    Join Date
    Aug 2015
    Location
    California, central coast
    Posts
    720
    Thanks
    689
    Thanked 879 Times in 471 Posts

    C-Bag's Tools
    The other night I was watching a 3pt YouTube on Bitcoin 101 and off to the side as often happens I see something that catches my eye. It's a vid by my favorite shop teacher Mr. Pete, and it's how to center a V cut!

    So I finally got to watch it and he goes through the idea of the drill mill and how expensive it would be and the trig etc and does the cut with a regular end mill. He also had the piece laid out with Dykem.


    Spoiler alert! At the end of the vid he does it how most of us math challenged would do it and cuts to his marks. Much to his amazement it's .002 off, just like his previous precision math produced cut! Basically about how far off I was. I don't remember if I ever saw that vid, I don't think so. But I don't feel so bad now

  6. The Following 2 Users Say Thank You to C-Bag For This Useful Post:

    BigE40 (Nov 9, 2018), Paul Jones (Aug 30, 2017)

  7. #15
    Supporting Member
    Join Date
    Jul 2017
    Posts
    91
    Thanks
    14
    Thanked 26 Times in 20 Posts
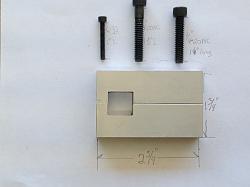
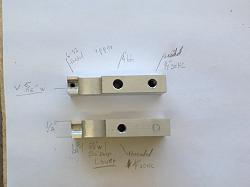
    What are the basic dimensions on the lantern vise shown in the photos? I'd like to make one of these, but having some idea where to start and how big to make one would be helpful.

  8. #16
    Supporting Member C-Bag's Avatar
    Join Date
    Aug 2015
    Location
    California, central coast
    Posts
    720
    Thanks
    689
    Thanked 879 Times in 471 Posts

    C-Bag's Tools
    Quote Originally Posted by Metalmuncher View Post
    What are the basic dimensions on the lantern vise shown in the photos? I'd like to make one of these, but having some idea where to start and how big to make one would be helpful.
    I'd be glad to, it just might take a little time. Contrary to what some think around here I don't work off drawings, napkins, paper scraps or anything else. I got the idea from Marv's post who seems to work like me. I took the basic idea and and scaled to the job(in this case trimming 1/4" socket head screws) and found some stock I had laying around. I'll see what I can come up with, thanks for asking.

  9. #17
    Supporting Member mklotz's Avatar
    Join Date
    Aug 2015
    Location
    LA, CA, USA
    Posts
    3,549
    Thanks
    363
    Thanked 6,582 Times in 2,166 Posts

    mklotz's Tools
    Quote Originally Posted by C-Bag View Post
    ... I got the idea from Marv's post who seems to work like me. I took the basic idea and and scaled to the job(in this case trimming 1/4" socket head screws) and found some stock I had laying around. ...
    Too right. I'm one of those "we doan need no steenkin' plans" guys for sure. While I will on occasion draw a diagram to work out a relationship between parts, for the most part it's TLAR (That Looks About Right) all the way.
    ---
    Regards, Marv

    Failure is just success in progress
    That looks about right - Mediocrates

  10. The Following 3 Users Say Thank You to mklotz For This Useful Post:

    C-Bag (Aug 30, 2017), Paul Jones (Aug 30, 2017), Toolmaker51 (Aug 30, 2017)

  11. #18
    Supporting Member
    Join Date
    Jul 2017
    Posts
    91
    Thanks
    14
    Thanked 26 Times in 20 Posts
    Thanks for the quick reply! If you could just tell me the approx. overall length, width, and thickness of the vise, and of the square hole, that will be enough info for me to start on. I can use one of your photos, with a known dimension, to get the other dimensions by putting the photo in my CAD program. Works the best when the photo is taken very perpendicular to the object. Your first picture is very close to that.

  12. #19
    Supporting Member Frank S's Avatar
    Join Date
    Aug 2015
    Location
    Peacock TX
    Posts
    11,716
    Thanks
    2,228
    Thanked 9,207 Times in 4,399 Posts

    Frank S's Tools
    Metalmuncher for starters you might try use 1"x1 1/2 " rectangular bar cut 2 pc 4 " long make a 1" wide notch .500 deep .375" from the end make the "V" .500" wide cross drill your holes for 5/16 18tpi this should give you a good starting point they can be made out of about any size to accommodate the parts you are wanting or needing to clamp but this should be close for up to a .500" diameter cylinder make the set back in the notch further from the end for better holding for longer or larger diameter cylinders and or use thicker wider and longer bars if cylinders of over .750 dia.
    Never try to tell me it can't be done
    When I have to paint I use KBS products

  13. #20
    Supporting Member C-Bag's Avatar
    Join Date
    Aug 2015
    Location
    California, central coast
    Posts
    720
    Thanks
    689
    Thanked 879 Times in 471 Posts

    C-Bag's Tools
    Ok, here goes Metalmuncher. It ain't no TM51 special, but I hope they help.

    Mod Marv's Lantern vise-image.jpg Mod Marv's Lantern vise-image.jpg

  14. The Following User Says Thank You to C-Bag For This Useful Post:

    Toolmaker51 (Aug 30, 2017)

Thread Information

Users Browsing this Thread

There are currently 1 users browsing this thread. (0 members and 1 guests)

Bookmarks

Posting Permissions

  • You may not post new threads
  • You may not post replies
  • You may not post attachments
  • You may not edit your posts
  •