Free 186 More Best Homemade Tools eBook:  
Get tool plans

User Tag List

Page 1 of 2 1 2 LastLast
Results 1 to 10 of 14

Thread: Milling Machine Motor Upgrade

  1. #1
    Supporting Member Crusty's Avatar
    Join Date
    May 2019
    Location
    Dry Gulch, Tx
    Posts
    749
    Thanks
    220
    Thanked 854 Times in 325 Posts

    Crusty's Tools

    Milling Machine Motor Upgrade

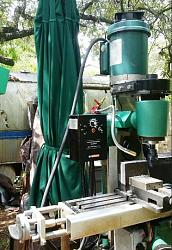
    I finished my motor upgrade to my little mill and it's working pretty darn good. I removed the puny ½HP DC motor and replaced it with a ¾HP 3 phase AC motor using a Variable Frequency Drive. The new motor is about 5 times heavier than the original so I beefed up the motor mount casting with stiffeners and added a support leg because I didn't trust the casting to take the weight.

    Milling Machine Motor Upgrade-finished-big-.jpg

    I selected the KB Electronics KBMA Hybrid VFD because it doesn't require night classes in programming to get it working. The VFD is entirely configured via trimmers and jumpers for operating parameters and it works flawlessly. I had it working in 10 minutes time but the manual was written by someone who spoke American English as a first language and all settings are clearly explained and shown in it.

    I used a TEFC motor because it's much cheaper than the usual TENV motor and I added an external cooling fan for operation at low rpms. I made a motor pulley for the XL timing drive the same size as the spindle pulley, but I'll probably make another with half the teeth so that I can get really low spindle rpms and add a switch to put the VFD in frequency doubling mode for extended top end rpms.

    The motor assembly was designed so that I can still use my convertible mill in horizontal mode as well but due to the heavier weight it's more of a chore to change over than it was before. That's a deficit that I'll live with.

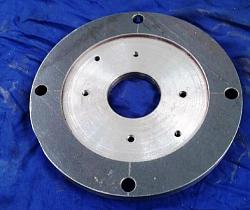
    I made a motor adapter to mount the motor onto the mill mount.

    Milling Machine Motor Upgrade-adapter.jpg

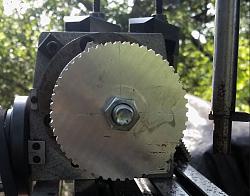
    And I made this XL timing pulley to drive the spindle. I used a boring bar with a bit ground to the tooth profile and a rotary table to cut the aluminum pulley and the second one turned out perfect. I broached a keyway into the pulley using another ground tool on my lathe and it fit perfectly. Keeper collars above and below the pulley hold it in position on the motor shaft and I can add flanges for the belt if it becomes necessary but it doesn't appear that it will be. I'm still waiting for the pulley I ordered from China when I started to arrive by rowboat (he may have been eaten by sharks).

    A very time saving technique is to install a bolt into the chuck with the bolt head behind the chuck jaws and center it one time using an indicator. Then parts can be securely mounted on the bolt with a nut and spacers and will be perfectly on center if the through hole in the part is sized closely to the smooth bolt shank. Leave the bolt in the chuck ready to go for next time. I use this same technique frequently on my lathe because I can securely mount pieces larger in diameter than my chucks will hold and I can turn to diameter without flipping the part around after turning it part way. I've settled on using 7/16" bolts.

    Milling Machine Motor Upgrade-mill-pulley.jpg

    Useful info from the KBMA manual:
    Inverter duty and most totally enclosed non-ventilated (TENV) motors can provide full rated torque over an extended speed range without overheating. If external fan cooling is provided, open ventilated motors (TEFC) can also achieve an extended speed range at full rated torque. A box fan or blower with a minimum of 100 CFM per HP is recommended. Mount the fan or blower so the motor is surrounded by the airflow.


    186 More Best Homemade Tools eBook
    Last edited by Crusty; Jul 8, 2020 at 07:00 AM.
    If you can't make it precise make it adjustable.

  2. The Following 6 Users Say Thank You to Crusty For This Useful Post:

    baja (Jul 8, 2020), Christophe Mineau (Jul 7, 2020), Frank S (Jul 7, 2020), Paul Jones (Jul 7, 2020), threesixesinarow (Jul 8, 2020), tonyfoale (Jul 8, 2020)

  3. #2
    Supporting Member Frank S's Avatar
    Join Date
    Aug 2015
    Location
    Peacock TX
    Posts
    11,636
    Thanks
    2,186
    Thanked 9,136 Times in 4,366 Posts

    Frank S's Tools
    Looks good dude

    2,000+ Tool Plans
    Never try to tell me it can't be done
    When I have to paint I use KBS products

  4. #3
    Supporting Member Crusty's Avatar
    Join Date
    May 2019
    Location
    Dry Gulch, Tx
    Posts
    749
    Thanks
    220
    Thanked 854 Times in 325 Posts

    Crusty's Tools
    Thanks Frank. I'm happy with the way this turned out as is but I think I can improve it some still. It does have testicular robustness that the old motor didn't have.
    If you can't make it precise make it adjustable.

  5. #4
    Supporting Member Frank S's Avatar
    Join Date
    Aug 2015
    Location
    Peacock TX
    Posts
    11,636
    Thanks
    2,186
    Thanked 9,136 Times in 4,366 Posts

    Frank S's Tools
    Quote Originally Posted by Crusty View Post
    Thanks Frank. I'm happy with the way this turned out as is but I think I can improve it some still. It does have testicular robustness that the old motor didn't have.
    Ha,ha,ha Never build anything which does not have room for improvements otherwise you will become bored with your projects and tools.
    Trust me I know
    Never try to tell me it can't be done
    When I have to paint I use KBS products

  6. #5
    Supporting Member tonyfoale's Avatar
    Join Date
    Nov 2016
    Location
    Spain
    Posts
    1,607
    Thanks
    722
    Thanked 2,706 Times in 726 Posts

    tonyfoale's Tools
    Quote Originally Posted by Frank S View Post
    Ha,ha,ha Never build anything which does not have room for improvements otherwise you will become bored with your projects and tools.
    Trust me I know
    Frank,

    My philosophy is just the opposite. I like to build things once and leave no need for improvements. As to boredom, I have a problem understanding the concept. I suspect that you are not one to have time to get bored.

  7. #6
    Supporting Member tonyfoale's Avatar
    Join Date
    Nov 2016
    Location
    Spain
    Posts
    1,607
    Thanks
    722
    Thanked 2,706 Times in 726 Posts

    tonyfoale's Tools
    Like you I have found increasing motor size makes a big difference. As the hot-rod enthusiasts say "There ain't no substitute for cubes".
    I replaced a 1.5hp 3ph mill motor with a 5hp and VFD and a 2hp 1 ph lathe motor with a 5.5hp dual speed motor and VFD. Both are a huge improvement.
    Here is a post on my mill heart transplant. How to make a 6000rpm Bridgeport.

    i like your night class reference for programming VFDs. Most are not difficult to do, just very very tedious. Understanding what to set many badly described parameters to is very difficult. Some units have over 100 settable parameters.

  8. #7
    Supporting Member Crusty's Avatar
    Join Date
    May 2019
    Location
    Dry Gulch, Tx
    Posts
    749
    Thanks
    220
    Thanked 854 Times in 325 Posts

    Crusty's Tools
    Maybe the most useful thing that I learned in this project Frank is how to make my own XL timing pulleys. I've found XL timing systems to be useful in general and now I can put one together as quick as I can get a belt for it (Gates belts from Amazon get to me in less than a week).

    Usually in my projects there's at least one unknown significant factor so engineering to completion is an iterative process for me and prototypes are just taking a swing hoping to hit in the ball park. My initial selection for the ratio between the drive and driven pulleys is not bad overall but I can make my mill operate at lower rpms with a ratio change and higher rpms by making the frequency doubler switch selectable, so here comes Rev. 1. My rifle brass annealer was finished in the 4th revision.

    There is no substitute for horsepower.
    Last edited by Crusty; Jul 8, 2020 at 07:47 AM.
    If you can't make it precise make it adjustable.

  9. #8
    Supporting Member Frank S's Avatar
    Join Date
    Aug 2015
    Location
    Peacock TX
    Posts
    11,636
    Thanks
    2,186
    Thanked 9,136 Times in 4,366 Posts

    Frank S's Tools
    Not sure if I can even spell boredom let alone pronounce it and for sure don't know the meaning of the word.
    yeah more horse power is almost always a good thing but there have been times when I took the Tim Taylor approach a little too far
    Never try to tell me it can't be done
    When I have to paint I use KBS products

  10. #9
    Supporting Member Crusty's Avatar
    Join Date
    May 2019
    Location
    Dry Gulch, Tx
    Posts
    749
    Thanks
    220
    Thanked 854 Times in 325 Posts

    Crusty's Tools
    That's how you find out what the limit is.

    As a lifelong member of the Torque & Recoil Club I often thought that the Tool Man's improvements landed kinda close to home.
    If you can't make it precise make it adjustable.

  11. #10
    Supporting Member Crusty's Avatar
    Join Date
    May 2019
    Location
    Dry Gulch, Tx
    Posts
    749
    Thanks
    220
    Thanked 854 Times in 325 Posts

    Crusty's Tools
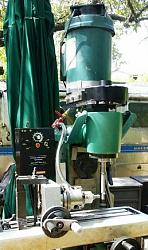
    Well I've finally finished my mill motor upgrade (the previous completion announcement was premature because as I used it I found it not completely performing to my satisfaction). I made another timing pulley to further reduce the spindle rotation speed and changed the drive:driven ratio to 4:3 and that seems to be about what I want. I have 300-1150 rpms on the low range and 584-2350 rpms on the high range (after I added a switch to put the VFD into freq. doubling mode) and I have a much broader operating rpm range now with plenty of torque at the low end, which was the primary objective of this project, and the extra hp is a bonus. Since my head lock tended to slip a bit and let the quill get out of tram, I added a couple of stiff arms with adjustable bracing screws to keep the head positioned where I wanted it and they appear to be working. I'll use it like this for some time to come. Along the way I've become familiar with my rotary table and I've learned how to make XL timing pulleys to boot and those skills will definitely be put to use in the future.

    Milling Machine Motor Upgrade-final.jpg


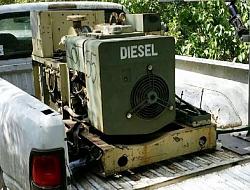
    Now it's time to get started on my next project which promises to be a big one. I bought a MEP-002A ex-military 5kW diesel generator that I intend to restore for backup power when the local electric utility goes down (not often but it's a PITA when it does).


    Milling Machine Motor Upgrade-home.jpg

    The first obstacle is getting it out of my pickup since it weighs 1000# and I don't have enough confidence in my bed mounted hoist at its rated maximum weight. I've been shopping for a chainfall hoist this morning and I've already eyeballed a suitable tree limb that with an additional support ought to work for hanging it.
    Last edited by Crusty; Aug 1, 2020 at 12:15 PM.
    If you can't make it precise make it adjustable.

Thread Information

Users Browsing this Thread

There are currently 1 users browsing this thread. (0 members and 1 guests)

Bookmarks

Posting Permissions

  • You may not post new threads
  • You may not post replies
  • You may not post attachments
  • You may not edit your posts
  •