Free 186 More Best Homemade Tools eBook:  
Get tool plans

User Tag List

Results 1 to 8 of 8

Thread: Milling Cutter Holders for Unimat

  1. #1
    Supporting Member Paul Jones's Avatar
    Join Date
    May 2014
    Location
    Del Mar, California
    Posts
    1,231
    Thanks
    5,810
    Thanked 1,461 Times in 657 Posts

    Paul Jones's Tools

    Milling Cutter Holders for Unimat

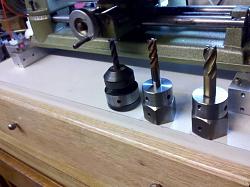
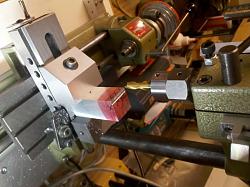
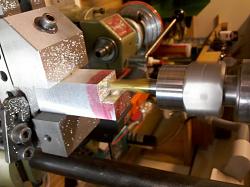
    I made my own Milling Cutter Holders for my Unimat SL so I could free up my ER16 collet chuck for my lathe work. I started with 1.25" hex rod of 12L14 steel and rough cut to length with a horizontal metal band saw. Next faced both ends to length and then drilled a rough-sized hole through the entire length. The Unimat headstock and milling spindles are threaded M12x1 which requires an 11mm tap drill. Drilling a 0.433 hole in steel with the Unimat is not possible because the drill and chuck combination is too long between centers so I bored this hole, next bored a shallow relief hole for the spindle, and then threaded with the M12x1 tap. Reversing the part on the headstock spindle allowed for the precise boring and reaming of the holes for the milling cutters. I made a set of holders for 3/16", 1/4", 5/16" and 3/8" diameter shanks and made two extra ones for the 3/8" shank to allow faster set-ups. In addition I drilled holes for 4mm tommy bars and two 8x32 set screws spaced at 90 degrees (one of the set screws is positioned to fit the flats on the milling cutters and keep the end of the cutter from touching the spindle nose). The finished holder with the cutter installed has a TIR of 0.0005 or less which is about the tolerance of the Unimat. It is possible to re-face the threaded end of the holders so the combined TIR of the holder and the lathe spindle almost cancel each other but this is hit or miss process. The last photo shows the milling cutter holder in action.

    Milling Cutter Holders for Unimat-milling-cutter-holders-unimat-compared-er16-collet-chuck.jpg


    Milling Cutter Holders for Unimat-milling-cutter-holder-unimat-12l14-steel-m12x1-thread.jpg


    Milling Cutter Holders for Unimat-milling-cutter-holder-unimat-action.jpg

    Thank you for looking,

    Paul

    186 More Best Homemade Tools eBook
    Last edited by Paul Jones; Apr 8, 2017 at 11:03 AM. Reason: Missing photos

  2. The Following User Says Thank You to Paul Jones For This Useful Post:

    kbalch (Jul 7, 2014)

  3. #2
    kbalch's Avatar
    Join Date
    Jun 2012
    Location
    Clermont, FL
    Posts
    5,034
    Thanks
    2,275
    Thanked 532 Times in 384 Posts
    Thanks Paul! I've added your Milling Cutter Holders to our Machining category, as well as to your builder page: Paul Jones' Homemade Tools. Your receipt:


    2,000+ Tool Plans

  4. The Following 2 Users Say Thank You to kbalch For This Useful Post:

    Captainleeward (Jan 5, 2018), Paul Jones (Aug 13, 2014)

  5. #3
    Melkal's Avatar
    Join Date
    Dec 2017
    Posts
    13
    Thanks
    0
    Thanked 7 Times in 6 Posts
    Paul, thanks for the pictures and discussion. I am a newbie and inherited a used Unimat with limited accessories. It came with a faceplate and dog, a 3 jaw chuck, Jacobs type chuck, tommy bars, a few dull cutters, a "grinding hub", lathe tool holder. It's all been torn down and rebuilt and repainted. I've added a milling table, Unimat vise, vertical post for milling. I have been cutting, turning and learning how to square it up. Goal is to build a mini steam engine.

    In learning to mill, I either use the Jacobs chuck or the 3 jaw chuck. The 3 jaw is the original, but out of round and I have not found a way to resolve that with filing or grinding, the jaws were buggered up. So, I'd like to fix that also. But, I just read this post about the collets which I did not know about, but that looks like a much better way to hold mills (etc) rather than the 3 jaw.

    Thanks again

  6. The Following User Says Thank You to Melkal For This Useful Post:

    Paul Jones (Jan 6, 2018)

  7. #4
    Supporting Member Captainleeward's Avatar
    Join Date
    Jul 2014
    Location
    San DIEGO, California
    Posts
    1,097
    Thanks
    496
    Thanked 1,336 Times in 525 Posts

    Captainleeward's Tools
    Hello Paul you hit a home run with this one for those unimat owners and your holders are very nicely made I must say...Cap.

  8. #5
    Supporting Member Paul Jones's Avatar
    Join Date
    May 2014
    Location
    Del Mar, California
    Posts
    1,231
    Thanks
    5,810
    Thanked 1,461 Times in 657 Posts

    Paul Jones's Tools
    Melkal and Captain,

    Thank you for the compliments.

    The Unimat milling cutter holders was one of my early "must have" tool additions before I totally tricked-out my old Unimat SL 1000 that I bought new in 1970 (please see http://www.homemadetools.net/forum/m...00-lathe-10111 for the continuing saga on my Unimat improvements).

    You want to preserve the quality and accuracy of the hardened jaws of your 3-Jaw chuck and best not to hold the HSS or carbide milling cutters in the 3-Jaw chuck. Plus you can never have a really tight grip on the milling cutters and may have them "pulled" from the chuck destroying the part and other things (early-on this happened to me).

    There is a way to restore the parallel alignment and TIR (Total Indicated Reading) of your Unimat 3-Jaw chuck to better than new. I have preformed this with a Dremel tool with 0.375" diameter Aluminum Oxide Grinding Stone and the Dremel tool mounted in a special holder held in the Unimat tool post. Most important in this operation is to "pre-load" the chuck jaws to take the slack out of chuck jaws for holding on the inside surfaces of the jaws and ensuring the chuck jaws will be ground concentrically. Also grind less than 0.001" per multiple passes before taking another grind on the jaws. There is no rush because you only have to do this every 10 years or more. There are many articles and fixture designs on the Internet for doing lathe chuck grinding. It is much easier with the Unimat because the homemade chuck pre-loading fixtures are so small that these can be made from 1/8" aluminum plate and drilled-out with a drill press and no need for a milling machine.

    Good luck on your Unimat endeavors,

    Paul Jones
    Last edited by Paul Jones; Jan 6, 2018 at 09:22 AM. Reason: partd

  9. The Following User Says Thank You to Paul Jones For This Useful Post:

    olderdan (Jan 6, 2018)

  10. #6
    Melkal's Avatar
    Join Date
    Dec 2017
    Posts
    13
    Thanks
    0
    Thanked 7 Times in 6 Posts
    Hello Paul and Capt,

    So I had a small piece of 3/4 hex and machined it out to Paul’s pictures. I measured a few of the small end mills I got
    And found many were 5.93mm shafts. So, the newbie question is where do I buy a ream for that, shouldn’t I buy a small set,
    And don’t reams come in standard sizes? So, after you stop laughing, can you suggest where I go to learn the basics of this subject.
    Thanks in advance.

  11. #7
    Supporting Member Paul Jones's Avatar
    Join Date
    May 2014
    Location
    Del Mar, California
    Posts
    1,231
    Thanks
    5,810
    Thanked 1,461 Times in 657 Posts

    Paul Jones's Tools
    Melkal ,

    5.93mm shafts are probably a nominal 6.00 mm diameter so the diameter error is 0.07 mm or 0.07/25.4 = 0.0028 inch undersized which is larger than expected and typically -0.0005". Most reamers are available in the nominal size (i.e., 6.00 mm is 6.00 mm) and in the other + or - sizes. In the Imperial (inch) sizes the + or - series sizes are typically +.001" or -0.001" over and undersized. My advice is to find a 6.00 mm under-sized reamer for the nominal 6.00 mm size. In my experience and no matter how accurate the TIR of lathe spindle, exact reamer diameter and the accuracy of the tail stock alignment, the exact sized machine reamer when using a lathe tends to ream just a few 0.0001" too large somewhere along the ID which is actually a good thing for sliding fits. So try this for the undersized diameters.

    Regards,

    Paul

  12. The Following User Says Thank You to Paul Jones For This Useful Post:

    olderdan (Jan 6, 2018)

  13. #8
    Melkal's Avatar
    Join Date
    Dec 2017
    Posts
    13
    Thanks
    0
    Thanked 7 Times in 6 Posts
    Paul, many thanks for the tutorial.
    Mel


    2,000+ Tool Plans

  14. The Following User Says Thank You to Melkal For This Useful Post:

    Paul Jones (Jan 10, 2018)

Thread Information

Users Browsing this Thread

There are currently 1 users browsing this thread. (0 members and 1 guests)

Bookmarks

Posting Permissions

  • You may not post new threads
  • You may not post replies
  • You may not post attachments
  • You may not edit your posts
  •