Free 186 More Best Homemade Tools eBook:  
Get tool plans

User Tag List

Results 1 to 10 of 10

Thread: Method for bending a tight set in solid bar

  1. #1
    Supporting Member thehomeengineer's Avatar
    Join Date
    Nov 2017
    Location
    Berkshire UK
    Posts
    737
    Thanks
    750
    Thanked 2,188 Times in 426 Posts

    thehomeengineer's Tools

    Method for bending a tight set in solid bar

    Hi All

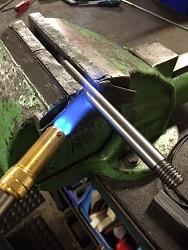
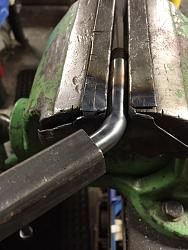
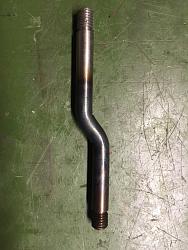
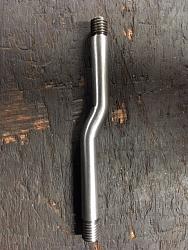
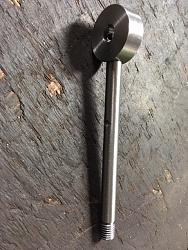
    This is a method I use to bend solid bar which works really well when a tight radius is required. I had to put a set in a piece of 12mm diameter bar for the handle on my retractable screw cutting tool holder. (for three reasons) To give better vision when external screw cutting, secondly to move operators hand further away from the chuck when retracting the tool and thirdly to miss one of the clamp screws.

    Method;
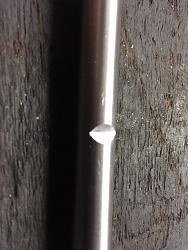
    Firstly, you notch with a file where the inside radius of each bend will start along the bar. In this case I also had to take in consideration the orientation as the bar screwed in to a housing. The bar can then be set in the vice with the notch vertical and at the edge of the vice jaw. The bar is then heated until red and a piece of tube slid over to aid leverage to bend the bar. Due to the notch, this is where the bend will be formed about. The process is repeated for the second bend to create the set.

    First photo shows notch cut with the bar screwed into the housing so the orientation of the handle is correct
    Method for bending a tight set in solid bar-img_0825-copy.jpg Method for bending a tight set in solid bar-img_0826-copy.jpg Method for bending a tight set in solid bar-img_0827-copy.jpg Method for bending a tight set in solid bar-img_0828-copy.jpg Method for bending a tight set in solid bar-img_0850-copy.jpg Method for bending a tight set in solid bar-img_0829.jpg

    Thank you for taking the time to read
    The Home Engineer

    186 More Best Homemade Tools eBook
    Last edited by thehomeengineer; Feb 19, 2018 at 03:39 PM. Reason: photo discription

  2. The Following 25 Users Say Thank You to thehomeengineer For This Useful Post:

    Andyt (Oct 25, 2018), baja (Mar 17, 2022), bgerens (Feb 21, 2018), carloski (Mar 16, 2022), drivermark (Feb 21, 2018), Eaglewood (Jan 24, 2019), high-side (Oct 25, 2018), JD62 (Feb 20, 2018), Jon (Feb 21, 2018), J_P (Mar 2, 2018), Paul Jones (Mar 4, 2018), PJs (Feb 20, 2018), Priemsy (Feb 21, 2018), Ralphxyz (Mar 17, 2022), rayh__ (Apr 4, 2023), rgsparber (Jan 25, 2019), rlm98253 (Feb 20, 2018), Scotsman Hosie (Mar 3, 2018), Seedtick (Feb 20, 2018), that_other_guy (Jan 24, 2019), tuchie (Feb 27, 2024), UncleBob (Jan 24, 2019), uv8452 (Feb 10, 2023), verticalmurph (Feb 10, 2023), volodar (Jul 2, 2018)

  3. #2
    Supporting Member frugalolegeezer's Avatar
    Join Date
    Nov 2015
    Location
    Mound City
    Posts
    51
    Thanks
    0
    Thanked 110 Times in 33 Posts

    frugalolegeezer's Tools
    Man I sure thank you for that tip. Over the years I had trouble bending two bars at the same place and now I can see this method will be a great improvement in my shop.

    2,000+ Tool Plans

  4. The Following 3 Users Say Thank You to frugalolegeezer For This Useful Post:

    jayzauto1 (Aug 4, 2022), Paul Jones (Mar 4, 2018), thehomeengineer (Feb 21, 2018)

  5. #3
    Supporting Member Scotsman Hosie's Avatar
    Join Date
    Apr 2017
    Location
    Salt Lake City, UTAH
    Posts
    359
    Thanks
    4,937
    Thanked 85 Times in 60 Posts

    Scotsman Hosie's Tools
    Sweet. Works better than I would've guessed.

  6. The Following 2 Users Say Thank You to Scotsman Hosie For This Useful Post:

    Paul Jones (Mar 4, 2018), thehomeengineer (Mar 3, 2018)

  7. #4
    Content Editor
    Supporting Member
    DIYer's Avatar
    Join Date
    Aug 2013
    Posts
    3,055
    Thanks
    791
    Thanked 1,880 Times in 1,677 Posts


    Thanks thehomeengineer! We've added your Bar Stock Bending Method to our Metalworking category,
    as well as to your builder page: thehomeengineer's Homemade Tools. Your receipt:


  8. #5
    Supporting Member old_toolmaker's Avatar
    Join Date
    Dec 2017
    Location
    Cape Coral, FL
    Posts
    579
    Thanks
    647
    Thanked 455 Times in 184 Posts

    old_toolmaker's Tools
    thehomeengineer,

    Thanks for the tip! It sure looks like a good way to get the bends to occur where they are wanted.
    Dick


    Links to some of my plans:

    https://www.homemadetools.net/forum/...965#post105972 OFF-SET TAILSTOCK CENTER PLANS
    http://www.homemadetools.net/forum/s...995#post112113 SMALL TURRET TOOL POST PLANS
    http://www.homemadetools.net/forum/l...994#post112111 LARGE TURRET TOOL POST PLANS
    http://www.homemadetools.net/forum/m...383#post110340 MINI-LATHE CARRIAGE LOCK PLANS
    http://www.homemadetools.net/forum/s...191#post106483 SMALL QC TOOL POST PLANS
    http://www.homemadetools.net/forum/q...849#post119345 QUICK CHANGE LATHE TURRET
    http://www.homemadetools.net/forum/m...949#post119893 MINI LATHE COMPOUND PIVOT MODIFICATION

  9. The Following User Says Thank You to old_toolmaker For This Useful Post:

    Paul Jones (Mar 4, 2018)

  10. #6

    Join Date
    Dec 2015
    Posts
    2
    Thanks
    4
    Thanked 1 Time in 1 Post
    Quote Originally Posted by thehomeengineer View Post
    Hi All

    This is a method I use to bend solid bar which works really well when a tight radius is required. I had to put a set in a piece of 12mm diameter bar for the handle on my retractable screw cutting tool holder. (for three reasons) To give better vision when external screw cutting, secondly to move operators hand further away from the chuck when retracting the tool and thirdly to miss one of the clamp screws.

    Method;
    Firstly, you notch with a file where the inside radius of each bend will start along the bar. In this case I also had to take in consideration the orientation as the bar screwed in to a housing. The bar can then be set in the vice with the notch vertical and at the edge of the vice jaw. The bar is then heated until red and a piece of tube slid over to aid leverage to bend the bar. Due to the notch, this is where the bend will be formed about. The process is repeated for the second bend to create the set.

    First photo shows notch cut with the bar screwed into the housing so the orientation of the handle is correct
    Click image for larger version. 

Name:	IMG_0825 - Copy.JPG 
Views:	1083 
Size:	159.9 KB 
ID:	22263 Click image for larger version. 

Name:	IMG_0826 - Copy.JPG 
Views:	950 
Size:	107.8 KB 
ID:	22264 Click image for larger version. 

Name:	IMG_0827 - Copy.JPG 
Views:	1015 
Size:	120.9 KB 
ID:	22265 Click image for larger version. 

Name:	IMG_0828 - Copy.JPG 
Views:	1047 
Size:	106.4 KB 
ID:	22266 Click image for larger version. 

Name:	IMG_0850 - Copy.JPG 
Views:	971 
Size:	143.2 KB 
ID:	22267 Click image for larger version. 

Name:	IMG_0829.JPG 
Views:	981 
Size:	150.5 KB 
ID:	22268

    Thank you for taking the time to read
    The Home Engineer
    What's the gas nozzle you are using for heating? and what type of gas are you using

  11. The Following User Says Thank You to swedishchopper For This Useful Post:

    Ralphxyz (Mar 17, 2022)

  12. #7
    Supporting Member thehomeengineer's Avatar
    Join Date
    Nov 2017
    Location
    Berkshire UK
    Posts
    737
    Thanks
    750
    Thanked 2,188 Times in 426 Posts

    thehomeengineer's Tools
    Hi
    MAPP gas on a T2000 torch that plumbers use.
    The Home Engineer

  13. #8

    Join Date
    Dec 2015
    Posts
    2
    Thanks
    4
    Thanked 1 Time in 1 Post

    Smile

    Quote Originally Posted by thehomeengineer View Post
    Hi
    MAPP gas on a T2000 torch that plumbers use.
    The Home Engineer
    Okey ,Thank you

  14. #9
    Supporting Member Philip Davies's Avatar
    Join Date
    Dec 2015
    Location
    Reading, Berks, UK
    Posts
    915
    Thanks
    1,250
    Thanked 1,047 Times in 353 Posts

    Philip Davies's Tools
    Do you weld the notch after bending?

  15. #10
    Supporting Member thehomeengineer's Avatar
    Join Date
    Nov 2017
    Location
    Berkshire UK
    Posts
    737
    Thanks
    750
    Thanked 2,188 Times in 426 Posts

    thehomeengineer's Tools
    Hi Philip
    It is up to you if you weld or not I have never welded the notch up on my projects but I guess it all depends on application and how deep the notch is cut. If the piece reqiures a weld I can't see any harm in filling the notch.
    Hope this helps
    The Home Engineer


    2,000+ Tool Plans

Thread Information

Users Browsing this Thread

There are currently 1 users browsing this thread. (0 members and 1 guests)

Bookmarks

Posting Permissions

  • You may not post new threads
  • You may not post replies
  • You may not post attachments
  • You may not edit your posts
  •