Free 186 More Best Homemade Tools eBook:  
Get 2,500+ tool plans, full site access, and more.

User Tag List

Results 1 to 9 of 9

Thread: Measuring tapers

  1. #1
    Supporting Member mklotz's Avatar
    Join Date
    Aug 2015
    Location
    LA, CA, USA
    Posts
    3,548
    Thanks
    363
    Thanked 6,580 Times in 2,165 Posts

    mklotz's Tools

    Measuring tapers

    Another one of my "not exactly a tool" but more of a "how to use the tools you already have". Nevertheless, I think the idea is sufficiently "toolish" to belong in the homemade tool forum.

    Many hobby machinists have 1-2-3 blocks. They're often used as spacers and supports but it's less often that they are used as measuring tools. Here I discuss such a use.

    Everyone knows that to measure a taper, one needs to measure the diameter at two points separated by a precisely known distance. The exact separation is not important but it must be known precisely to produce precise results. Many taper standards exist and often the differences are tiny so precise measurement is important in order to distinguish between similar tapers.

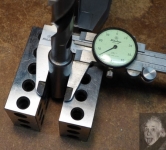
    Support the taper vertically (in the photos I propped the drill against one of my height gages) and lay a 1-2-3 block on each side with the 1" dimension vertical. Lay your calipers on the blocks and close them against the taper. Record the caliper measurement as D1. In the photo below, my caliper is reading D1 = 0.614" against a taper known to me to be a Morse #2.


    Now repeat the procedure but this time lay the blocks so the 2" dimension is vertical. Here my caliper is reading D2 = 0.664".


    We now have two diameter measurements separated by precisely one inch. The taper is then calculated as:

    Taper (in/in) = (D2 - D1) / 1 = (0.664 - 0.614) / 1 = 0.05 in/in

    If you look up the spec for a MT2 in your references, you'll find that it's..., wait for it... 0.050 in/in.

    There are other ways to do this, of course. You could build an attachment to mount your calipers on a height gage and use the latter to establish the measurement separation or mount the calipers to a lathe carriage fitted with a DRO and hold the taper to be measured in the lathe chuck.

    But I prefer my approach. It's simple and requires a minimum of equipment. Plus, it provides a satisfying opportunity to use one of the most under-used tools in the shop, 1-2-3 blocks.

    Of course, this technique requires blocks that are on size. Check yours before using. Even if they're not precisely on-size, the technique can be used but you'll need to calculate the actual separation between the two measurements.

    Download plans for lathes.

    Last edited by mklotz; Jul 8, 2017 at 06:00 PM.
    ---
    Regards, Marv

    Failure is just success in progress
    That looks about right - Mediocrates

  2. The Following 37 Users Say Thank You to mklotz For This Useful Post:

    57_210 (Feb 29, 2024), albertq (Dec 26, 2023), benkeller3 (Dec 16, 2016), Bobinwa (Jan 8, 2017), Christophe Mineau (Jan 15, 2017), cmarlow (Apr 20, 2022), cogentia (Sep 16, 2022), davesrepair (Oct 2, 2024), DIYer (Dec 16, 2016), emu roo (Dec 14, 2022), flyfr8rs (Jan 1, 2025), Frank S (Dec 28, 2016), jjr2001 (Dec 14, 2016), Jon (Dec 15, 2016), JRock (Apr 25, 2018), Kevic (Jan 14, 2018), Mazay (Nov 16, 2022), Moby Duck (May 23, 2018), morsa (Dec 12, 2016), mr mikey (Sep 15, 2022), mwmkravchenko (Nov 16, 2022), n9dug (Feb 21, 2020), nova_robotics (Apr 20, 2022), Paul Jones (Dec 12, 2016), PJs (Dec 12, 2016), PRC (Oct 13, 2018), racer-john (Dec 18, 2016), rasta (Jan 16, 2018), RetiredFAE (Apr 20, 2022), rgsparber (Jan 4, 2017), Saltfever (Feb 22, 2020), Seedtick (Dec 16, 2016), Taruchon (Sep 2, 2021), thadrodgers (Feb 29, 2024), Toolmaker51 (Dec 16, 2016), tooly (Feb 21, 2020), user name blacksmith (Apr 26, 2018)

  3. #2
    Supporting Member Toolmaker51's Avatar
    Join Date
    Feb 2016
    Location
    Midwest USA
    Posts
    5,338
    Thanks
    7,048
    Thanked 3,020 Times in 1,905 Posts

    Toolmaker51's Tools
    Anyone else see potential of increased sales of 1-2-3's? They'll want 4-5-6's next, yes there are! Our friends at extreme edges of the various ponds will find the same idea in metric increments.
    Great depiction and application Marv, seriously.
    To the readers of HMT.net; Whatever your involvement, the ABILITY to establish accurate measurements is a huge part of this hobby, avocation, means of employment, and keystone of civilization.

    Download plans for lathes.

    Sincerely,
    Toolmaker51
    ...we'll learn more by wandering than searching...

  4. The Following 2 Users Say Thank You to Toolmaker51 For This Useful Post:

    Paul Jones (Dec 29, 2016), PJs (Aug 16, 2018)

  5. #3
    Content Editor
    Supporting Member
    DIYer's Avatar
    Join Date
    Aug 2013
    Posts
    3,055
    Thanks
    795
    Thanked 1,895 Times in 1,690 Posts
    Thanks mklotz! We've added your Taper Measuring Method to our Measuring and Marking category, as well as to your builder page: mklotz's Homemade Tools. Your receipt:


  6. #4

    Join Date
    Jul 2015
    Posts
    18
    Thanks
    1
    Thanked 10 Times in 5 Posts

    Angry brain fart

    Quote Originally Posted by mklotz View Post
    Another one of my "not exactly a tool" but more of a "how to use the tools you already have". Nevertheless, I think the idea is sufficiently "toolish" to belong in the homemade tool forum.

    Many hobby machinists have 1-2-3 blocks. They're often used as spacers and supports but it's less often that they are used as measuring tools. Here I discuss such a use.

    Everyone knows that to measure a taper, one needs to measure the diameter at two points separated by a precisely known distance. The exact separation is not important but it must be known precisely to produce precise results. Many taper standards exist and often the differences are tiny so precise measurement is important in order to distinguish between similar tapers.

    Support the taper vertically (in the photos I propped the drill against one of my height gages) and lay a 1-2-3 block on each side with the 1" dimension vertical. Lay your calipers on the blocks and close them against the taper. Record the caliper measurement as D1. In the photo below, my caliper is reading D1 = 0.614" against a taper known to me to be a Morse #2.


    Now repeat the procedure but this time lay the blocks so the 2" dimension is vertical. Here my caliper is reading D2 = 0.664".


    We now have two diameter measurements separated by precisely one inch. The taper is then calculated as:

    Taper (in/in) = (D2 - D1) / 1 = (0.664 - 0.614) / 1 = 0.05 in/in

    If you look up the spec for a MT2 in your references, you'll find that it's..., wait for it... 0.050 in/in.

    There are other ways to do this, of course. You could build an attachment to mount your calipers on a height gage and use the latter to establish the measurement separation or mount the calipers to a lathe carriage fitted with a DRO and hold the taper to be measured in the lathe chuck.

    But I prefer my approach. It's simple and requires a minimum of equipment. Plus, it provides a satisfying opportunity to use one of the most under-used tools in the shop, 1-2-3 blocks.

    Of course, this technique requires blocks that are on size. Check yours before using. Even if they're not precisely on-size, the technique can be used but you'll need to calculate the actual separation between the two measurements.
    Good method Marv ( see I got your name this time) .lol , for this method the chamfer in the 123 blocks must be the same?, edit :in fact it does not matter at all as you are measuring with the vernier ( the blocks are only to get te right distance)
    Last edited by rasta; Jan 16, 2018 at 02:47 AM. Reason: brain fart

  7. #5
    Supporting Member mklotz's Avatar
    Join Date
    Aug 2015
    Location
    LA, CA, USA
    Posts
    3,548
    Thanks
    363
    Thanked 6,580 Times in 2,165 Posts

    mklotz's Tools
    Yes, your self-correction is correct. Only the fact that the blocks have matching dimensions matters.

    Thanks for remembering my name but that tool is properly called a "dial caliper", not a "vernier". The old style calipers that actually had a vernier scale, e.g.,

    https://en.wikipedia.org/wiki/File:Vernier_caliper.svg

    might be nicknamed "verniers" but the terminology for the more modern ones is "dial caliper" or "digital caliper" for the purely electronic style.
    ---
    Regards, Marv

    Failure is just success in progress
    That looks about right - Mediocrates

  8. The Following User Says Thank You to mklotz For This Useful Post:

    Toolmaker51 (Jan 16, 2018)

  9. #6

    Join Date
    Jul 2015
    Posts
    18
    Thanks
    1
    Thanked 10 Times in 5 Posts
    Quote Originally Posted by mklotz View Post
    Yes, your self-correction is correct. Only the fact that the blocks have matching dimensions matters.

    Thanks for remembering my name but that tool is properly called a "dial caliper", not a "vernier". The old style calipers that actually had a vernier scale, e.g.,

    https://en.wikipedia.org/wiki/File:Vernier_caliper.svg

    might be nicknamed "verniers" but the terminology for the more modern ones is "dial caliper" or "digital caliper" for the purely electronic style.
    when I was apprentice many years ago we used to call it " calibre" thats the normal ones while the ones that did not had thin legs in the back to measure interior , and you had to use the front of the outside measuring legs , used to be called "pie de rey".Latter when I migrated to Australia found that they were called Vernier , maybe in reference to the vernier scale on it, and to differenciate between that tool ant what people at the time used to call calliper , a tool that was used to measure outside and inside diameters that is like a dividers with curved legs , and that I used to call "compas de gruesos"
    again Marv, Thank you for your marvellous ideas , that help a lot of people , even old hands like me.
    mariano

  10. #7
    Supporting Member Toolmaker51's Avatar
    Join Date
    Feb 2016
    Location
    Midwest USA
    Posts
    5,338
    Thanks
    7,048
    Thanked 3,020 Times in 1,905 Posts

    Toolmaker51's Tools
    Quote Originally Posted by mklotz View Post
    Yes, your self-correction is correct. Only the fact that the blocks have matching dimensions matters. Thanks for remembering my name but that tool is properly called a "dial caliper", not a "vernier". The old style calipers that actually had a vernier scale, might be nicknamed "verniers" but the terminology for the more modern ones is "dial caliper" or "digital caliper" for the purely electronic style.
    An important bit of terminology. All three are available, my preference has always been for vernier calipers. I have a 6" digital that I use most often on the lathe getting stock and shoulder lengths near finish size before completing accurate work with a micrometer. I use verniers outside & inside where we haven't a large enough micrometer, or a mic won't get past an obstruction. I have several, from over the years, ranging 6" to 48" and seriously enjoy using them. easy to use, simple to calibrate, and virtually maintenance free - if you preserve the all important storage case. And don't store with a tightened lock screw, or jaws fully closed. Each case has a loose stub of wood dowel between the jaws I've added. If you should bump the case the jaws won't impact each other.

    To rasta's description of calipers with different jaw styles. Combined jaws; flat outside, radiused inside faces are typically 'heavy-duty', and also the larger sizes where knife edge jaws prove too delicate. Radiused jaws are a bit more accurate inside too; knife edge have a small, narrow flat on each. The flat is incidental on larger ID's. Smaller ID's might show .001-.003 less than true diameter. The more difficult problem is knife edge don't seek the extreme right and left bore apex of both axis [radial & axial] so readily. That makes consistent measurements iffy, both from a mechanical and tactile standpoint.

    In the US, digital calipers are the runaway favorite, last twenty years or so. Only recently have they gotten really nice. Dial calipers have an issue with particles being lodged in the measuring rack, making the pinion jump, and it's uncommon to see one zero out at the twelve o'clock position. They also have two different 'resolutions' which isn't the exact term but affects it. Earlier models read .200 in one complete revolution, with suspect measurements anything less than +/- .004 of true size. Newer .100 dials are good for +/- .002.
    Most precision instruments are graded at 4:1 ratio for inspection purposes. That means the instrument must be capable of measuring 1/4 the drawings part tolerance. So + or - .001 = .002 tolerance. The instrument required has to discern .002 / 4 = .0005, a typical micrometer in 1/10th's. Standard micrometers, and indicating micrometers I recall, are the only analog tool that reach into the tenths. Many popular test indicators showing 1/.0005 dials will not reach that repeatability, or repeatedly.
    There are differences between what sound alike, in ALL measuring instruments. Accuracy. Resolution. Repeatability.
    Sincerely,
    Toolmaker51
    ...we'll learn more by wandering than searching...

  11. The Following User Says Thank You to Toolmaker51 For This Useful Post:

    RetiredFAE (Sep 14, 2022)

  12. #8
    Supporting Member
    Join Date
    Oct 2021
    Posts
    9
    Thanks
    1
    Thanked 1 Time in 1 Post
    I love the simple ways. Thanks! It will be very useful.

  13. #9
    Supporting Member mklotz's Avatar
    Join Date
    Aug 2015
    Location
    LA, CA, USA
    Posts
    3,548
    Thanks
    363
    Thanked 6,580 Times in 2,165 Posts

    mklotz's Tools
    Quote Originally Posted by eimerbuilt View Post
    I love the simple ways. Thanks! It will be very useful.
    If you liked this, you might find this post...

    Extending the range of calipers

    interesting. Not quite as simple but still a new way to use a common tool.


    Download plans for lathes.

    ---
    Regards, Marv

    Failure is just success in progress
    That looks about right - Mediocrates

Thread Information

Users Browsing this Thread

There are currently 1 users browsing this thread. (0 members and 1 guests)

Bookmarks

Posting Permissions

  • You may not post new threads
  • You may not post replies
  • You may not post attachments
  • You may not edit your posts
  •