Free 186 More Best Homemade Tools eBook:  
Get tool plans

User Tag List

Page 1 of 2 1 2 LastLast
Results 1 to 10 of 15

Thread: making a 3/8" female electrical spade connector

  1. #1
    Supporting Member Frank S's Avatar
    Join Date
    Aug 2015
    Location
    Peacock TX
    Posts
    11,635
    Thanks
    2,186
    Thanked 9,134 Times in 4,366 Posts

    Frank S's Tools

    making a 3/8" female electrical spade connector

    I have not fewer than 5 electrical connector kits and not one of them had the connector I needed.
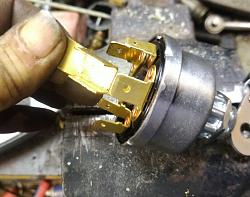
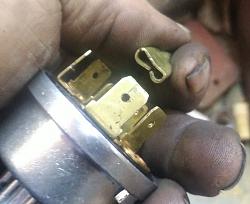
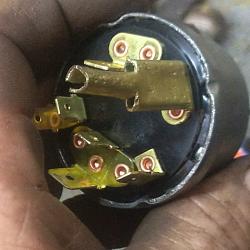
    I finally was going to get around and change the key switch on my Backhoe since the key broke off in it 6 months ago I have been using pliers to turn the switch. Only the new switch has 3/8" blade connectors the old switch had 1 of the large connectors but for the new one I needed a second large connector.
    I solved this problem with a piece of .030" brass drop from the shim washers I made a while back
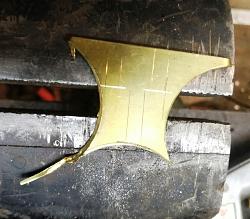
    her is how I made the connector I scribed a rough layout on the brass then cut with snips, no concern with getting too critical with size I just needed it to carry current not be pretty for sale.
    making a 3/8" female electrical spade connector-img_20220619_150548sc.jpg
    making a 3/8" female electrical spade connector-img_20220619_151100sc.jpg
    After the initial forming over a piece of 3/8 HSS I checked for size against the spade on the switch
    making a 3/8" female electrical spade connector-img_20220619_151834sc.jpg
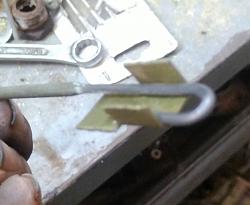
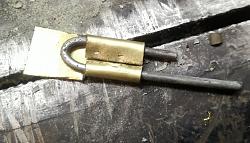
    I then made a forming jig out of a 3/32 welding rod to roll the sides of the connector over this would make the spring type holding clamp of the connector
    making a 3/8" female electrical spade connector-img_20220619_151925fw.jpg
    The shape of the connector after forming over the rod
    making a 3/8" female electrical spade connector-img_20220619_152548fw.jpg
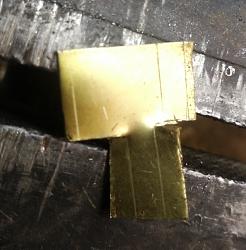
    It will now lock onto the blade the next step will be to form the crimp tube end
    making a 3/8" female electrical spade connector-img_20220619_153141sc.jpg
    making a 3/8" female electrical spade connector-img_20220619_153156sc.jpg
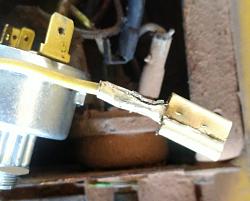
    the wire now crimped in place
    making a 3/8" female electrical spade connector-img_20220619_153841sc.jpg
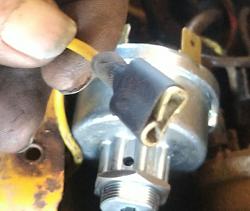
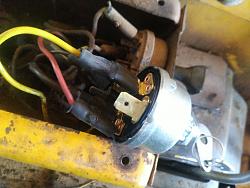
    the completed connector attached to the switch with shrink tube insulator
    making a 3/8" female electrical spade connector-img_20220619_154002sc.jpg
    making a 3/8" female electrical spade connector-img_20220619_154111sc.jpg

    186 More Best Homemade Tools eBook
    Never try to tell me it can't be done
    When I have to paint I use KBS products

  2. The Following 12 Users Say Thank You to Frank S For This Useful Post:

    baja (Jun 22, 2022), carloski (Jun 21, 2022), durrelltn (Jun 29, 2022), katy (Jun 21, 2022), Little Rabbit (Jun 30, 2022), mwmkravchenko (Jun 24, 2022), RetiredFAE (Jun 26, 2022), rlm98253 (Jun 20, 2022), Scotsman Hosie (Jul 16, 2022), toolkribkeeper (Jun 24, 2022), uv8452 (Jun 24, 2022), WmRMeyers (Jun 19, 2022)

  3. #2
    WmRMeyers's Avatar
    Join Date
    Dec 2014
    Posts
    885
    Thanks
    405
    Thanked 371 Times in 254 Posts

    WmRMeyers's Tools
    So far, I've never needed one that size. Now that I know how (relatively) easy it is, I'll probably never need one at all, but good to know how it's done!

    Thanks!

    Bill

    2,000+ Tool Plans

  4. The Following User Says Thank You to WmRMeyers For This Useful Post:

    Frank S (Jun 19, 2022)

  5. #3
    Supporting Member Frank S's Avatar
    Join Date
    Aug 2015
    Location
    Peacock TX
    Posts
    11,635
    Thanks
    2,186
    Thanked 9,134 Times in 4,366 Posts

    Frank S's Tools
    Quote Originally Posted by WmRMeyers View Post
    So far, I've never needed one that size. Now that I know how (relatively) easy it is, I'll probably never need one at all, but good to know how it's done!

    Thanks!

    Bill
    I know what you mean, This was the first one I've ran onto in decades So I never even thought about needing them in my kits.
    It really only takes a few minutes to make one and now that it is installed and insulated I doubt if anyone would ever be able to tell it wasn't store bought at a glance.
    If I had known the switch on the backhoe only had 1 instead of the 2 required for the new switch I would have ordered a small packet of them and waited to install the switch. but I hate tearing something down only to have to put it back together while waiting on parts
    Never try to tell me it can't be done
    When I have to paint I use KBS products

  6. #4
    Content Editor
    Supporting Member
    DIYer's Avatar
    Join Date
    Aug 2013
    Posts
    3,055
    Thanks
    793
    Thanked 1,888 Times in 1,683 Posts


    Thanks Frank S! We've added your Female Spade Connector to our Electrical category,
    as well as to your builder page: Frank S's Homemade Tools. Your receipt:


  7. #5
    Supporting Member IntheGroove's Avatar
    Join Date
    May 2019
    Location
    Lake Tahoe
    Posts
    2,093
    Thanks
    195
    Thanked 944 Times in 573 Posts

    IntheGroove's Tools
    I have never made one but I have "Un-Crimped" used ones more than once...

  8. The Following User Says Thank You to IntheGroove For This Useful Post:

    mr mikey (Jun 21, 2022)

  9. #6
    Supporting Member mr mikey's Avatar
    Join Date
    May 2022
    Location
    Michigan
    Posts
    300
    Thanks
    1,008
    Thanked 65 Times in 50 Posts

    mr mikey's Tools
    Looks good to me and it works. Sometimes you can get away with using a file to shorten the width of the blade to use a smaller terminal but only if you know the current flow through that wire. If its 30 amp plus it needs the correct terminal. Most likely your new switch had the second wide terminal because of terminal failures. Years later they fixed that with the use of relays to handle high current. Thanks for the idea. Mr Mikey.

  10. #7
    Supporting Member Frank S's Avatar
    Join Date
    Aug 2015
    Location
    Peacock TX
    Posts
    11,635
    Thanks
    2,186
    Thanked 9,134 Times in 4,366 Posts

    Frank S's Tools
    Quote Originally Posted by mr mikey View Post
    Looks good to me and it works. Sometimes you can get away with using a file to shorten the width of the blade to use a smaller terminal but only if you know the current flow through that wire. If its 30 amp plus it needs the correct terminal. Most likely your new switch had the second wide terminal because of terminal failures. Years later they fixed that with the use of relays to handle high current. Thanks for the idea. Mr Mikey.
    There have been many times when I have filed the 1/4" blade down to fit an existing 3/16" female connector and never gave it a second thought since the corresponding wires were usually 16ga or smaller, or stretched a ring connector from a #10 hole to fit a 1/4" stud.
    I also suspect the reason for the new switch having both the main battery blade and the start blade being made to the 3/8" size is as was stated to correct an issue the switch MFG. had learned or possibly to make it a universal replacement for another piece of equipment.
    I also know that my homemade terminal should be far superior to any 1/4" connector I could have used by filing the blade down. The original connector on the harness needed replacing anyway as it was loose on the old switch when I removed it.SO it made no sense to me to file the switch down and cut off the old connector only to crimp on one which would not be any better in the long term.
    Never try to tell me it can't be done
    When I have to paint I use KBS products

  11. #8
    WmRMeyers's Avatar
    Join Date
    Dec 2014
    Posts
    885
    Thanks
    405
    Thanked 371 Times in 254 Posts

    WmRMeyers's Tools
    Quote Originally Posted by Frank S View Post
    I know what you mean, This was the first one I've ran onto in decades So I never even thought about needing them in my kits.
    It really only takes a few minutes to make one and now that it is installed and insulated I doubt if anyone would ever be able to tell it wasn't store bought at a glance.
    If I had known the switch on the backhoe only had 1 instead of the 2 required for the new switch I would have ordered a small packet of them and waited to install the switch. but I hate tearing something down only to have to put it back together while waiting on parts
    You are not the only one! I have probably half a million projects here that are AWP (or my getting a round-tuit) as we called it in the Air Force. It took me something like two years to finish rewiring my Atlas TH42 lathe when I had to wait for a part for it. The switch I had didn't fit the space I needed it to fit in, so had to order another. Only took a few days to get it, but I kept having other stuff pop up that had to be done RFN. Which led to the switch getting put somewhere I couldn't find it so delaying the repair further. When I finally found it, again, I dropped everything else to install it and finish the wiring job. And the crapstorm actually let me do it! I was SO surprised by that.

  12. The Following User Says Thank You to WmRMeyers For This Useful Post:

    Frank S (Jun 21, 2022)

  13. #9
    Supporting Member Frank S's Avatar
    Join Date
    Aug 2015
    Location
    Peacock TX
    Posts
    11,635
    Thanks
    2,186
    Thanked 9,134 Times in 4,366 Posts

    Frank S's Tools
    Quote Originally Posted by WmRMeyers View Post
    You are not the only one! I have probably half a million projects here that are AWP (or my getting a round-tuit) as we called it in the Air Force. It took me something like two years to finish rewiring my Atlas TH42 lathe when I had to wait for a part for it. The switch I had didn't fit the space I needed it to fit in, so had to order another. Only took a few days to get it, but I kept having other stuff pop up that had to be done RFN. Which led to the switch getting put somewhere I couldn't find it so delaying the repair further. When I finally found it, again, I dropped everything else to install it and finish the wiring job. And the crapstorm actually let me do it! I was SO surprised by that.
    I have a stack of tuits chest high to the 50ft woman most of them are actually round, as in there is a little progress to many of them on a regular basis its the getting done part that slows everything down.
    A good thing about mounting the new switch was I finally took the time to connect my electric booster fuel pump to it so any time the ign switch is on or more importantly off, so is the pump, instead of just jugging the wires together each time I started the machine. Forgetting to turn it on just meant it took longer to start because the diesel injection pump had to do all of the work. Forgetting to turn it off wasn't a problem if I was going to use the backhoe again soon, but leaving it sit there and stutter against the fuel stop for weeks on end would eventually drain the batteries
    Never try to tell me it can't be done
    When I have to paint I use KBS products

  14. #10
    WmRMeyers's Avatar
    Join Date
    Dec 2014
    Posts
    885
    Thanks
    405
    Thanked 371 Times in 254 Posts

    WmRMeyers's Tools
    Quote Originally Posted by Frank S View Post
    I have a stack of tuits chest high to the 50ft woman most of them are actually round, as in there is a little progress to many of them on a regular basis its the getting done part that slows everything down.
    A good thing about mounting the new switch was I finally took the time to connect my electric booster fuel pump to it so any time the ign switch is on or more importantly off, so is the pump, instead of just jugging the wires together each time I started the machine. Forgetting to turn it on just meant it took longer to start because the diesel injection pump had to do all of the work. Forgetting to turn it off wasn't a problem if I was going to use the backhoe again soon, but leaving it sit there and stutter against the fuel stop for weeks on end would eventually drain the batteries
    What I'm doing right now is sorting through boxes of stuff, in most cases very mixed stuff, and trying to get rid of the absolute garbage, and then put the good stuff with other similar good stuff. Tools with tools, parts with parts, etc. I guess I'm lucky in a way, as my whole yard is probably not a lot larger than your workshop. Though I'm pretty sure that, proportionally, I've got ten pounds of crap stuffed in a five pound bag...

    I've got one old ratty pickup truck that is too expensive to run unless there is no choice, a new car that has already over 2200 miles on it in just a bit over 2 months, and somewhere out in the back yard there may still be a lawn edger that's gas powered, and might run. Maybe. Current lawn mower is a Ryobi 40V system, for which one of the batteries is dead, and the other getting rather weak, and a bunch of machine tools that need refurbished. And I'm having trouble keeping up with this. My stuff is weak, and that's all there is to it!

    Bill

  15. The Following User Says Thank You to WmRMeyers For This Useful Post:

    mr mikey (Jun 23, 2022)

Thread Information

Users Browsing this Thread

There are currently 1 users browsing this thread. (0 members and 1 guests)

Bookmarks

Posting Permissions

  • You may not post new threads
  • You may not post replies
  • You may not post attachments
  • You may not edit your posts
  •