Free 186 More Best Homemade Tools eBook:  
Get tool plans

User Tag List

Page 6 of 6 FirstFirst 1 2 3 4 5 6
Results 51 to 60 of 60

Thread: Looking to add a treadmill motor to a JD Wallace vintage bandsaw.

  1. #51
    PJs
    PJs is offline
    Supporting Member PJs's Avatar
    Join Date
    Sep 2014
    Location
    Northern CA
    Posts
    1,844
    Thanks
    8,420
    Thanked 1,128 Times in 724 Posts

    PJs's Tools
    Right O' C-Bag...RMS Vs Peak or Brake Vs 550LBS/1ft/1sec...Nominal Vs What Is. All will drive you crazy. BTW thanks for the wizard comment but I'm still practicing!

    The more I think about this some testing and fingering needs to go on. Hate for Jere to do all this work for Naught! Pulley may be the better way but it's all figurable and testable. With Pulley though it would be usable as a wood and Metal saw I believe but its also about respecting the age and dignity of this fine old machine! ~PJ

    186 More Best Homemade Tools eBook
    ‘‘Always do right. This will gratify some people and astonish the rest.’’
    Mark Twain

  2. The Following User Says Thank You to PJs For This Useful Post:

    jere (Sep 4, 2015)

  3. #52
    Supporting Member jere's Avatar
    Join Date
    Feb 2015
    Posts
    200
    Thanks
    183
    Thanked 117 Times in 69 Posts

    jere's Tools
    Lots of informative discussion, I sort of had an instinct about some of these ideas but its good to hear specifics. thanks for bringing it up C-Bag and you other two for filling in the blanks.

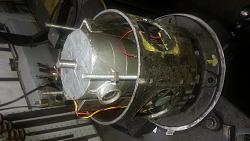
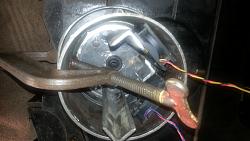
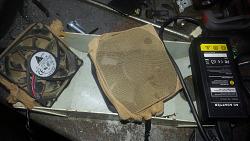
    I got a few hours of grinding done, as I didn't have a bi metal hole saw set (the hole saw set is on the list now!). the fan holes are roughed out and there is a layer of grindings covering half the shop. I went with the computer fans rather than the metal caged fan. there is room for two computer fans instead and they fit in the motor housing better. and hopefully they should do a better job cooling the mill motor.

    Looking to add a treadmill motor to a JD Wallace vintage bandsaw.-20150904_001556.jpg
    Looking to add a treadmill motor to a JD Wallace vintage bandsaw.-20150902_190753.jpg

    I still have to decide the best way to power the fans. for testing I used an ac adaptor for a cell phone charger. the amperage ratings for the fans were more than the power supply but I didn't notice any effect. both fans moved air at a speed independently from the mills motor rotation speed so I think they should be an improvement at least at low rpm. the two fans seemed to move as much air as the mills fan did when I did the bench test of the mill motor.

    next I trial fit the mount with the motor and gear. there is no window to see how the gears are meshing so I ran whiteout along 4 points of the larger gear. the gears do catch but there is a slight click when reversing rotation of the motor. so it seems there is a gap between the axials that could be closed up. there is some adjustment/slack in the factory bolt holes it will take some fiddling to get it all right.

    I am questioning what to use for the oil bath again. sealing everything shouldn't be too hard nor should cutting the gasket. I don't have much experience with choosing a lubricant for situations like this. choosing lubricants for car gear boxes have everything spec-ed out for the most part.

    either way i am thinking the lube should be synthectic (for longer life and low moisture absorbsion), tolerate cold conditions (around 0*F is as low as I can tolerate to work in), hopefully get along with the micarta coating (not really sure why it is there in the first place) on the large gear, and provide the best wear resistance possible (while not being so thick it bogs the motor down in low temperatures). what else should I be considering? am I over thinking this problem?

    2,000+ Tool Plans
    Last edited by jere; Sep 4, 2015 at 02:50 PM.

  4. The Following User Says Thank You to jere For This Useful Post:

    PJs (Sep 5, 2015)

  5. #53
    Supporting Member jere's Avatar
    Join Date
    Feb 2015
    Posts
    200
    Thanks
    183
    Thanked 117 Times in 69 Posts

    jere's Tools
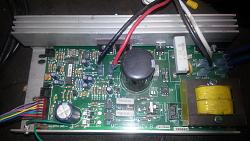
    Took a few steps forward and a few steps back with the saw. The motor controller for the larger of the two motors has no schematics anywhere online. I also apparently set the same motor's controller wire harness down on some passing dark matter. The harness has vanished without a trace ( or it got mixed it with some scrap wires I took in a few weeks ago). I tried making my own harness from following another controllers diagram as a last ditch effort to no avail. It would have been nice if it worked because the face speed control for the motor would have been about 4x5 inches. Instead I went with the Chinese motor controller, which is awkwardly large. With the ROC speed controller chopped up it fits to the wide side of a desktop PC case. (The pc is also the temporary means in which the controller is now housed with a number of zipties keeping the circuit boards secured )

    The hidden benefit of switching controllers is that the ROC model has schematics and similar variations in how tos all over the internet. It is a mc2100 -rev b. https://m.youtube.com/watch?list=LLj...&v=z39exjbHzag that is the video I am going to eventually go with for modding the speed controller. So ideally the saw will just have a on off switch and a dial potentiometer in the original switchbox showing. That will be the only immediate visual tell the bs will have. The controller will be very easy to conceal with in the saw's stand.

    For the oil replacement conundrum I am going to just do some trial and error and see what works. I already had the redline heavy gear oil on hand so it is first. I haven't run the saw much but so far it is staying in the gear box. I left a few bolt holes open for a 20min test under power from the motor. No leaks from the open holes in that time ( or from the permatex rtv copper gasket maker that didn't dry after about week).

    In the 20 minute test the rubber grommet on the shaft seal failed. I think the torque from the motor plates being tightened must have off centered the grommet. The grommet\gasket made some noise and bogged the motors rotation. I replaced it with 2 thin flat pieces of rubber with holes cut out of them. The gasket maker was replaced with a cutout of thin cardboard coated in spray tack.

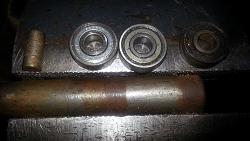
    I did some other maintenace like changing blade guide bearings (ballbearings that used leather for seals!) and installed\tensioned the blade. I have to hunt down some urethane bandsaw tires that fit 15 ½ inch wheels. For now I just wrapped some black electric tape over the old gaffers tape already on the wheels to add a crown.

    Later today I will actually get to try cutting some wood. I can experiment with choosing the right mph button from the treadmills control panel with various woods. I have a choice of 1-10 mph settings to choose from

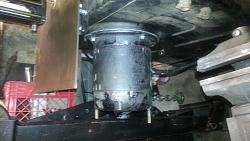
    Looking to add a treadmill motor to a JD Wallace vintage bandsaw.-20150918_000659.jpg
    above is the old motor housing over the newer treadmill motor. still needs cleaned up and the long all thread sections trimmed off (there is sections of clear hose covering them in the photo to help thread them in their holes and to limit accidental stab wounds)

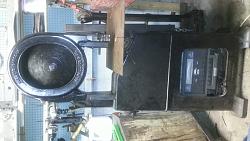
    Looking to add a treadmill motor to a JD Wallace vintage bandsaw.-20150918_000644.jpg
    the saw with the temporary giant treadmill board speed control.

    sorry these keep showing up sideways it seems my phone remembers the orientation but that data doesn't transfer over

    Looking to add a treadmill motor to a JD Wallace vintage bandsaw.-20150917_223059.jpg
    the computer fans with pantie hose dust filter and a laptop adaptor/charger for their power source.

    Looking to add a treadmill motor to a JD Wallace vintage bandsaw.-20150916_161057.jpg
    old blade guide bearings vs their replacements and modern numbers

    Looking to add a treadmill motor to a JD Wallace vintage bandsaw.-20150916_161145.jpg
    ROC motor controller that is usable and has online support
    Last edited by jere; Sep 18, 2015 at 10:00 AM.

  6. The Following User Says Thank You to jere For This Useful Post:

    PJs (Sep 18, 2015)

  7. #54
    PJs
    PJs is offline
    Supporting Member PJs's Avatar
    Join Date
    Sep 2014
    Location
    Northern CA
    Posts
    1,844
    Thanks
    8,420
    Thanked 1,128 Times in 724 Posts

    PJs's Tools
    Wow Jere, you've made some progress!! How's your rotator cuff doing? That motor housing turned out really fine!...who'd know what lurks inside. Are you considering cutting the PWA like the guy in the video intended? Interesting he had no further videos than the 2 on the subject...wonder if it was a multi-layer board (instead of 2) and ruined the board¿ Cutting traces is one thing but the board isn't that big and shouldn't hurt to leave everything else unhooked.
    How much oil got in there? Might be able to find a cup seal for the shaft from the local bearing house or auto supply...couple of bucks.

    Look forward to hearing about your speed (SFM)/wood tests! A side note to your speed test: I got a digital photo tach a while back and its great for figuring SFM on my belt sanders and checking lathe & drill press speeds...cheap and cheerful and plenty accurate for my use...a handy tool. You could use it to correlate your 1-10mph to SFM.

    Thanks for the update. ~PJ
    ‘‘Always do right. This will gratify some people and astonish the rest.’’
    Mark Twain

  8. The Following User Says Thank You to PJs For This Useful Post:

    jere (Sep 19, 2015)

  9. #55
    Supporting Member jere's Avatar
    Join Date
    Feb 2015
    Posts
    200
    Thanks
    183
    Thanked 117 Times in 69 Posts

    jere's Tools
    thanks pj ! the rotator cuff is much better thanks. the shoulder lift exercises seem to be doing the trick.

    for the board I don't think I will actually cut the board just break the circuits.I have heard heating the plastic then scratching the layer of foil traces underneath might be a good method.

    all of the oil ( maybe a cup or 2) in the gear box remained contained so far even though the grommet met its end. thanks for the tip on the cup seal that looks like a great way to go! the torque of the plates shouldn't bother it at all.

    the photo tach is another godsend, I never knew something like that was on the market let alone affordable. it should be useful in all sorts of machines thanks!

    didn't get far with the wood cutting test before the blade started jumping the wheels. it has been tracking true up until this point so its a little strange. I am blaming the old wheels taped up tires for the time being while I try and find a set of replacements. didn't jump while cutting either. so I am hoping there isn't some other underlying issue.

    I did get to cut a couple of hardwood pallet planks up. above 3 or 4 mph there wasn't any noticable bogging. that's with the 20 year or so old slightly rusty blade the saw came with. it was fun for a little while very smooth with little vibration.

    the old tire ended up being 49 inches in circumference and 15 ⅝ inhes in diameter in case anyone else comes looking for those sizes.

  10. The Following User Says Thank You to jere For This Useful Post:

    PJs (Sep 20, 2015)

  11. #56
    PJs
    PJs is offline
    Supporting Member PJs's Avatar
    Join Date
    Sep 2014
    Location
    Northern CA
    Posts
    1,844
    Thanks
    8,420
    Thanked 1,128 Times in 724 Posts

    PJs's Tools
    the rotator cuff is much better thanks. the shoulder lift exercises seem to be doing the trick.
    Good to hear!

    I've never heated a board to cut a trace and might cause issues with any surface mount devices. Typically I use a new exacto blade (#11) or scalpel and slice through the trace in 2 places about an 1/8" if possible. Then lightly scrape or slice along the edge of the small section to remove the coating then peal up the section and off the board....my method, lots of ways to do it but precision is the best way. Depending on the trace size I usually put a little clear coat on it to reseal the edges from corrosion.


    all of the oil ( maybe a cup or 2) in the gear box remained contained so far even though the grommet met its end.
    Didn't know there were only a few ounces in there...thought it might be a quart or something. The cup seal should work perfect then.

    Couldn't believe the price of the tach either and mine is over a year old with the same batteries it came with. Great tool!

    Too bad about the wheels/tires but but if I was 100+ I might come off my tracks a bit more often too! It's always a work in progress it seems. Glad you got some cutting done and sounds like you found a sweat spot on your speed.

    Thanks for the update...look forward to more. ~PJ
    ‘‘Always do right. This will gratify some people and astonish the rest.’’
    Mark Twain

  12. The Following 2 Users Say Thank You to PJs For This Useful Post:

    jere (Sep 21, 2015), Paul Jones (Nov 9, 2015)

  13. #57
    Supporting Member jere's Avatar
    Join Date
    Feb 2015
    Posts
    200
    Thanks
    183
    Thanked 117 Times in 69 Posts

    jere's Tools
    thanks I will try the exacto, and the clear coat good ideas both.

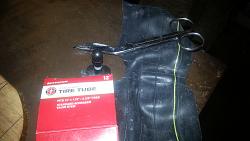
    today I played around with making some tire from 12 in bike wheels. I trimmed the inner tube and valve and stretched the inner tubes around the wheels easily. the new tires also slipped off easily, so I put a light coat of contact cement around the metal wheels and let it tack slightly. in sections that I didn't let tack the cement encouraged the tire to slide off.

    after the cement dried I tried mounting and tracking the blade. it went well with the machine off but I found a lot of vibration and the blade contacted the table. my tire was too thin and wouldn't line up with the ballbearing roller guides as well as contacted the table. I found the wheels were dropped in a few spots and that seems to be what caused the vibrations. I guess the gaffers tape, masked both issues. I resorted back to the electrical tape but used rubber splicing tape rather than the vinyl stuff. I left the inner tube as another layer and a more solid foundation. it all might just get scrapped anyway but I can't just call up JD Wallace and get his recommendation for a replacement.

    at this pointi started finding out that the blade is a few inches short. the better the blade was centered against the guides, the less adjustment there was for blade tension adjustment knob until it was as loose as it could get. the blade will just barely mount the wheels if slowly turned against the wheel while mounting. I believe the rubber tape will slowly tighten its wrapping as the rubber tape settles into place. I found wrapping the tape clockwise slowly unravelled the low adhesion tape.

    hopefully the tape I put on will act in a similar manner as the gaffers tape and even the wheel. otherwise building new wheels will be the only other option. as the wheels came from the factory they are sheet metal . casting aluminum replacements might be worthwhile anyway for the added strength. it would obviously be a lot more added work and experimenting

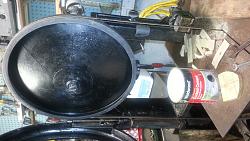
    Looking to add a treadmill motor to a JD Wallace vintage bandsaw.-20150920_180435.jpg

    Looking to add a treadmill motor to a JD Wallace vintage bandsaw.-20150920_230518.jpg

    Looking to add a treadmill motor to a JD Wallace vintage bandsaw.-20150920_230432.jpg

    the center disk in the table is another part that now needs replacement. it wasn't flat starting off so I assume it was another add on from over the years. I am going to try melting down some plastic bottles and see if I can make a worthwhile (minimal blade) clearance replacement.
    Last edited by jere; Sep 21, 2015 at 07:21 PM.

  14. The Following User Says Thank You to jere For This Useful Post:

    PJs (Sep 22, 2015)

  15. #58
    Supporting Member jere's Avatar
    Join Date
    Feb 2015
    Posts
    200
    Thanks
    183
    Thanked 117 Times in 69 Posts

    jere's Tools
    So a quick update:

    I gave up on the bike tires and went with poly urethane ( usa made from an ebay seller). I coated the wheel s tire surfaces with jb weld. To level the tire surfaces i spin the wheels in combination with grind them flat with an angle grinder. I have been applying the jb weld in coats and this seems to be doing the trick. It is pretty tedious truing the surfaces with the grinder so i have been putting this project on the backburners lately. It seems have the worst time finishing projects when they are 90% done

  16. The Following 2 Users Say Thank You to jere For This Useful Post:

    Paul Jones (Nov 9, 2015), PJs (Nov 5, 2015)

  17. #59
    Supporting Member
    Join Date
    Dec 2018
    Posts
    463
    Thanks
    0
    Thanked 78 Times in 65 Posts
    I recently converted my 12" Craftsman wood bandsaw - with a 2.5 hp treadmill motor that now can be slowed down to cut metal with a blade change. Was almost a direct swap. Also converted a HF lathe with another treadmill motor. Kept the original treadmill PWM control board and speed panel. Speeds are now very easy to adjust. (used a tach to learn what speed setting translate to various rpm values. Have also converted a drill press, and a HF 1" x 30" sander. I love the ability to control operation speeds.

  18. #60
    Content Editor
    Supporting Member
    DIYer's Avatar
    Join Date
    Aug 2013
    Posts
    3,055
    Thanks
    793
    Thanked 1,885 Times in 1,682 Posts


    Thanks jere! We've added your Bandsaw Wheel to our Bandsaws category,
    as well as to your builder page: jere's Homemade Tools. Your receipt:


    2,000+ Tool Plans

Thread Information

Users Browsing this Thread

There are currently 1 users browsing this thread. (0 members and 1 guests)

Bookmarks

Posting Permissions

  • You may not post new threads
  • You may not post replies
  • You may not post attachments
  • You may not edit your posts
  •