Free 186 More Best Homemade Tools eBook:  
Get tool plans

User Tag List

Page 1 of 3 1 2 3 LastLast
Results 1 to 10 of 27

Thread: Lathe Tool Height Gage

  1. #1
    Supporting Member rossbotics's Avatar
    Join Date
    Dec 2013
    Location
    Florida
    Posts
    731
    Thanks
    1,019
    Thanked 1,689 Times in 404 Posts

    rossbotics's Tools

    Lathe Tool Height Gage

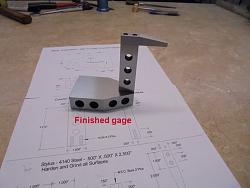
    There are numerous ways to set a lathe tool on center to the lathes axis, the height setting gage I came up with is by no means a new method, but I think it is one of the most simplest and easiest to use gages and by far the most accurate, it consists of only three parts, the base, column, and stylus (plus four socket head cap screws)

    The way I came up with the height of the gage was to take a measurement from the top of the cross slide on the lathe carriage using a height gage to the top of a 1/2” dowel pin chucked in the lathe, then subtract one half the diameter of the dowel pin, the measurement I had on my lathe was 4.442” - .250” = 4.192” this is the total height I made my gage from the bottom of the base to the top of the column. (See photo)

    Depending upon what manufacturer of lathe you own you may not have a ground flat cross slide, in that case you could lay a couple of parallels across the bed of your lathe and measure from there, however it doesn’t matter where you take your measurement from, where ever you take your measurement from is where you will have to use the gage every time to set the tools height.

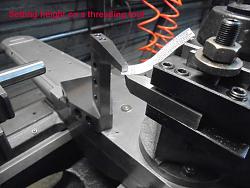
    I made the gage heavy and ridged enough so it wouldn’t be easy to lift by adjusting the tool bit, in other words you can feel the tool bit touch the bottom of the stylus before it starts to lift the gage, I use a piece of phone book paper (which is .002”) as a shim between the top of the tool bit and the bottom of the stylus, once I felt a drag on the shim I removed it and turned the adjusting screw on the BXA tool holder just a fraction and locked it down, think of it like setting the gap on a spark plug. (See photo)

    This height gage will work on any tool holder, those who use a rocker type tool post will find this gage very useful, those using a rocker type are always adjusting the height of the tool every time you resharpen and reinstall a bit.

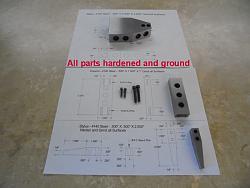
    The entire unit was made from 4140 steel; all parts were hardened and ground, though it could be made from mild steel, however hardened steel is just less easy to ding, scratch and rust, the stylus should be made from a heat treatable steel, reason being that a soft steel stylus would be gouged by the tool bit creating burrs resulting in an inaccurate reading,

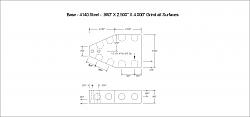
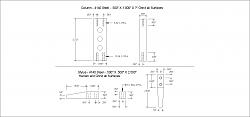
    I have included two drawings along with multiple photos on the construction of this tool; the height of the column will have to be adjusted to one’s own needs.

    As always thanks for looking
    And happy Machining

    Doug


    Lathe Tool Height Gage-1.jpg

    Calculating the height to make the gage


    Lathe Tool Height Gage-2.jpg

    Grinding in the final height


    Lathe Tool Height Gage-3.jpg

    Checking the height


    Lathe Tool Height Gage-4.jpg

    Setting the height of a 60° threading tool, this method would apply to all cutting tools


    Lathe Tool Height Gage-5.jpg

    All parts made, hardened and ground


    Lathe Tool Height Gage-6.jpg

    Assembled


    Lathe Tool Height Gage-7.jpg

    Another angle


    Lathe Tool Height Gage-8.jpg

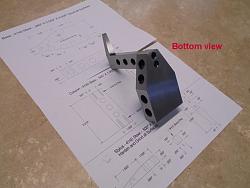
    Bottom view


    Lathe Tool Height Gage-9.jpg

    Top view


    Lathe Tool Height Gage-base.jpg

    Drawing 1


    Lathe Tool Height Gage-column.jpg

    Drawing 2

    186 More Best Homemade Tools eBook
    Comments are always welcome
    Doug

    Subscribe to my you tube channel

    https://www.youtube.com/channel/UCDD..._as=subscriber


    Tool Plans for Sale by rossbotics


  2. The Following 14 Users Say Thank You to rossbotics For This Useful Post:

    baja (Jul 10, 2024), Carlos B (May 17, 2017), emu roo (Jul 8, 2024), high-side (Jul 27, 2020), Home-PC (Aug 1, 2022), jjr2001 (Oct 11, 2018), LMMasterMariner (May 18, 2017), Metallurg33 (Feb 16, 2018), metric_taper (May 18, 2017), nova_robotics (Jul 31, 2022), Paul Jones (May 18, 2017), Seedtick (May 17, 2017), Tonyg (Jul 24, 2020), zarembak (Jun 13, 2018)

  3. #2
    Supporting Member Christophe Mineau's Avatar
    Join Date
    Jul 2014
    Location
    France, Brittany !
    Posts
    913
    Thanks
    832
    Thanked 1,705 Times in 481 Posts

    Christophe Mineau's Tools
    Hi Doug,
    Beautiful work, as always.
    May I suggest a couple of rare earth magnet sunk under the bottom ?
    It's what I did in my (much more crude) round version, but obviously, mine was lighter and the base narrower so I needed the magnet, but anyway, I find it useful to be sure the gage is not lifted by the cutting tool.

    2,000+ Tool Plans
    Cheers !
    Christophe
    ________________________________________________________________
    Visit my Website : http://www.labellenote.fr/
    Facebook : La Belle Note
    All my personal works, unless explicitly specified, are released under
    Creative Commons BY-NC-SA license.

  4. #3
    Supporting Member rossbotics's Avatar
    Join Date
    Dec 2013
    Location
    Florida
    Posts
    731
    Thanks
    1,019
    Thanked 1,689 Times in 404 Posts

    rossbotics's Tools
    Thanks Christophe
    Your pretty darn good yourself
    I thought about magnets but I just don't care for them, they seam to be more of a problem than help, the unit is heavy and very stable, thank for the heads up though

    Doug
    Comments are always welcome
    Doug

    Subscribe to my you tube channel

    https://www.youtube.com/channel/UCDD..._as=subscriber


    Tool Plans for Sale by rossbotics


  5. #4
    Supporting Member Carlos B's Avatar
    Join Date
    Mar 2017
    Location
    Canada
    Posts
    103
    Thanks
    81
    Thanked 170 Times in 39 Posts

    Carlos B's Tools
    I like that, nice work.

  6. #5
    Content Editor
    Supporting Member
    DIYer's Avatar
    Join Date
    Aug 2013
    Posts
    3,055
    Thanks
    793
    Thanked 1,888 Times in 1,683 Posts


    Thanks rossbotics! We've added your Lathe Tool Height Gage to our Measuring and Marking category,
    as well as to your builder page: rossbotics's Homemade Tools. Your receipt:


  7. #6
    Supporting Member Paul Jones's Avatar
    Join Date
    May 2014
    Location
    Del Mar, California
    Posts
    1,231
    Thanks
    5,810
    Thanked 1,461 Times in 657 Posts

    Paul Jones's Tools
    Doug,

    Very nice workmanship and I love the detailing with the hole recesses for less weight and easier tool gripping. The magnets can be useful but can also collect fine chips to distort the vertical dimension. I slightly recessed the bottom magnets on my lathe height gage to allow for the fine chips to slide into the gap and prevent distorting the height distance ( http://www.homemadetools.net/forum/l...8587#post25937 )

    Thank you for the advice on measuring off the top of a 1/2” dowel pin chucked in the lathe as a way to determine the exact height gage minus the dowel radius. It is a simple method and something all metal lathe owners should record. Knowing the height comes in handy for many operations on the lathe including broaching keyways.

    Regards,

    Paul

  8. #7
    Supporting Member Frank S's Avatar
    Join Date
    Aug 2015
    Location
    Peacock TX
    Posts
    11,638
    Thanks
    2,189
    Thanked 9,137 Times in 4,367 Posts

    Frank S's Tools
    I find that the use of magnets around machining operations goes better if you use a thin removable plate under the magnet the plate has to be true parallel to its top and bottom surfaces thin enough to allow enough of the magnetic flux to penetrate and hold and be removed to allow it to be cleaned but thick enough that it does not become distorted or damaged in use. what I really like is to be able to rotate the magnet inside of a sealed base to break the magnetic field for cleaning that way the mounting surface is always true to the post or device it is supporting.
    Never try to tell me it can't be done
    When I have to paint I use KBS products

  9. The Following User Says Thank You to Frank S For This Useful Post:

    Paul Jones (May 22, 2017)

  10. #8
    Supporting Member mklotz's Avatar
    Join Date
    Aug 2015
    Location
    LA, CA, USA
    Posts
    3,529
    Thanks
    362
    Thanked 6,559 Times in 2,161 Posts

    mklotz's Tools
    On my magnetic pickup tools I use aluminum foil or Saran wrap (transparent) on the one that has a built-in light. Simply unwrap in such a way as to include the gathered swarf then discard. My guess is that the thickness of aluminum foil is very uniform so it should work well shielding the base of a height gauge.

    I tend to not use the magnetic base indicator holders. Long ago I made a DI-holding block for the QCTP and that handles most of the work requiring indicators.
    ---
    Regards, Marv

    Failure is just success in progress
    That looks about right - Mediocrates

  11. The Following 2 Users Say Thank You to mklotz For This Useful Post:

    Paul Jones (May 18, 2017), Toolmaker51 (May 18, 2017)

  12. #9
    Supporting Member Toolmaker51's Avatar
    Join Date
    Feb 2016
    Location
    Midwest USA
    Posts
    5,334
    Thanks
    7,044
    Thanked 3,012 Times in 1,901 Posts

    Toolmaker51's Tools
    Plastic wrap and foil work perfectly and store simply, Marv. And cleaning a magnet is easy; duct or masking tape.
    I use a travel indicator frequently on lathe crosslide, especially to monitor shafts and bores for bearing fits. The MightyMag has foil, the touch plate has 3 neodymium magnets mounted sub-flush, sealed flush with discs of brass .005 shim.
    Sincerely,
    Toolmaker51
    ...we'll learn more by wandering than searching...

  13. The Following User Says Thank You to Toolmaker51 For This Useful Post:

    Paul Jones (May 18, 2017)

  14. #10
    Supporting Member metric_taper's Avatar
    Join Date
    Mar 2017
    Location
    Marion, Iowa
    Posts
    612
    Thanks
    238
    Thanked 266 Times in 161 Posts

    metric_taper's Tools
    Quote Originally Posted by rossbotics View Post

    The way I came up with the height of the gage was to take a measurement from the top of the cross slide on the lathe carriage using a height gage to the top of a 1/2” dowel pin chucked in the lathe, then subtract one half the diameter of the dowel pin, the measurement I had on my lathe was 4.442” - .250” = 4.192” this is the total height I made my gage from the bottom of the base to the top of the column. (See photo)
    Thanks for describing this technique. I've only had a height gage for a few months, and only think of using it on the surface plate.

  15. The Following User Says Thank You to metric_taper For This Useful Post:

    Paul Jones (May 22, 2017)

Thread Information

Users Browsing this Thread

There are currently 1 users browsing this thread. (0 members and 1 guests)

Bookmarks

Posting Permissions

  • You may not post new threads
  • You may not post replies
  • You may not post attachments
  • You may not edit your posts
  •