Free 186 More Best Homemade Tools eBook:  
Get 2,500+ tool plans, full site access, and more.

User Tag List

Page 1 of 3 1 2 3 LastLast
Results 1 to 10 of 24

Thread: Lathe threading disengagement set-up

  1. #1
    Supporting Member gatz's Avatar
    Join Date
    Feb 2016
    Posts
    180
    Thanks
    2
    Thanked 154 Times in 54 Posts

    gatz's Tools

    Lathe threading disengagement set-up

    Often times, there's a need to stop a threading operation at exactly the same place.
    A dial indicator generally works, for the most part, but it's easy to make a mistake; usually with dire consequences.

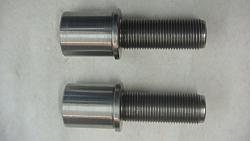
    I needed to thread some 4140 pieces right up next to a shoulder & with the least amount of under-cut.
    Blank parts were turned to 3/4" diameter and had the necessary undercut in the 3-jaw chuck.

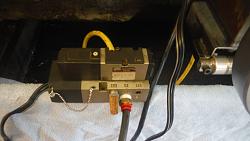
    I set the lathe up with a Limit Switch, a 110v Solenoid Valve and a small Air Cylinder.

    The adjustable carriage stop is set to trip the Limit Switch at the right carriage position, which then powers the Solenoid Valve which in turn sends air to the Air Cylinder.
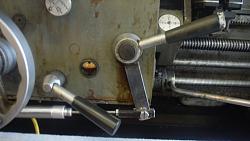
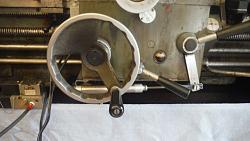
    The Air Cylinder pushes the threading lever out of engagement and the carriage stops abruptly.

    It worked much better than I had anticipated. Sure saved alot of time & worry too.

    I didn't take pictures of the Solenoid Valve or the Air Cylinder. They're just common items.

    parts with threading complete;

    Lathe threading disengagement set-up-3-4-x-28mm-demmeler-clamp-post_2.jpg

    a link to the operation;

    https://drive.google.com/file/d/1FSa...ew?usp=sharing

    Download plans for lathes.


  2. The Following 19 Users Say Thank You to gatz For This Useful Post:

    Canyonman44 (Oct 5, 2021), emu roo (Sep 12, 2024), Floradawg (Feb 2, 2024), high-side (Dec 19, 2018), jjr2001 (Feb 19, 2019), Jon (Mar 14, 2024), LMMasterMariner (Jul 30, 2018), NortonDommi (Jul 27, 2018), old_toolmaker (Aug 1, 2018), papadog (Sep 8, 2022), Ralphxyz (Oct 6, 2021), rossbotics (Jul 30, 2018), Scotsman Hosie (Apr 5, 2019), Seedtick (Jul 29, 2018), Stevohdee (Jul 27, 2018), that_other_guy (Apr 14, 2019), Toolmaker51 (Jul 25, 2018), tooly (Sep 5, 2022), Tule (Apr 5, 2019)

  3. #2
    Supporting Member Frank S's Avatar
    Join Date
    Aug 2015
    Location
    Peacock TX
    Posts
    11,714
    Thanks
    2,226
    Thanked 9,207 Times in 4,399 Posts

    Frank S's Tools
    Meed pictures of the set up.the video just shows the limit sw
    Anytime I ever had to thread right up to the flange I preferred to thread out instead or thread in.
    to do this I ran the lathe in reverse with the cutter inverted. this way I could start right next to the flange the only relief or under cut as you called it was the depth of the cutter.

    Download plans for lathes.

    Last edited by Frank S; Jul 23, 2018 at 08:10 PM.
    Never try to tell me it can't be done
    When I have to paint I use KBS products

  4. The Following 5 Users Say Thank You to Frank S For This Useful Post:

    NortonDommi (Jul 27, 2018), Paul Jones (Jul 23, 2018), PJs (Jul 25, 2018), Ralphxyz (Oct 6, 2021), volodar (Jul 24, 2018)

  5. #3
    Supporting Member
    Join Date
    Jan 2016
    Location
    Southern tip of Vancouver Island
    Posts
    139
    Thanks
    957
    Thanked 40 Times in 28 Posts
    Can't run my circa 1900 16x40 or so Hendey in reverse, as the chuck unscrews!

  6. The Following User Says Thank You to volodar For This Useful Post:

    PJs (Jul 25, 2018)

  7. #4
    Supporting Member Frank S's Avatar
    Join Date
    Aug 2015
    Location
    Peacock TX
    Posts
    11,714
    Thanks
    2,226
    Thanked 9,207 Times in 4,399 Posts

    Frank S's Tools
    I can understand that, A couple of my La Blonds have threaded spindles, but they are a tapered thread nearly impossible to to remove the chuck from the 1917 16 inch with 2 " through bore
    the 1951 19 by 60 has a short nose adapter installed. with the 3 jaw the bolt pattern just scrapes the spindle threads and will not unscrew but the 4 jaw uses the larger bolting pattern and it will allow the nose adapter to unscrew. Someday I would like to convert both of them to a d 1-6 and the 26 inch to a D1-8 but the 26 inch has the long nose which uses a spanner nut to hold the chucks in place do it is not bad the only thing I really dislike about the 26 is the 1.5 inch bore
    Never try to tell me it can't be done
    When I have to paint I use KBS products

  8. The Following 2 Users Say Thank You to Frank S For This Useful Post:

    PJs (Jul 25, 2018), Toolmaker51 (Dec 19, 2018)

  9. #5
    PJs
    PJs is offline
    Supporting Member PJs's Avatar
    Join Date
    Sep 2014
    Location
    Northern CA
    Posts
    1,844
    Thanks
    8,431
    Thanked 1,129 Times in 725 Posts

    PJs's Tools
    A bit confused here as the video show a Jet faceplate on the headstock? Do you have 2 lathes?

    PJ
    ‘‘Always do right. This will gratify some people and astonish the rest.’’
    Mark Twain

  10. #6
    Supporting Member Toolmaker51's Avatar
    Join Date
    Feb 2016
    Location
    Midwest USA
    Posts
    5,338
    Thanks
    7,048
    Thanked 3,020 Times in 1,905 Posts

    Toolmaker51's Tools
    Lathe threading disengagement set-up...
    Quote Originally Posted by gatz View Post
    The adjustable carriage stop is set to trip the Limit Switch at the right carriage position, which then powers the Solenoid Valve which in turn sends air to the Air Cylinder. The Air Cylinder pushes the threading lever out of engagement and the carriage stops abruptly.
    This apparently works effectively. Pneumatics; good solution for what would be a tricky action through mechanical retrofit. Your adaptation's made to order for recent tool retraction devices posted lately.
    I think we'd all like to see the linkage in operation, hint - hint. I'm interested where adjustments are, if any, past the bed stop. I'd want zero free play, probably via Heim joints.
    No matter how enthralled I am with distinctive lathes, very few have threading kick out mechanisms. Not many even kick out carriage feed travel, and each I recall depend on a cam and finger.
    I'm guessing worries on inertia of chucks, carriages and maintenance keep machine engineers from making them common.
    Sincerely,
    Toolmaker51
    ...we'll learn more by wandering than searching...

  11. The Following 3 Users Say Thank You to Toolmaker51 For This Useful Post:

    NortonDommi (Jul 27, 2018), old_toolmaker (Jul 31, 2018), PJs (Jul 26, 2018)

  12. #7
    Supporting Member gatz's Avatar
    Join Date
    Feb 2016
    Posts
    180
    Thanks
    2
    Thanked 154 Times in 54 Posts

    gatz's Tools
    Quote Originally Posted by PJs View Post
    A bit confused here as the video show a Jet faceplate on the headstock? Do you have 2 lathes?

    PJ
    ? PJ....... there's no faceplate on the lathe

  13. #8
    Supporting Member NortonDommi's Avatar
    Join Date
    Jul 2014
    Location
    North Island, New Zealand.
    Posts
    990
    Thanks
    1,800
    Thanked 533 Times in 319 Posts

    NortonDommi's Tools
    Hello gatz,
    Very effective. Like Frank S. I like to thread away from the chuck and also have 1/2" & 3/4" Coventry die heads but I like your setup.
    Question? The tube over the leadscrew is that an add on? I have some thoughts as to what for but would like to know.
    Cheers.

  14. #9
    Supporting Member gatz's Avatar
    Join Date
    Feb 2016
    Posts
    180
    Thanks
    2
    Thanked 154 Times in 54 Posts

    gatz's Tools
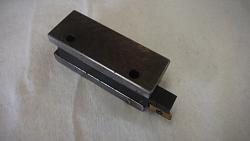
    Believe me, I would have done that, but I'm using ThinBit threading insert & holder.

    Lathe threading disengagement set-up-thinbit-threading-tool-holder_1.jpg
    Lathe threading disengagement set-up-thinbit-threaidng-tool-holder_2.jpg
    And I don't have an adjustable QC tool-holder

    2 problems
    1) Just flipping the tool over wouldn't work.....a Left-Hand holder would be needed and some way of changing the height (the Jet tool-post is fixed height)
    2) It would work for threading OUT from the shoulder, but I'd have to make a mount for it on the opposite side with the right-hand ThinBit & holder flipped over.

    That's the reasons for me doing it this way.

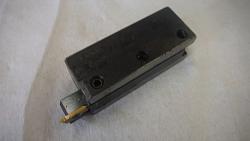
    Here's a few pics of the mechanism. ...I had already taken the set-up down, so didn't make a video of that operation in its entirety; but remounted the components temporarily for those who asked to see it.

    Lathe threading disengagement set-up-threading-kickout_1.jpg

    Lathe threading disengagement set-up-threading-kickout_2.jpg

    Lathe threading disengagement set-up-threading-kickout_3.jpg

    Lathe threading disengagement set-up-threading-kickoput-smc-valve.jpg

  15. The Following 6 Users Say Thank You to gatz For This Useful Post:

    Canyonman44 (Mar 8, 2020), LMMasterMariner (Jul 30, 2018), NortonDommi (Jul 30, 2018), Seedtick (Jul 29, 2018), that_other_guy (Apr 14, 2019), Tule (Apr 5, 2019)

  16. #10
    Supporting Member gatz's Avatar
    Join Date
    Feb 2016
    Posts
    180
    Thanks
    2
    Thanked 154 Times in 54 Posts

    gatz's Tools
    Quote Originally Posted by NortonDommi View Post
    Hello gatz,
    Very effective. Like Frank S. I like to thread away from the chuck and also have 1/2" & 3/4" Coventry die heads but I like your setup.
    Question? The tube over the leadscrew is that an add on? I have some thoughts as to what for but would like to know.
    Cheers.
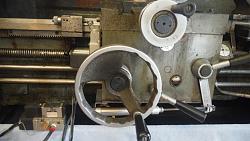
    The tube is what came on the Jet lathe. Its purpose seems to be to keep chips (esp long and stringy ones) out of the lead-screw, and ACME screw as close up to the headstock as possible.

  17. The Following User Says Thank You to gatz For This Useful Post:

    NortonDommi (Jul 30, 2018)

Thread Information

Users Browsing this Thread

There are currently 1 users browsing this thread. (0 members and 1 guests)

Bookmarks

Posting Permissions

  • You may not post new threads
  • You may not post replies
  • You may not post attachments
  • You may not edit your posts
  •