Free 186 More Best Homemade Tools eBook:  
Get tool plans

User Tag List

Page 1 of 2 1 2 LastLast
Results 1 to 10 of 14

Thread: Lathe Cutting Tool Height Gage

  1. #1
    Supporting Member Paul Jones's Avatar
    Join Date
    May 2014
    Location
    Del Mar, California
    Posts
    1,231
    Thanks
    5,810
    Thanked 1,461 Times in 657 Posts

    Paul Jones's Tools

    Lathe Cutting Tool Height Gage

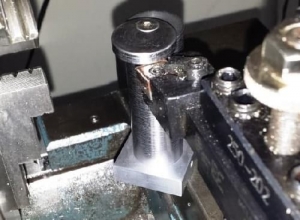
    This lathe cutting tool height gage is based on a design by Hardinge but with the addition of a rectangular base for extending the gage past the edge of a lathe cross slide housing for easy access to the cutting tool. This tool provides a convenient way for setting the correct cutting tool height without the need of first setting steel parallels spanning the carriage aprons to set the height gage. The distance from the top of the lathe cross slide to the center line of the lathe spindle is 3.460” for my 12” swing geared-head lathe. In addition, this height gage has a pair of rare earth magnets embedded in the base that allow the gage to easily extend over the top edge of the lathe cross slide.

    The gage is made from 1.1” dia. cast iron round stock and 1.5”x2.5”x0.5” 6061-T5 aluminum. The top surface and bottom surface were machined using the gage cylinder as a mandrel to ensure the base was perpendicular to the height gage body. The Hardinge tool design allows over and under cutting tool touch-off by using a thin cylindrical part that pivots from the top of the cylindrical body (which is 3.460” tall). Two recessed rare earth magnets keep the gage firmly seated on cast iron cross slide. I should have drilled the 10-32 thread hole before parting the thin cylinder part but did not do this step in the right order so instead I used a small hose clamp to ensure the separate parts were aligned during the drilling.

    The gage base has a sliding fit and held in place with two 8-32 set screws placed on opposite sides of the aluminum base. A Cogsdill Burraway tool (an eBay buy) was used manually to deburr the threaded holes to ensure a smooth sliding fit of the tool height cylinder. The two side set screws allow minor height adjustments. A future improvement may be to add another 0.375” dia. x 0.188 thick rare earth magnet in between the existing magnets and/or lengthen the 2.5” aluminum based to ensure sufficient extension over the cross slide edge.
    Attached Thumbnails Attached Thumbnails Lathe Cutting Tool Height Gage-lathe-tool-height-gage-front-view.jpg   Lathe Cutting Tool Height Gage-lathe-tool-height-gage-rear-view.jpg   Lathe Cutting Tool Height Gage-lathe-tool-height-gage-bottom-view-magnets.jpg   Lathe Cutting Tool Height Gage-parts-lathe-tool-height-gage.jpg   Lathe Cutting Tool Height Gage-boring-sliding-fit-lathe-height-gage-base.jpg  

    Lathe Cutting Tool Height Gage-using-lathe-height-gage-cylinder-machining-mandrel.jpg   Lathe Cutting Tool Height Gage-machining-bottom-lathe-height-gage.jpg   Lathe Cutting Tool Height Gage-cogsdill-burraway-deburs-inside-holes.jpg   Lathe Cutting Tool Height Gage-aligning-lathe-height-gage-parts-hose-clamp.jpg   Lathe Cutting Tool Height Gage-taping-10-32-thread-lathe-height-gage.jpg  


    Download plans for height and depth gauges.


  2. The Following 11 Users Say Thank You to Paul Jones For This Useful Post:

    billster (May 19, 2017), C-Bag (May 18, 2017), emu roo (Nov 14, 2024), gunsgt1863 (Feb 15, 2018), high-side (Oct 3, 2019), jjr2001 (Sep 1, 2016), kbalch (Jun 8, 2015), mwmkravchenko (Feb 15, 2018), PJs (Feb 14, 2017), Seedtick (May 18, 2017), Toolmaker51 (May 18, 2017)

  3. #2
    kbalch's Avatar
    Join Date
    Jun 2012
    Location
    Clermont, FL
    Posts
    5,034
    Thanks
    2,275
    Thanked 532 Times in 384 Posts
    Thanks Paul! I've added your Lathe Cutting Tool Height Gauge to our Height and Depth Gauges category, as well as to your builder page: Paul Jones' Homemade Tools. Your receipt:


    Download plans for height and depth gauges.


  4. #3
    Supporting Member rossbotics's Avatar
    Join Date
    Dec 2013
    Location
    Florida
    Posts
    731
    Thanks
    1,019
    Thanked 1,694 Times in 404 Posts

    rossbotics's Tools
    Hi Paul
    Nice little tool you made there
    Comments are always welcome
    Doug

    Subscribe to my you tube channel

    https://www.youtube.com/channel/UCDD..._as=subscriber


    Tool Plans for Sale by rossbotics


  5. The Following User Says Thank You to rossbotics For This Useful Post:

    Paul Jones (Jun 24, 2015)

  6. #4
    Supporting Member Christophe Mineau's Avatar
    Join Date
    Jul 2014
    Location
    France, Brittany !
    Posts
    913
    Thanks
    832
    Thanked 1,707 Times in 481 Posts

    Christophe Mineau's Tools
    Very nice tool Paul, I need one !

    Thanks for sharing, nicely built and documented, as usual !
    Christophe
    Cheers !
    Christophe
    ________________________________________________________________
    Visit my Website : http://www.labellenote.fr/
    Facebook : La Belle Note
    All my personal works, unless explicitly specified, are released under
    Creative Commons BY-NC-SA license.

  7. The Following User Says Thank You to Christophe Mineau For This Useful Post:

    Paul Jones (Jun 24, 2015)

  8. #5
    Supporting Member Paul Jones's Avatar
    Join Date
    May 2014
    Location
    Del Mar, California
    Posts
    1,231
    Thanks
    5,810
    Thanked 1,461 Times in 657 Posts

    Paul Jones's Tools
    Thank you Doug and Christophe. I made one more modification by adding one more rare earth magnet in the bottom of the aluminum base. Now there are three magnets used to hold the base to the cross slide cover. A very easy change drilling with a letter drill V (0.377") and setting the 0.375" dia. magnet with Loctite 680 (designed for the bonding of cylindrical parts). I like using Loctite 680 for permanently joining loose, sliding and press fit parts because it is very easy to use and wipes off easily in the first 30 seconds. I attached a photo of the improved base that can extend even farther over the edge of the cross slide. Another improvement would be to use aluminum for the vertical cylinder to reduce the weight for long extensions over the side of the cross slide. Thanks again for the feedback, Paul
    Attached Thumbnails Attached Thumbnails Lathe Cutting Tool Height Gage-lathe-height-tool-extension-using-three-base-magnets.jpg   Lathe Cutting Tool Height Gage-additional-magnet-lathe-height-gage-base.jpg   Lathe Cutting Tool Height Gage-extra-magnet-allows-longer-tool-extension-over-edge.jpg  
    Last edited by Paul Jones; Sep 15, 2015 at 12:35 PM.

  9. The Following User Says Thank You to Paul Jones For This Useful Post:

    jjr2001 (May 18, 2017)

  10. #6
    Supporting Member crazypj's Avatar
    Join Date
    Nov 2014
    Location
    Central Florida
    Posts
    53
    Thanks
    5
    Thanked 18 Times in 13 Posts

    crazypj's Tools
    I just use a vernier caliper and a fixed point on compound slide. Centre height on my 'HF lathe/mill lathe is 3.496"
    As I don't have a QCTP, variations let me know what shim to add or subtract

  11. The Following 2 Users Say Thank You to crazypj For This Useful Post:

    Paul Jones (Jun 10, 2015), Toolmaker51 (May 18, 2017)

  12. #7
    Supporting Member Catfish's Avatar
    Join Date
    Oct 2013
    Location
    Mariposa, California
    Posts
    274
    Thanks
    57
    Thanked 421 Times in 159 Posts

    Catfish's Tools
    Nice job on the tool Paul. I need to make 3 one for each lathe. Thanks Randy

  13. #8
    Supporting Member Paul Jones's Avatar
    Join Date
    May 2014
    Location
    Del Mar, California
    Posts
    1,231
    Thanks
    5,810
    Thanked 1,461 Times in 657 Posts

    Paul Jones's Tools
    Randy,
    You are right about needing a dedicated height gage for each lathe. I like to "set it and forget it" so I don't have waste my time adjusting the same gage for each lathe.
    Thanks, Paul

  14. #9
    Content Editor
    Supporting Member
    DIYer's Avatar
    Join Date
    Aug 2013
    Posts
    3,055
    Thanks
    793
    Thanked 1,892 Times in 1,687 Posts
    Those are good improvements on a tool one could easily buy, but get not much pride from.

  15. The Following User Says Thank You to DIYer For This Useful Post:

    Paul Jones (Jun 24, 2015)

  16. #10
    Supporting Member C-Bag's Avatar
    Join Date
    Aug 2015
    Location
    California, central coast
    Posts
    720
    Thanks
    689
    Thanked 879 Times in 471 Posts

    C-Bag's Tools
    Good one Paul, and excellent documentation. I'd seen a similar design, but I like this one a lot. Glad this got recycled as it was before my time here.

  17. The Following User Says Thank You to C-Bag For This Useful Post:

    Paul Jones (May 18, 2017)

Thread Information

Users Browsing this Thread

There are currently 1 users browsing this thread. (0 members and 1 guests)

Tags for this Thread

Bookmarks

Posting Permissions

  • You may not post new threads
  • You may not post replies
  • You may not post attachments
  • You may not edit your posts
  •