Free 186 More Best Homemade Tools eBook:  
Get tool plans

User Tag List

Page 1 of 2 1 2 LastLast
Results 1 to 10 of 15

Thread: Laser Printer Toner Transfer With Kitchen Parchment Paper and a Laminator

  1. #1
    Supporting Member rgsparber's Avatar
    Join Date
    Nov 2012
    Location
    Phoenix, AZ
    Posts
    1,321
    Thanks
    775
    Thanked 2,838 Times in 670 Posts

    rgsparber's Tools

    Laser Printer Toner Transfer With Kitchen Parchment Paper and a Laminator

    A search of the Internet will turn up countless articles and videos about how to transfer toner from a laser printer to either bare metal or plastic. Some of these methods use specialized material. That bothers me. Others, like using acetone, took me a lot of time to develop the skill to get good results. That bothers me too.

    My quest, which has gone on for about 2 years, was to come up with a method requiring minimum skill and commonly found equipment. All materials must be low cost and easily found or bought.

    I don't think the procedure offered here takes a lot of skill but only others can verify that.

    Materials include Kitchen Parchment Paper which costs around $3 for 50 square feet. You will also need an Elmer's Glue stick which comes in a two pack for $3. Equipment includes a laser printer and a plastic pouch laminator.

    If you are interested, please see

    https://rick.sparber.org/TonerTransfer.pdf

    Your comments are welcome. All of us are smarter than any one of us.


    Thanks,

    Rick

    186 More Best Homemade Tools eBook
    Rick

  2. The Following 7 Users Say Thank You to rgsparber For This Useful Post:

    jjr2001 (Feb 14, 2019), Jon (Feb 12, 2019), olderdan (Feb 12, 2019), PJs (Feb 13, 2019), Scotsman Hosie (Feb 17, 2019), Seedtick (Feb 12, 2019), Tonyg (Feb 13, 2019)

  3. #2
    Supporting Member tonyfoale's Avatar
    Join Date
    Nov 2016
    Location
    Spain
    Posts
    1,598
    Thanks
    716
    Thanked 2,694 Times in 721 Posts

    tonyfoale's Tools
    Interesting.
    Those making PCBs by etching will find this useful. I make them by milling now.

    2,000+ Tool Plans

  4. #3
    Supporting Member rgsparber's Avatar
    Join Date
    Nov 2012
    Location
    Phoenix, AZ
    Posts
    1,321
    Thanks
    775
    Thanked 2,838 Times in 670 Posts

    rgsparber's Tools
    Quote Originally Posted by tonyfoale View Post
    Interesting.
    Those making PCBs by etching will find this useful. I make them by milling now.
    Tony,

    Do you have a router tied to the side of your mill head in order to get the higher RPMs?

    Rick
    Rick

  5. #4
    Supporting Member tonyfoale's Avatar
    Join Date
    Nov 2016
    Location
    Spain
    Posts
    1,598
    Thanks
    716
    Thanked 2,694 Times in 721 Posts

    tonyfoale's Tools
    Quote Originally Posted by rgsparber View Post
    Tony,

    Do you have a router tied to the side of your mill head in order to get the higher RPMs?

    Rick
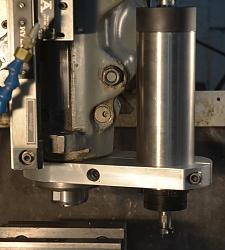
    Not a router but a high speed spindle, runs at 24,000 rpm. In fact I am right now preparing a new post about this subject.
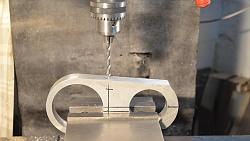
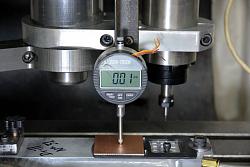
    Here are a couple of pix.

    Laser Printer Toner Transfer With Kitchen Parchment Paper and a Laminator-makingclamp-01.jpg Laser Printer Toner Transfer With Kitchen Parchment Paper and a Laminator-spindle-mill.jpg Laser Printer Toner Transfer With Kitchen Parchment Paper and a Laminator-testingflatness.jpg

    In the past I have made PCBs by etching, by drilling holes from a simple drill jig and using the holes as references to draw tracks by hand with a "resist" pen, before etching.
    That is messy and now that I have a CNC mill I prefer making tracks with isolation milling. This will be clear in the upcoming post.

  6. #5
    Supporting Member rgsparber's Avatar
    Join Date
    Nov 2012
    Location
    Phoenix, AZ
    Posts
    1,321
    Thanks
    775
    Thanked 2,838 Times in 670 Posts

    rgsparber's Tools
    Quote Originally Posted by tonyfoale View Post
    Not a router but a high speed spindle, runs at 24,000 rpm. In fact I am right now preparing a new post about this subject.
    Here are a couple of pix.

    Click image for larger version. 

Name:	makingClamp 01.JPG 
Views:	240 
Size:	202.6 KB 
ID:	28066 Click image for larger version. 

Name:	Spindle on Mill.JPG 
Views:	240 
Size:	146.7 KB 
ID:	28067 Click image for larger version. 

Name:	testingFlatness.jpg 
Views:	241 
Size:	129.5 KB 
ID:	28068

    In the past I have made PCBs by etching, by drilling holes from a simple drill jig and using the holes as references to draw tracks by hand with a "resist" pen, before etching.
    That is messy and now that I have a CNC mill I prefer making tracks with isolation milling. This will be clear in the upcoming post.
    Is it air or water cooled?

    Rick
    Rick

  7. #6
    Supporting Member tonyfoale's Avatar
    Join Date
    Nov 2016
    Location
    Spain
    Posts
    1,598
    Thanks
    716
    Thanked 2,694 Times in 721 Posts

    tonyfoale's Tools
    Quote Originally Posted by rgsparber View Post
    Is it air or water cooled?

    Rick
    Air cooled 2.2 kw. I only wanted one for things like PCBs, small engraving, internal grinding on a lathe and getting a decent speed on small milling cutters for aluminium so aircooled was quite adequate, without the extra complication. I monitor the current and it has never exceeded 25% of rated and only ever gets lute warm.
    I am planning on using it for a high speed sensitive drill.

  8. #7
    Supporting Member rgsparber's Avatar
    Join Date
    Nov 2012
    Location
    Phoenix, AZ
    Posts
    1,321
    Thanks
    775
    Thanked 2,838 Times in 670 Posts

    rgsparber's Tools
    Quote Originally Posted by tonyfoale View Post
    Air cooled 2.2 kw. I only wanted one for things like PCBs, small engraving, internal grinding on a lathe and getting a decent speed on small milling cutters for aluminium so aircooled was quite adequate, without the extra complication. I monitor the current and it has never exceeded 25% of rated and only ever gets lute warm.
    I am planning on using it for a high speed sensitive drill.
    Where did you buy it? Looks like a valuable addition to my CNC mill.

    Thanks,

    Rick
    Rick

  9. #8
    Supporting Member tonyfoale's Avatar
    Join Date
    Nov 2016
    Location
    Spain
    Posts
    1,598
    Thanks
    716
    Thanked 2,694 Times in 721 Posts

    tonyfoale's Tools
    Quote Originally Posted by rgsparber View Post
    Where did you buy it? Looks like a valuable addition to my CNC mill.

    Thanks,

    Rick
    I got mine off the Spanish eBay. It is usual to buy a spindle and VFD package like this one
    https://www.ebay.es/itm/UK-2-2KW-ER2...6Y19:rk:3:pf:0

    However, I bought mine separately because I wanted a more powerful VFD to drive the 5 hp main motor on my mill. http://www.homemadetools.net/forum/h...idgeport-56661
    Currently if I switch between the main spindle and the high speed one then I have to reprogramme the VFD to change between 0 - 60 Hz and 130 - 400 Hz. It only take a few minutes but it is an inconvenience, VFD prices have come down and I'll probably buy a smaller one dedicated to the high speed spindle (probably when I finish writing this).

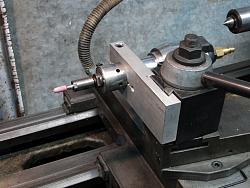
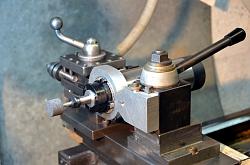
    Even with a 6000 rpm machine the surface speed is too low for small cutters in Aluminium so the high speed spindle is a great addition and I am pleased with it. Because it is clamped to the quill of the mill the Z motion is as normal, manual or CNC controlled. It is important to make a rigid clamp. I have seen some on the net that I regard as too flexible. My quill motion is reduced by the thickness of the clamp bracket but that is a small price to pay.

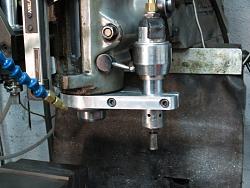
    Before getting this electric spindle I occasionally used a high speed pneumatic turbine, shown next, but that bogged down under load too easily.

    Laser Printer Toner Transfer With Kitchen Parchment Paper and a Laminator-airgrinder-mill.jpg Click thumbnail for full size image.

    Here are pix of each type on the lathe.

    Laser Printer Toner Transfer With Kitchen Parchment Paper and a Laminator-airgrinder-lathe.jpg Laser Printer Toner Transfer With Kitchen Parchment Paper and a Laminator-spindle-lathe.jpg

  10. The Following User Says Thank You to tonyfoale For This Useful Post:

    that_other_guy (Feb 18, 2019)

  11. #9
    Supporting Member rgsparber's Avatar
    Join Date
    Nov 2012
    Location
    Phoenix, AZ
    Posts
    1,321
    Thanks
    775
    Thanked 2,838 Times in 670 Posts

    rgsparber's Tools
    Tony,

    Very helpful!

    My RF-30 CNC mill is set up to always run at 5,000 RPM with a 1/4” end mill except when drilling. Is there much call for running less than 24,000 RPMS with this high speed spindle?

    Rick
    Rick

  12. #10
    Supporting Member tonyfoale's Avatar
    Join Date
    Nov 2016
    Location
    Spain
    Posts
    1,598
    Thanks
    716
    Thanked 2,694 Times in 721 Posts

    tonyfoale's Tools
    Quote Originally Posted by rgsparber View Post
    Tony,
    My RF-30 CNC mill is set up to always run at 5,000 RPM with a 1/4” end mill except when drilling. Is there much call for running less than 24,000 RPMS with this high speed spindle?

    Rick
    I mostly run around 22,000 rpm because it is noticeably quieter. In general it is reasonably quiet though, quieter than I expected. Depending on use I do sometimes run it as low as 12,000 rpm.
    Being air-cooled by internal fan it is not advised to run below 1/3 of max due to reduced cooling but that needs to be balanced against the load on it. I programme my VFD to a minimum of 133 Hz, so my range of frequencies is 133 to 400 Hz so I can't run it too slow in a thoughtless moment.

    If your question is based on the idea of dispensing with the VFD and running on a non-adjustable power source I should mention that as well as being high speed they also need to be fed on a high frequency 3 phase source. The stock VFDs also convert from 1 ph 50/60 Hz 220 v source to 3 phase with voltage programmable up to around 240 v and frequency 0 to 400 Hz. Max safe current is programmable up to the capacity of the VFD and you have programme control over acceleration and braking. There are well over 100 parameters that can be set but in practice 10 should cover most needs, voltage, freq range, max current and acceleration values. If you buy the spindle/VFD package then the VFD will likely come setup for your spindle although the acceleration and braking parameters will be very conservative, resulting in excessive runup and rundown times. From memory I think that I have those values around 8 times more aggressive than stock. If you go too far then it will either not run up to speed or in braking it will simple go into coast mode and let friction and windage do the braking.
    BTW the manuals are very (that should be VERY) badly translated and very difficult to figure out. Hence there is a lot of info on the net in plain English, unfortunately the helpful intent of the authors is spoilt by dangerous incorrect info. resulting in many burnt out motors.

Thread Information

Users Browsing this Thread

There are currently 1 users browsing this thread. (0 members and 1 guests)

Tags for this Thread

Bookmarks

Posting Permissions

  • You may not post new threads
  • You may not post replies
  • You may not post attachments
  • You may not edit your posts
  •