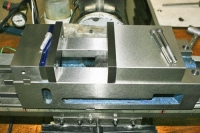
I wanted to try this for a long time but most of what I read indicated that even a 4" Kurt style vise was too big for the Mini Mill.
The vise shown:
https://www.amazon.com/gp/product/B0...?ie=UTF8&psc=1
Fits the Mini Mill and is quite useable even with the loss of a little head room.
Another feature is the lack of an extended base for mounting. This vise may be mounted vertically if needed.
Picture 0 shows the vise mounted along the X-axis. I do not have a picture of it mounted along the Y-axis.
In my setup I wanted a "quick change" mounting so I could switch out the vise for one of my other vises. The supplied keys were too large to fit my T-slots so I filed just a bit more than half the height so they fit my mill but still fit the vise. Proceeding slowly I was able to get a nice fit and maintain a good alignment. While the fit is not a slip fit there is enough clearance so that if the vise is always torqued slightly clockwise while mounting it I was able to file in the keys for an alignment to about .001" in 4" across the fixed jaw. Anything better and I just have to indicate it in. For some reason this seems to work in both the X and Y slots in the vise. (I think I just got lucky). The keys must be positioned exactly the same anytime they are moved from X to Y but I used a center punch to put matching dimples in each key and then on the vise base so they can always be put back in the same position. I still "clock it in" when I install the vise on the mill but it goes so much faster now! (Pics 1 and 2) Oh yes, I did hone the high spots created by the center punching!
I use the center T-slot when aligning the vise with the Y axis and that left my spindle with a 3/8 end mill not able to mill the edge of the part in the fixed jaw. To fix that I added a small steel spacer to push the fixed jaw out a bit and now I can reach the edge of the part in the vise. (Pic 3)
Now I can use a 4" Kurt style vise on the Mini Mill when it is mounted with the Y-axis. But what If I needed to use the vise mounted onthe X-axis? Well there is a fix for that also. Just be ready to drill your new cast iron vise and void any warranty if there ever was one! I drilled and counter bored two holes in the back side of the vise that would accept 1/4-20 allen cap screws. These holes line up with the T-slots in the milling table and go into standard 1/4-20 T-nuts. For the front of the vise I needed to drill a clearance hole in the base for a 1/4-20 allen head cap screw for it's T-nut. I still use the modified keys to get a course alignment of the vise and then clock it in. That is all there is to it. (Pic 4 and 5)
One other minor add was the 1/4-20 threaded holes in both ends of the fixed jaw (Picture 3) so I could use my previously made vise stops.Just watch out not to drill into the existing holes already in the fixed jaw.
Vise Stops: Machinist Vise and Milling/Drilling Vise Stops
Now the bad. That handle is not what was shown in the picture of the listing for the vise. They showed a nice polished and what looked to be chrome plated handle.....Nope, not what I received. I received an ugly, rough finished, black painted cast iron handle....Floppy as can be, sure to whack me in the toe some day......But the fix is in for that minor problem.
Cheers, JR
Here is the fix:
Speed Handle for the 4 Inch CNC or Milling Vise


 LinkBack URL
 About LinkBacks


 Reply With Quote


Bookmarks