Free 186 More Best Homemade Tools eBook:  
Get tool plans

User Tag List

Page 1 of 3 1 2 3 LastLast
Results 1 to 10 of 21

Thread: Jack stands

  1. #1
    Supporting Member Tuomas's Avatar
    Join Date
    Jun 2016
    Location
    Jyväskylä Finland
    Posts
    832
    Thanks
    558
    Thanked 1,864 Times in 507 Posts

    Tuomas's Tools

    Jack stands

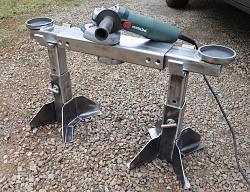
    Making jack stands:


    There was no suitable combination on sale in any hardware store near me.
    ( and i don't trust my life for stuff bought from Amazon.. )
    No lifting support that would have been rated over 1 ton. ( My car weights 1,8 tons )
    Or no wide enough stands that could have been possible to place under the lifting support.

    Making takes about a day, used surplus material, so costs we're less than 20$ for me.

    186 More Best Homemade Tools eBook
    Last edited by Tuomas; May 18, 2020 at 12:44 AM.

  2. The Following 9 Users Say Thank You to Tuomas For This Useful Post:

    Chadboye (May 20, 2020), dubbby (May 24, 2020), Jon (May 21, 2020), olderdan (May 20, 2020), PowerMk (May 18, 2020), Rangi (May 19, 2020), rossbotics (Jun 1, 2020), sossol (Sep 8, 2020), verticalmurph (May 19, 2020)

  3. #2
    Content Editor
    Supporting Member
    DIYer's Avatar
    Join Date
    Aug 2013
    Posts
    3,055
    Thanks
    793
    Thanked 1,885 Times in 1,682 Posts


    Thanks Tuomas! We've added your Jack Extension to our Jacks and Lifts category,
    as well as to your builder page: Tuomas's Homemade Tools. Your receipt:


    2,000+ Tool Plans

  4. #3
    Supporting Member Tuomas's Avatar
    Join Date
    Jun 2016
    Location
    Jyväskylä Finland
    Posts
    832
    Thanks
    558
    Thanked 1,864 Times in 507 Posts

    Tuomas's Tools
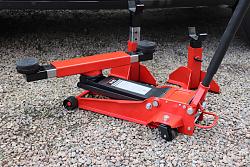
    Here is some pictures.

    Before painting.
    Jack stands-4.jpg

    Painted.
    Jack stands-5.jpg

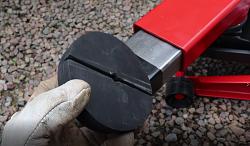
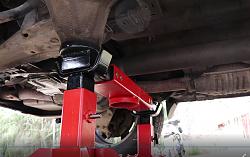
    Skirt lifting pads. Made from rubber, groove cut with angle grinder.
    Jack stands-1.jpg

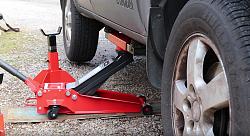
    Lifting one side up from the skirt.
    Jack stands-3.jpg
    Fast to change tires. ( i need to change tires to three cars every autumn and spring. )

    Front or rear can be lift up with one jack. Adjustable width, optimal lifting position in every car.
    Leaves axles and tires free, important when working with axles, suspension etc..
    Jack stands-2.jpg

    Stands works nicely even in little softer surface. Weight is delivered directly to the ground, feets are just for keeping poles straight.

  5. The Following 2 Users Say Thank You to Tuomas For This Useful Post:

    Jon (May 22, 2020), olderdan (May 20, 2020)

  6. #4
    Supporting Member olderdan's Avatar
    Join Date
    Jun 2016
    Posts
    793
    Thanks
    1,463
    Thanked 1,585 Times in 470 Posts

    olderdan's Tools
    I dont crawl under cars any more (to old) but I sure wish I had that available when I did.

  7. #5
    Supporting Member Tuomas's Avatar
    Join Date
    Jun 2016
    Location
    Jyväskylä Finland
    Posts
    832
    Thanks
    558
    Thanked 1,864 Times in 507 Posts

    Tuomas's Tools
    Quote Originally Posted by olderdan View Post
    I dont crawl under cars any more (to old) but I sure wish I had that available when I did.
    I still need to do that. Sometimes its even fun.
    Then there is those days, that one bolt...

  8. #6
    Supporting Member Toolmaker51's Avatar
    Join Date
    Feb 2016
    Location
    Midwest USA
    Posts
    5,334
    Thanks
    7,044
    Thanked 3,011 Times in 1,900 Posts

    Toolmaker51's Tools
    I'll recommend a favorite addition for such jackstands [other than ratcheting type]. One more hole at adjacent or opposite face [female tube] offset by half the spacing used in the sliding tube. Just the ticket for instances calling for only a little higher or lower, not a full step, and neither component is weakened by excess holes.
    Sincerely,
    Toolmaker51
    ...we'll learn more by wandering than searching...

  9. The Following 2 Users Say Thank You to Toolmaker51 For This Useful Post:

    sossol (Sep 8, 2020), Tuomas (May 21, 2020)

  10. #7
    Supporting Member Tuomas's Avatar
    Join Date
    Jun 2016
    Location
    Jyväskylä Finland
    Posts
    832
    Thanks
    558
    Thanked 1,864 Times in 507 Posts

    Tuomas's Tools
    Quote Originally Posted by Toolmaker51 View Post
    I'll recommend a favorite addition for such jackstands [other than ratcheting type]. One more hole at adjacent or opposite face [female tube] offset by half the spacing used in the sliding tube. Just the ticket for instances calling for only a little higher or lower, not a full step, and neither component is weakened by excess holes.
    Yep. Those half steps can be usefull sometimes.
    It wouldn't be bad idea to add "half step" between every hole.

  11. The Following User Says Thank You to Tuomas For This Useful Post:

    Toolmaker51 (May 21, 2020)

  12. #8

    Join Date
    May 2013
    Posts
    7
    Thanks
    0
    Thanked 2 Times in 2 Posts
    Great Job! You have given me some ideas!

  13. #9
    Supporting Member Toolmaker51's Avatar
    Join Date
    Feb 2016
    Location
    Midwest USA
    Posts
    5,334
    Thanks
    7,044
    Thanked 3,011 Times in 1,900 Posts

    Toolmaker51's Tools
    Quote Originally Posted by Tuomas View Post
    Yep. Those half steps can be usefull sometimes.
    It wouldn't be bad idea to add "half step" between every hole.
    Well, how I've done it only takes one hole through; drill the female tube additionally. Any convenient increment(s) of those found in male tube, and works over entire range.
    Sincerely,
    Toolmaker51
    ...we'll learn more by wandering than searching...

  14. #10
    Supporting Member Tuomas's Avatar
    Join Date
    Jun 2016
    Location
    Jyväskylä Finland
    Posts
    832
    Thanks
    558
    Thanked 1,864 Times in 507 Posts

    Tuomas's Tools
    Quote Originally Posted by Toolmaker51 View Post
    Well, how I've done it only takes one hole through; drill the female tube additionally. Any convenient increment(s) of those found in male tube, and works over entire range.
    Yep.

    I tought that i could make another holes to the outer casing to same level with those original ones.
    And add half steps to the internal casing. Then i just need to change side where to place pin, without need to turn internal casing 90 degrees, when using half step feature.

    It needs 4 holes more to be drilled, but needs to be done just once.
    Then actual using would be little faster.

    And. Thanks for the tip!
    Last edited by Tuomas; May 21, 2020 at 11:05 PM.

  15. The Following User Says Thank You to Tuomas For This Useful Post:

    Toolmaker51 (May 21, 2020)

Thread Information

Users Browsing this Thread

There are currently 1 users browsing this thread. (0 members and 1 guests)

Bookmarks

Posting Permissions

  • You may not post new threads
  • You may not post replies
  • You may not post attachments
  • You may not edit your posts
  •