Free 186 More Best Homemade Tools eBook:  
Get 2,500+ tool plans, full site access, and more.

User Tag List

Page 2 of 3 FirstFirst 1 2 3 LastLast
Results 11 to 20 of 27

Thread: Inverting an hydraulic jack for a workshop press.

  1. #11
    Supporting Member tonyfoale's Avatar
    Join Date
    Nov 2016
    Location
    Spain
    Posts
    1,632
    Thanks
    739
    Thanked 2,745 Times in 735 Posts

    tonyfoale's Tools
    Quote Originally Posted by penca View Post
    hello tony, seems to me the frame is a fabrication too, i imagine you`re really busy but if not much trouble can you comment on material and size? i`m about to make a press and would like to get on the correct path regarding to this. thanks man.
    been following your work for years (and i mean years... )
    regards
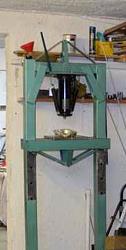
    Rigidity is of the utmost importance in a press, especially if you are using it to insert or separate interference fits such as crank pins in a built up crankshaft. If the the press is "springy" then instead of a nice smooth action it will "stick-slip" as the spring winds up and releases. Therefore, use material for the frame with the thickest sections that you can find or afford. As shown in my previous photos the was a little too much flex under high pressures and I soon braced the bottom and top sections. I'll take some photos of the current arrangement and post them here. I'll also check what section sizes I used, and let you know.

    186 More Best Homemade Tools eBook

  2. The Following User Says Thank You to tonyfoale For This Useful Post:

    Paul Jones (Dec 26, 2016)

  3. #12
    Supporting Member penca's Avatar
    Join Date
    Apr 2013
    Posts
    26
    Thanks
    15
    Thanked 9 Times in 6 Posts

    penca's Tools
    thanks tony, i saw the bracing in the pictures you posted, i`m thinking the ideal shape for the top of the frame would be a triangular form so the members are in tension rather than flex but that`s armchair engineering. i better ask first.
    i`m worried about the casting of the base of the jack i`m planning to use not being strong enough to cope with any side load if there is misalignment while pressing something. i`ve used a different design in which instead of drilling holes for adjusting the height of the "table" there are tabs welded to the frame, looks easier and faster to make although a bit clumsier to operate.
    i`ve experienced the chattering you mention and thought it was flexing within the pieces but makes much more sense what you`re saying, flexing of the press frame.
    i`ll wait for your reply and thanks for taking your time to answer
    pete

    2,500+ Tool Plans

  4. #13
    Supporting Member Cascao's Avatar
    Join Date
    Feb 2016
    Location
    Brasil
    Posts
    153
    Thanks
    118
    Thanked 435 Times in 106 Posts

    Cascao's Tools
    Rigidity is important for safety reasons too.
    More rigidity means less energy stored. Les chance of thing flying around.
    When you feel your press flex, it's time to release pressure and start to heat or freeze something.
    You're the Tony who wrote the book Motorcycle Handling And Chassis Design?

  5. The Following User Says Thank You to Cascao For This Useful Post:

    Paul Jones (Dec 26, 2016)

  6. #14
    Supporting Member tonyfoale's Avatar
    Join Date
    Nov 2016
    Location
    Spain
    Posts
    1,632
    Thanks
    739
    Thanked 2,745 Times in 735 Posts

    tonyfoale's Tools
    Quote Originally Posted by Cascao View Post
    You're the Tony who wrote the book Motorcycle Handling And Chassis Design?
    I have to plead guilty. Details can be found here TONY FOALE DESIGNS - Home page

  7. The Following User Says Thank You to tonyfoale For This Useful Post:

    Paul Jones (Dec 26, 2016)

  8. #15
    Supporting Member tonyfoale's Avatar
    Join Date
    Nov 2016
    Location
    Spain
    Posts
    1,632
    Thanks
    739
    Thanked 2,745 Times in 735 Posts

    tonyfoale's Tools
    Quote Originally Posted by penca View Post
    thanks tony, i saw the bracing in the pictures you posted, i`m thinking the ideal shape for the top of the frame would be a triangular form so the members are in tension rather than flex but that`s armchair engineering. i better ask first.
    Pete,

    Here is a pic. with the bracing that I put on after the previous photos were taken.

    Inverting an hydraulic jack for a workshop press.-bracing.jpg

    As to size of the members. basically some 100 x 100 tube with 3 or 4mm wall. I'd prefer thicker but it is what I had.

  9. The Following User Says Thank You to tonyfoale For This Useful Post:

    Paul Jones (Dec 29, 2016)

  10. #16
    Supporting Member penca's Avatar
    Join Date
    Apr 2013
    Posts
    26
    Thanks
    15
    Thanked 9 Times in 6 Posts

    penca's Tools
    thanks tony, the picture helps a lot, hope to finish the tool soon and i`ll post.
    i definitely prefer the bracing to the ginormous sections
    thanks again
    happy new year - feliz aņo nuevo
    pete

  11. #17
    janders1957's Avatar
    Join Date
    Sep 2017
    Location
    Cootamundra, NSW, AU
    Posts
    8
    Thanks
    35
    Thanked 9 Times in 4 Posts
    Brilliant! Have never liked the usual econo shop presses. This is going to be high on my list as I rebuild my shop.

  12. #18
    Supporting Member Hans Pearson's Avatar
    Join Date
    Jan 2017
    Posts
    203
    Thanks
    16
    Thanked 76 Times in 51 Posts
    Well done Tony, my sentiments on hydraulic presses entirely. I did almost exact what you did some time back and needed about four modifications to get to where I am now with it. I went a different route (eventually) with the pump. I mounted a cut-off hydraulic power pack pump remotely on the side of the press stand and take the pressure into an adapter mounted into the press pump position. (I used steel brake lines for high pressure). Unfortunately the piston of the power pack is a bit bigger than the jack's piston so I only get about 7.5 tons instead of the theoretical 12 tons. I still use the jack reservoir for the oil supply with a return line to the remote pump tank. On the subject of the frame work, it is nice to have a wide press but it puts tremendous forces on the cross members, so watch that width. There is a way of using a second low load jack as a remote pump - the pumps are all the same capacity - come back to me if anybody wants the instructions for that mod.

  13. The Following User Says Thank You to Hans Pearson For This Useful Post:

    Paul Jones (Oct 8, 2017)

  14. #19
    Supporting Member tonyfoale's Avatar
    Join Date
    Nov 2016
    Location
    Spain
    Posts
    1,632
    Thanks
    739
    Thanked 2,745 Times in 735 Posts

    tonyfoale's Tools
    Hans,

    I have been thinking of removing the outer reservoir cylinder and feeding the pump directly from the header tank and taking the outlet of the release valve directly back to the tank. This is not high on the priority list.

  15. The Following User Says Thank You to tonyfoale For This Useful Post:

    Paul Jones (Oct 8, 2017)

  16. #20
    Supporting Member Hans Pearson's Avatar
    Join Date
    Jan 2017
    Posts
    203
    Thanks
    16
    Thanked 76 Times in 51 Posts
    That would be possible, you would then take your return from the pressure release valve, but would have to close off the return to reservoir port in the base. I think working a supply into the inbuilt pump would pose a problem. I have an adapter that replaces the jack pump and feeds directly from the remote pump. It still returns into the reservoir but another low pressure pipe leads back into the power pack reservoir, a pressure relief filter high in the jack relieves air pressure build up and protects the piston seal. Perhaps I should post a series of pictures of my setup. My pipe connections are a copy of the high pressure couplings used on older models of Citroen cars. A very simple and effective system that easily withstands over 2000 psi.

Thread Information

Users Browsing this Thread

There are currently 1 users browsing this thread. (0 members and 1 guests)

Tags for this Thread

Bookmarks

Posting Permissions

  • You may not post new threads
  • You may not post replies
  • You may not post attachments
  • You may not edit your posts
  •