I tried to buy one, I really did. My local Honda dealer said they were out of stock, there were guys in the USA (I'm in the EU) who had them but it cost a bundle to ship, other guys on fleabay had them, kinda. Oh well. Totally convinced that the 250,000 kms on my steering rack had worn the 'slipper' and was the reason my old CRV handles like a pig on roller skates, (oh, and the rack rattles off road).
I decided that I'm just gonna have to make one.
OK, the 14mm centre adjustment bolt on these Honda steering racks have a 40mm locking ring around them and is located on these (stupidly, stupidly designed) racks underneath, nay, behind where the steering column joins the rack itself, tight up against the bulkhead, obviously at the back of the engine bay. In other words, it's a real peach to get at. I'll leave the internet to show you where yours is, but suffice to say I could not quite get enough room for my homemade wrench to work, so I did remove the support bracket at that end of the rack to allow a little more wiggle room for the wrench.
p.s. I tend to judge the quality of the design on a vehicle by how few 'special tools' one needs to maintain it. My Honda CRV needs plenty...
So, since lots of folks I talked to about this particular adjustment had no idea what I was talking about, I'm a wondering just how many perfectly serviceable steering racks ended up in the scrap bin, when in reality all they needed was a very awkward adjustment to take up the slack in the rack where the slipper hits the internal rack :-(
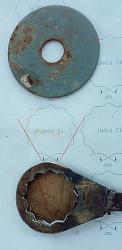
I used a thin blade in a 4 1/2" grinder to cut out a 12 point 40mm wrench shape from a 3mm thick piece of steel. I copied an image from the net and printed it out, adjusting the image size until it printed out at 40mm across the flats. Cutting from both sides the 3mm thick washer and then I finished it off with a hacksaw blade and a file. I'll be honest, it would have been a lot easier if I'd had a 40mm bolt or nut to keep checking progress on but hey, it got the job done in the end, I just needed a little more space than I'd have needed if the wrench was a 100% tight fit. I then shaped the excess metal away and welded the results onto an old fire poker.
You use the tool to back off the lock nut. Spray everything with WD40 and then tighten and back off the central slipper adjustment nut a few times to get it really free. Then run it up until it's just nipped up tight (specs say 4nm, which isn't much) and then back it off 20 degrees. I folded a piece of paper over and over until it was 20 degrees on my kids protractor and then held it up behind the 14mm spanner when I backed it off.
The result? Oh, man, the rattle has gone and it steers like a new car (I know because I have the mother in laws new motor on loan for comparison!). Definitely worth considering making this tool if you've got an ageing Honda and the steerings a little vague at motorway speeds.
Cheers
Ian


 LinkBack URL
 About LinkBacks


 Reply With Quote


Bookmarks