Free 186 More Best Homemade Tools eBook:  
Get tool plans

User Tag List

Page 5 of 6 FirstFirst 1 2 3 4 5 6 LastLast
Results 41 to 50 of 52

Thread: Homemade press

  1. #41
    Supporting Member Tuomas's Avatar
    Join Date
    Jun 2016
    Location
    Jyväskylä Finland
    Posts
    832
    Thanks
    558
    Thanked 1,865 Times in 507 Posts

    Tuomas's Tools
    Quote Originally Posted by chy_farm View Post
    Great job Toumas, I love this press. Would not mind making one for my own use some day. Thanks for sharing.
    Chy
    Thanks mate. Im happy if you found it usefull.

    186 More Best Homemade Tools eBook

  2. #42
    Supporting Member Toolmaker51's Avatar
    Join Date
    Feb 2016
    Location
    Midwest USA
    Posts
    5,334
    Thanks
    7,044
    Thanked 3,011 Times in 1,900 Posts

    Toolmaker51's Tools

    Tuomas's press

    Quote Originally Posted by Tuomas View Post
    All kinds of good features in this project, but my favorite is pictured.
    Round stock for dies, far better at shaping than conventional use of inverted angle iron [apex up]. Not only easier to control, but makes acute angles possible. Contact with angles remain constant, while round diminishes as punch enters farther.
    Notated illustration below, click to enlarge. Enjoy!
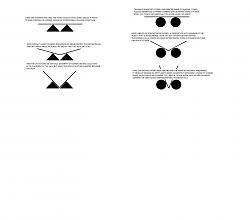
    Homemade press-vee_vs_round-dies.jpg

    2,000+ Tool Plans
    Last edited by Toolmaker51; Apr 7, 2018 at 03:17 PM. Reason: sketch-up
    Sincerely,
    Toolmaker51
    ...we'll learn more by wandering than searching...

  3. The Following 3 Users Say Thank You to Toolmaker51 For This Useful Post:

    Frank S (Apr 7, 2018), Paul Jones (Apr 9, 2018), PJs (Apr 10, 2018)

  4. #43
    Supporting Member Tuomas's Avatar
    Join Date
    Jun 2016
    Location
    Jyväskylä Finland
    Posts
    832
    Thanks
    558
    Thanked 1,865 Times in 507 Posts

    Tuomas's Tools
    Quote Originally Posted by Toolmaker51 View Post
    All kinds of good features in this project, but my favorite is pictured.
    Round stock for dies, far better at shaping than conventional use of inverted angle iron [apex up]. Not only easier to control, but makes acute angles possible. Contact with angles remain constant, while round diminishes as punch enters farther.
    Notated illustration below, click to enlarge. Enjoy!
    Click image for larger version. 

Name:	Vee_vs_Round dies.jpg 
Views:	307 
Size:	178.7 KB 
ID:	23131
    Thanks. I like both are usefull. Angle iron for very tight corners. Round bars for larger diameters.. bonus is that round die doesn't leave marks so easily.

    Personally i like that angle irons and "sharp" upper die helps to get bens to the right spots, specially when you need to bend both ends of the object, and right distance between bends is important.

    I place the "sharp" upper die to the mark and press. I count the centerpoint of the bend radius, wich usually is one times plate thickness, if both bends are 90 degree. ( material thickness affects ) With round upper die placing it to the right spot needs more carefull preparations.

  5. The Following 3 Users Say Thank You to Tuomas For This Useful Post:

    Paul Jones (Apr 9, 2018), PJs (Apr 10, 2018), Toolmaker51 (Apr 9, 2018)

  6. #44
    Supporting Member Toolmaker51's Avatar
    Join Date
    Feb 2016
    Location
    Midwest USA
    Posts
    5,334
    Thanks
    7,044
    Thanked 3,011 Times in 1,900 Posts

    Toolmaker51's Tools
    Quote Originally Posted by Tuomas View Post
    Thanks. I like both are usefull. Angle iron for very tight corners. Round bars for larger diameters.. bonus is that round die doesn't leave marks so easily.

    Personally i like that angle irons and "sharp" upper die helps to get bens to the right spots, specially when you need to bend both ends of the object, and right distance between bends is important.

    I place the "sharp" upper die to the mark and press. I count the centerpoint of the bend radius, wich usually is one times plate thickness, if both bends are 90 degree. ( material thickness affects ) With round upper die placing it to the right spot needs more carefull preparations.
    Well, I don't want to be the taskmaster, but you'll get a good measure of repeatability with a back-gauge. Then preparation will cover a run of parts. I need to do some round corners myself, to restore a rusted out and ancient Kennedy roll-cabinet. I'm even thinking of making it a bit taller. Issue now is how to produce offsets for the panels between...
    Last edited by Toolmaker51; Apr 9, 2018 at 08:37 PM.
    Sincerely,
    Toolmaker51
    ...we'll learn more by wandering than searching...

  7. The Following User Says Thank You to Toolmaker51 For This Useful Post:

    PJs (Apr 10, 2018)

  8. #45
    Supporting Member Tuomas's Avatar
    Join Date
    Jun 2016
    Location
    Jyväskylä Finland
    Posts
    832
    Thanks
    558
    Thanked 1,865 Times in 507 Posts

    Tuomas's Tools
    Quote Originally Posted by Toolmaker51 View Post
    Well, I don't want to be the taskmaster, but you'll get a good measure of repeatability with a back-gauge. Then preparation will cover a run of parts. I need to do some round corners myself, to restore a rusted out and ancient Kennedy roll-cabinet. I'm even thinking of making it a bit taller. Issue now is how to produce offsets for the panels between...
    Yep. It helps sometimes. But i don't usually trust them. If you make bends for the both ends using back-gauge, and have made little mistake when cutting the workpiece, then mistake is delivered between the bends.

    I like to design my builds so that possible measuring mistakes are left to the edges, where there usually is no matter, if one side is one millimeter longer or shorter. ( if it matters, then its easy to remove with grinder.)

    This gives me a conclusion that there is no best way to do anything that would work with everybody. Everyone works on their own way, how they design, mark or measure..

    Personally i think that its good to have many different bending dies. But if i would need to choose only one option, that would be:

    Round bars at the lower die, and sharp one on upper.

  9. The Following 2 Users Say Thank You to Tuomas For This Useful Post:

    PJs (Apr 10, 2018), Toolmaker51 (Oct 28, 2019)

  10. #46
    Supporting Member Toolmaker51's Avatar
    Join Date
    Feb 2016
    Location
    Midwest USA
    Posts
    5,334
    Thanks
    7,044
    Thanked 3,011 Times in 1,900 Posts

    Toolmaker51's Tools
    Quote Originally Posted by Tuomas View Post
    Personally i think that its good to have many different bending dies. But if i would need to choose only one option, that would be:
    Round bars at the lower die, and sharp one on upper.
    Agreed, 100%. A little radius on a "sharp" die will bend many thicknesses without fracture, though I know you mean minimal [even smaller] radius. Those are the basic form of air dies.
    Sincerely,
    Toolmaker51
    ...we'll learn more by wandering than searching...

  11. The Following 2 Users Say Thank You to Toolmaker51 For This Useful Post:

    PJs (Apr 13, 2018), Tuomas (Apr 12, 2018)

  12. #47
    Supporting Member Tuomas's Avatar
    Join Date
    Jun 2016
    Location
    Jyväskylä Finland
    Posts
    832
    Thanks
    558
    Thanked 1,865 Times in 507 Posts

    Tuomas's Tools
    Made this jig for stamping sheet metals, it also works when punching holes.

    I like to make tools that can be used many ways, it saves material and space.

    I have couple projects where i can use this tool. I shared it, because i tought one can get ideas from it for some other projects too.

    Attachment 23303

    Cone shaped ends are stamped.
    Attachment 23305Attachment 23306

    Bottom is flat, because i weld M8 nuts behind the plates, to attach leds and hose fittings.


    Made a "stress test" with 4mm alumine plate. I need to punch hundreds of holes to 1mm thick plates to make heat exchanger, so it looks promising.
    Didn't want to waste that test piece, so i used it for this.
    Attachment 23304

    Video shows more:

    Attached Thumbnails Attached Thumbnails Homemade press-img_20180412_103726_505.jpg   Homemade press-img_20180412_103726_506.jpg  
    Last edited by Tuomas; Apr 14, 2018 at 02:44 AM.

  13. The Following 2 Users Say Thank You to Tuomas For This Useful Post:

    Jon (Oct 28, 2019), PJs (Apr 13, 2018)

  14. #48
    Supporting Member
    Join Date
    Aug 2016
    Posts
    635
    Thanks
    1
    Thanked 187 Times in 166 Posts

    wizard69's Tools
    Tuomas;

    Thanks for this post, I believe I missed it when it was first posted. In any event you have filled my mind with a massive number of ideas as this press certainly has the flexibility to do most of what I need out of a press.

    One thing I might suggest for future builders is to keep the top cross member flat or provide a way to mount a table above the brace. The idea here is that the top cylinder can be permanently attached to the press and simply stored on top of the upper cross member when not needed. I'm always thinking about storage issue due to very little shop space at the moment. The idea of being able to gain quick access to the upper cylinder has great appeal also.

    I might actually have enough materials on hand to build a variant of this press. It won't be an exact copy due to not having all the same material you used.

  15. The Following User Says Thank You to wizard69 For This Useful Post:

    PJs (May 31, 2018)

  16. #49
    Supporting Member ranald's Avatar
    Join Date
    Jan 2018
    Location
    Black Mountain Queensland
    Posts
    1,326
    Thanks
    992
    Thanked 367 Times in 256 Posts

    ranald's Tools
    Really nice job Tuomas. I was a gunna guy & was gunna make one mainly for removing bearings from mower decks. The bearings would be fouled by fishing line in parks (fishing and kite flying). The second worst culprit was bailing twine that the local government used for stabalising young trees & never cleaned up after themselves after removal of twine and stakes from the trees. Then the price of a 20 ton press was about the same as for the bottle jack alone so I bought one.

    Could you use the bender attachment (new one) turned at 90 degrees to form longer( than distance between uprights) thinner plate?

  17. #50
    Supporting Member Tuomas's Avatar
    Join Date
    Jun 2016
    Location
    Jyväskylä Finland
    Posts
    832
    Thanks
    558
    Thanked 1,865 Times in 507 Posts

    Tuomas's Tools
    Here is a video about the whole idea behind this build.


    Its a little long, but it should tell the whole story.

  18. The Following 5 Users Say Thank You to Tuomas For This Useful Post:

    Jon (Oct 28, 2019), Little Rabbit (Nov 4, 2019), Moby Duck (Oct 30, 2019), Rangi (Oct 30, 2019), Toolmaker51 (Oct 28, 2019)

Thread Information

Users Browsing this Thread

There are currently 1 users browsing this thread. (0 members and 1 guests)

Bookmarks

Posting Permissions

  • You may not post new threads
  • You may not post replies
  • You may not post attachments
  • You may not edit your posts
  •