Free 186 More Best Homemade Tools eBook:  
Get tool plans

User Tag List

Page 2 of 2 FirstFirst 1 2
Results 11 to 18 of 18

Thread: Homemade manual square tube bender

  1. #11
    Supporting Member Tuomas's Avatar
    Join Date
    Jun 2016
    Location
    Jyväskylä Finland
    Posts
    832
    Thanks
    558
    Thanked 1,865 Times in 507 Posts

    Tuomas's Tools
    Quote Originally Posted by Frank S View Post
    Are you noticing any flex in the side plates or are they staying tight against the center die.
    I haven't.

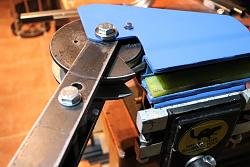
    As you see "arms" supports the package on vertical direction.
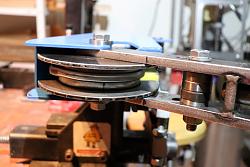
    Homemade manual square tube bender-1.jpg

    Also i have to take back my previous post.
    If you look those pictures closely, you notice that i mounted that lower edge support plate wrong side up. blaah...
    That's why i got different results with the widht.


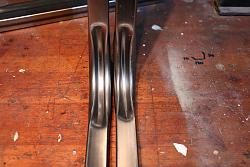
    Also i made a little improvement, just drilled a hole through the whole thing, now i can lock the used "slot depth", and get similar results every time.

    Homemade manual square tube bender-2.jpg

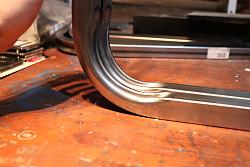
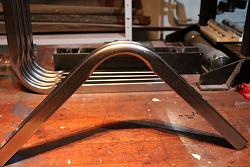
    Now when comparing deep, or shallow slot. Only difference can be seen from this picture:
    Homemade manual square tube bender-3.jpg

    Somewhat similar, only difference is that deeper slot handles little bigger force before it starts to loose its shape.

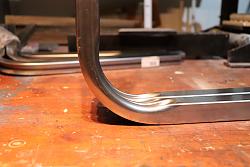
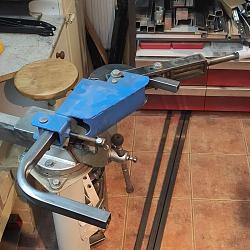
    I think that the result is now somewhat best that i can get with the manual bender with radius this tight, and i wanted to get tight radius.
    ( without need to use plenty of time for bending ).


    Homemade manual square tube bender-4.jpgHomemade manual square tube bender-5.jpgHomemade manual square tube bender-6.jpg

    Personally i am satisfied... Now i just need to make stronger vise mount.

    186 More Best Homemade Tools eBook
    Last edited by Tuomas; Dec 19, 2018 at 05:36 AM.

  2. The Following User Says Thank You to Tuomas For This Useful Post:

    Jon (Dec 19, 2018)

  3. #12
    Supporting Member Frontier Forge's Avatar
    Join Date
    Nov 2018
    Location
    Lyons, Kansas
    Posts
    64
    Thanks
    37
    Thanked 52 Times in 21 Posts

    Frontier Forge's Tools
    Brilliant! What a great idea. Heck of a job, mate!

    2,000+ Tool Plans
    Subscribe To My Channel!!
    Frontier Forge

  4. The Following User Says Thank You to Frontier Forge For This Useful Post:

    Tuomas (Dec 19, 2018)

  5. #13
    Supporting Member Tuomas's Avatar
    Join Date
    Jun 2016
    Location
    Jyväskylä Finland
    Posts
    832
    Thanks
    558
    Thanked 1,865 Times in 507 Posts

    Tuomas's Tools
    Quote Originally Posted by Frontier Forge View Post
    Brilliant! What a great idea. Heck of a job, mate!
    Thank you very much.

  6. #14

    Join Date
    Oct 2015
    Posts
    4
    Thanks
    0
    Thanked 0 Times in 0 Posts
    Very good work Thomas.
    Try putting the weld on the side. (Neutral axis). It may or may not make a big difference. However it's good practice to put the seam or weld on the neutral axis. To minimise any chance of the weld splitting

  7. #15

    Join Date
    Oct 2015
    Posts
    4
    Thanks
    0
    Thanked 0 Times in 0 Posts
    If you want a really small radius. You can fabricate a vee block with slightly tapered sides out of say 10mm plate. To use in a hydraulic press. Then make a "nose" from polished 25 x 8 mm flat bar to push on the inside (topside) of the steel tube. The die needs to be lubricated.
    It's probably better to call it a "crush" bend. It did not take too long to set up and it worked very well.
    I am not sure if I kept it when I moved workshops but if I find it I will post an image.
    Last edited by Whitworthsocket; Mar 12, 2019 at 08:28 PM. Reason: Spelling mistake

  8. #16
    Supporting Member Tuomas's Avatar
    Join Date
    Jun 2016
    Location
    Jyväskylä Finland
    Posts
    832
    Thanks
    558
    Thanked 1,865 Times in 507 Posts

    Tuomas's Tools
    Quote Originally Posted by Whitworthsocket View Post
    Very good work Thomas.
    Try putting the weld on the side. (Neutral axis). It may or may not make a big difference. However it's good practice to put the seam or weld on the neutral axis. To minimise any chance of the weld splitting
    Thanks!

    Sorry about answering little late. But, my English ain't very good.. I am not sure where you suggested to add welds?

    Its always good to practise welding, but i rather don't practise for pieces that i'm working on.
    Anyway, i like to use welds only in those places where its required.

    That might sound weird, because i have worked with metals over 20 years, and have two graduates about welding.

    Actual bender is designed so, that there is welds on every direction,
    those plug welds and seams on the ends of the split square tubing " locks " possible movements on the sideways, also there is that curved plate on opposite edge of the square tubing.

    Those makes structure so strong, that at the point when welds could possible split,
    it is lost its shape and most likely is unusable condition anyway.
    I try to plan and use welds as strong as the materials are, to avoid unnecessary distortion.

  9. #17
    Supporting Member Tuomas's Avatar
    Join Date
    Jun 2016
    Location
    Jyväskylä Finland
    Posts
    832
    Thanks
    558
    Thanked 1,865 Times in 507 Posts

    Tuomas's Tools
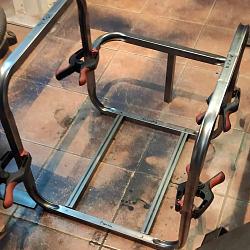
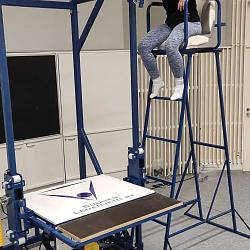
    Here is one example where i use this.

    Homemade manual square tube bender-fb_img_1637950499529.jpg

    Homemade manual square tube bender-fb_img_1637950507781.jpg

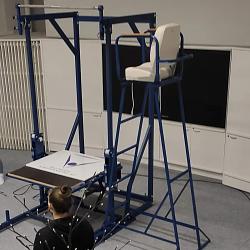
    Result was a referee's chair for pull ups competition.

    Homemade manual square tube bender-fb_img_1637950513032.jpg

    Homemade manual square tube bender-fb_img_1637950518268.jpg

  10. #18
    Supporting Member Tuomas's Avatar
    Join Date
    Jun 2016
    Location
    Jyväskylä Finland
    Posts
    832
    Thanks
    558
    Thanked 1,865 Times in 507 Posts

    Tuomas's Tools
    I made the pull up stand too. I post some pictures later, If one is interested.

    Here is a clip about in use.
    New national Record in Females 52 chinups: https://www.instagram.com/tv/CWyX_v9...dium=copy_link

    Idea in the stand is to lift shorter pullers to reach the bar, and then lower it down, to allow free movement of feets.


    2,000+ Tool Plans

Thread Information

Users Browsing this Thread

There are currently 1 users browsing this thread. (0 members and 1 guests)

Bookmarks

Posting Permissions

  • You may not post new threads
  • You may not post replies
  • You may not post attachments
  • You may not edit your posts
  •