Free 186 More Best Homemade Tools eBook:  
Get tool plans

User Tag List

Page 3 of 5 FirstFirst 1 2 3 4 5 LastLast
Results 21 to 30 of 47

Thread: Home built universal grinder

  1. #21
    Supporting Member tonyfoale's Avatar
    Join Date
    Nov 2016
    Location
    Spain
    Posts
    1,617
    Thanks
    730
    Thanked 2,725 Times in 730 Posts

    tonyfoale's Tools
    Quote Originally Posted by albertq View Post
    Good luck with your grinding project. As I mostly make one-off parts, I didn't want to CNC my machine, but rather manually operate it with the use of DRO.
    Anyway I'm not that smart so couldn't do it if I wanted to.
    I only make one-stuff also but as the movements are simple on a surface grinder a CNC drive for the table is the easiest for me. Just back and forth a set distance at a set speed and and set step overs each stroke. The down feed on the wheel will be manual.

    I am currently undecided on the longitudinal feed method. I did get a 20 mm pitch ball screw to drive it and I mocked up a wooden test table to see if a reasonable size stepper motor could drive it with enough acceleration. That worked perfectly but I am still debating whether to use a belt like yours or a wire in place of a belt. I have some experience with wire drives so it would not be a big learning experience.

    CNC was the obvious choice for the cam grinding machine, that will save a lot of mechanical construction. With ball screws the accuracy should be good which is essential. Only the infeed axis will be CNC though, moving between adjacent cam lobes will be manual.

    186 More Best Homemade Tools eBook

  2. #22
    Supporting Member
    Join Date
    Aug 2021
    Location
    Cape Town SA
    Posts
    250
    Thanks
    751
    Thanked 87 Times in 39 Posts

    albertq's Tools
    Quote Originally Posted by tonyfoale View Post
    Albert,

    Considering the effort that you put into this you must be really annoyed with the mis-spelling in the 4th axis column. Many years ago I had a batch of Tee shirts made with a spelling mistake and I hated it.

    On some projects I have made face panels by simply laser printing on to adhesive backed paper and sprayed a couple of coats of clear as you mentioned. Recently I have used a laser engraver but that tends to limit the colours. You need light coloured lettering on a dark coloured background. I paint the panel white to start with and then followed by black. The black absorbs the laser light and burns off, but the white reflects the light and stays intact.
    Yes irritating indeed that I didn't spot it before the point I ran out of patience to replace it, as it is spelt correctly below. Was very happy until you also spotted it.
    After you have lasered on the black paint lettering, is the white paint below untouched? I suppose you have to get the laser setting just right.

    2,000+ Tool Plans

  3. #23
    Supporting Member
    Join Date
    Aug 2021
    Location
    Cape Town SA
    Posts
    250
    Thanks
    751
    Thanked 87 Times in 39 Posts

    albertq's Tools
    Quote Originally Posted by tonyfoale View Post
    I only make one-stuff also but as the movements are simple on a surface grinder a CNC drive for the table is the easiest for me. Just back and forth a set distance at a set speed and and set step overs each stroke. The down feed on the wheel will be manual.

    I am currently undecided on the longitudinal feed method. I did get a 20 mm pitch ball screw to drive it and I mocked up a wooden test table to see if a reasonable size stepper motor could drive it with enough acceleration. That worked perfectly but I am still debating whether to use a belt like yours or a wire in place of a belt. I have some experience with wire drives so it would not be a big learning experience.

    CNC was the obvious choice for the cam grinding machine, that will save a lot of mechanical construction. With ball screws the accuracy should be good which is essential. Only the infeed axis will be CNC though, moving between adjacent cam lobes will be manual.
    As I'm no good with electronics I left the connection of steppers, drivers and panel to my electrical engineer nephew. I prefer toggle & push-button switches and rotating potentiometer knobs to a touch screen for this application, as I can eyeball the speed I want while making the adjustment.
    I used steppers for their compactness and torque rather than for exact positioning, as I always intended on using DRO.

    The CNC for cam profiling is a great idea as you can easily change the profiles or size. Way beyond my skill set, as I usually make expensive smoke with electronics.

  4. #24
    Supporting Member tonyfoale's Avatar
    Join Date
    Nov 2016
    Location
    Spain
    Posts
    1,617
    Thanks
    730
    Thanked 2,725 Times in 730 Posts

    tonyfoale's Tools
    Quote Originally Posted by albertq View Post
    Yes irritating indeed that I didn't spot it before the point I ran out of patience to replace it, as it is spelt correctly below. Was very happy until you also spotted it.
    After you have lasered on the black paint lettering, is the white paint below untouched? I suppose you have to get the laser setting just right.
    I hope that I did not raise a sore point about the spelling but I am afraid those things jumps out of the page at me and I assumed that you had realised it by then. It is so easy to do and so annoying when you do.

    About the laser engraver. My son had a surplus to requirements 3D printer and I saw that replacing the printing head with a laser would be an easy job. So I fitted a low power laser (read CHEAP) to check out whether it would be a useful tool before spending more on a more powerful unit. I'll make a post on that soon. I do not have many photos of the lettering tasks but here is a first attempt at getting some software settings adjusted, near the top you can just see some witness marks where the power was too low or the feed too high.
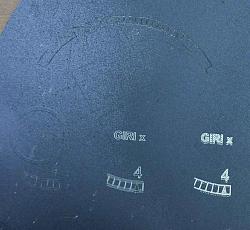
    Home built universal grinder-laserthing005.jpg Click for full size.

    Once I understood the settings the results improved. As you can see the white below is not noticeably affected.

    Home built universal grinder-tacho-aermacchi-partial.jpg

    This was just a test because I actually needed a black on white dial to roughly replicate a vintage tacho dial. I just printed this on adhesive backed paper and coated it with 2 coats of clear lacquer.

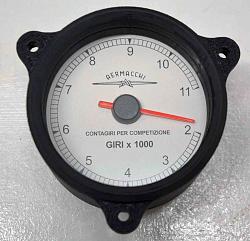
    Home built universal grinder-tacho-aermacchi-no-extras.jpg Home built universal grinder-tacho.jpg

  5. #25
    Supporting Member tonyfoale's Avatar
    Join Date
    Nov 2016
    Location
    Spain
    Posts
    1,617
    Thanks
    730
    Thanked 2,725 Times in 730 Posts

    tonyfoale's Tools
    Quote Originally Posted by albertq View Post
    As I'm no good with electronics I left the connection of steppers, drivers and panel to my electrical engineer nephew. I prefer toggle & push-button switches and rotating potentiometer knobs to a touch screen for this application, as I can eyeball the speed I want while making the adjustment.
    I used steppers for their compactness and torque rather than for exact positioning, as I always intended on using DRO.

    The CNC for cam profiling is a great idea as you can easily change the profiles or size. Way beyond my skill set, as I usually make expensive smoke with electronics.
    From 8 yo to 16 yo my hobby was electronics, then I left it alone for several decades except for when needs required it. Although my knowledge quickly got outdated more recently these sort of projects have become much easier with the advent of really cheap micros. These have largely replaced a need for circuit design skills with programming. You just get an Arduino, Pi, teensy or ESP32 for a few dollars and in effect it becomes any circuit that you programme it to be.

    I have a Bridgeport mill which came to me with a very old CNC controller. The axis were powered by top quality servos, there were various suggestions to change these for steppers when I wanted to upgrade the controller. i just did not like the affordable steppers at that time. Since then the closed loop steppers have dropped in price and my opinion has changed. You may like my not-CNC lathe conversion which is controlled with a $5 ESP32 board and closed loop steppers. It has exceeded my expectations in all respects. I fitted ball screws on both axis, and as you have pointed out, the accuracy is improved. Here is a link to a post on this forum. Ball screw and electronic lathe conversion and a follow up More on my lathe conversion

  6. #26
    Supporting Member
    Join Date
    Aug 2021
    Location
    Cape Town SA
    Posts
    250
    Thanks
    751
    Thanked 87 Times in 39 Posts

    albertq's Tools
    Quote Originally Posted by tonyfoale View Post
    I hope that I did not raise a sore point about the spelling but I am afraid those things jumps out of the page at me and I assumed that you had realised it by then. It is so easy to do and so annoying when you do.

    About the laser engraver. My son had a surplus to requirements 3D printer and I saw that replacing the printing head with a laser would be an easy job. So I fitted a low power laser (read CHEAP) to check out whether it would be a useful tool before spending more on a more powerful unit. I'll make a post on that soon. I do not have many photos of the lettering tasks but here is a first attempt at getting some software settings adjusted, near the top you can just see some witness marks where the power was too low or the feed too high.

    Click image for larger version. 

Name:	LaserThing005.jpg 
Views:	61 
Size:	98.3 KB 
ID:	46656 Click for full size.

    Once I understood the settings the results improved. As you can see the white below is not noticeably affected.

    Click image for larger version. 

Name:	Tacho Aermacchi Partial.jpg 
Views:	57 
Size:	23.6 KB 
ID:	46657

    This was just a test because I actually needed a black on white dial to roughly replicate a vintage tacho dial. I just printed this on adhesive backed paper and coated it with 2 coats of clear lacquer.

    Click image for larger version. 

Name:	Tacho Aermacchi No extras.jpg 
Views:	59 
Size:	99.9 KB 
ID:	46658 Click image for larger version. 

Name:	Tacho.jpg 
Views:	50 
Size:	98.1 KB 
ID:	46659
    I'd say those are pretty good results. I would have been more than happy with that. Well done.

  7. #27
    Supporting Member
    Join Date
    Aug 2021
    Location
    Cape Town SA
    Posts
    250
    Thanks
    751
    Thanked 87 Times in 39 Posts

    albertq's Tools
    Quote Originally Posted by ozylee View Post
    Hi Albertq,

    I have been involved with machine tools in building and repair (mainly CNC) machines for over 45 years and very impressed with your quality machinery and drawing details.
    If you could send the .dxf files I would be most appreciated.
    I have often thought about building a universal grinder but yours is the next level up.
    It would be a project that I would love to attempt.
    What I see on your parts photo I may have many of the bearings and linear way in my workshop already that I have collected over the years.
    Just waiting for the right project to attempt.

    Cheers
    Ozylee
    Hi Ozylee, I could send you all 160 odd sheet metal .dxf and .pdf bending drawings but that would only be for all the sheet metal bits. The problem would be all the machined parts which I have only in Fusion design and drawing files. If you are running Fusion, I'm happy to give you access to the project then you would have every detail.

  8. The Following User Says Thank You to albertq For This Useful Post:

    ozylee (Nov 29, 2023)

  9. #28
    Jon
    Jon is online now Jon has agreed the Seller's Terms of Service
    Administrator
    Supporting Member
    Jon's Avatar
    Join Date
    Jan 2012
    Location
    Colorado, USA
    Posts
    26,532
    Thanks
    8,135
    Thanked 40,441 Times in 11,815 Posts
    Fusion may allow you to export to PDF or another format. This will not be as nice as viewing a Fusion file, but it would be more portable.

  10. #29
    Supporting Member
    Join Date
    Sep 2020
    Location
    Australia
    Posts
    5
    Thanks
    11
    Thanked 0 Times in 0 Posts
    Hi Albertq,

    When I was serving and repairing CNC machines for my work, I told myself I would buy a machine than build one.
    Now that I have retired, I find that going back to my old craft of precision machining for a hobby is more satisfying than purchasing a finished machine.
    I do use Fusion software and if you are willing to let me have access to your files it would be most appreciated.
    Look forward to hearing back from you.

    Cheers
    Ozylee.


  11. #30
    Supporting Member Saltfever's Avatar
    Join Date
    Apr 2012
    Location
    NorCal
    Posts
    405
    Thanks
    404
    Thanked 141 Times in 101 Posts

    Saltfever's Tools
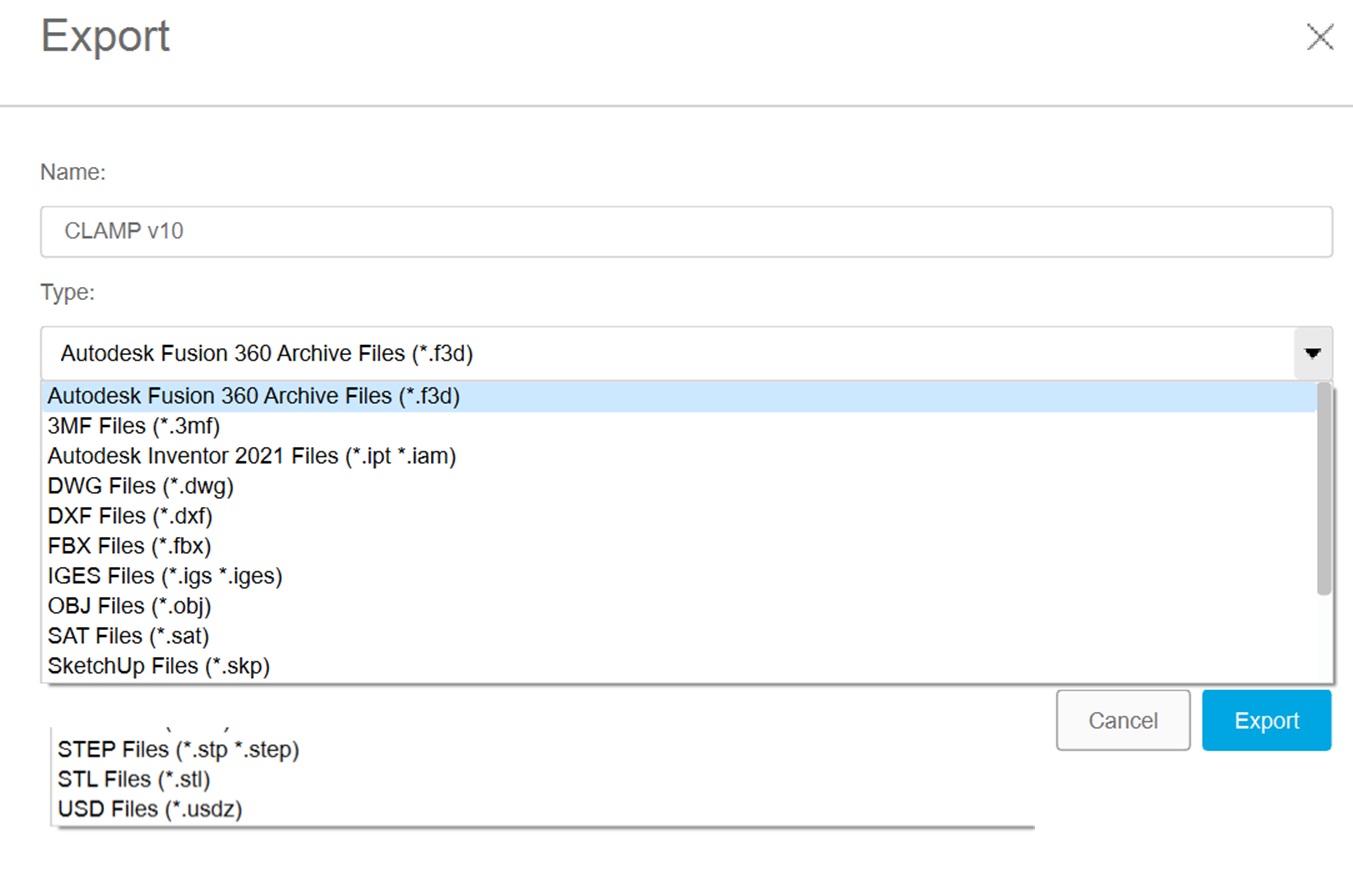
    It looks like these are the only formats F-360 can export.
    EDIT: This list is for the full blown education version. Free versions of F-360 restrict many features (or formats).

    Name:  Fusion Export files.jpg
Views: 184
Size:  123.1 KB
    Last edited by Saltfever; Nov 30, 2023 at 02:07 PM. Reason: Added red text above.

  12. The Following User Says Thank You to Saltfever For This Useful Post:

    ozylee (Nov 30, 2023)

Thread Information

Users Browsing this Thread

There are currently 2 users browsing this thread. (0 members and 2 guests)

Bookmarks

Posting Permissions

  • You may not post new threads
  • You may not post replies
  • You may not post attachments
  • You may not edit your posts
  •