Free 186 More Best Homemade Tools eBook:  
Get tool plans

User Tag List

Page 1 of 4 1 2 3 4 LastLast
Results 1 to 10 of 37

Thread: Home built Heat Treating Oven

  1. #1
    Supporting Member anthonyget's Avatar
    Join Date
    Oct 2019
    Location
    Kelmarsh, UK
    Posts
    89
    Thanks
    31
    Thanked 153 Times in 42 Posts

    anthonyget's Tools

    Home built Heat Treating Oven

    This has been a real tough one. Here is part one of my home made electric steel heat treat oven.
    I have researched loads of different designs and builds. Here is the one I believe is best suited to guys who have limited equipment and avoids the over engineered models out there. Tell me if you agree/dont agree.

    186 More Best Homemade Tools eBook

  2. The Following 9 Users Say Thank You to anthonyget For This Useful Post:

    clydeman (Jun 8, 2020), DIYSwede (Jun 7, 2020), gogs26 (Jun 8, 2020), high-side (Jun 11, 2020), Inner (Jun 8, 2020), Jon (Jun 8, 2020), mwmkravchenko (Jun 8, 2020), n9dug (Jun 9, 2020), Saltfever (Jun 9, 2020)

  3. #2
    Supporting Member DIYSwede's Avatar
    Join Date
    May 2019
    Location
    Stockholm, Sweden...
    Posts
    634
    Thanks
    416
    Thanked 804 Times in 319 Posts

    DIYSwede's Tools
    -Thank you for a well made video! Nicely presented considerations and executions.
    Also, thanks for the crucial warning regarding the dust produced and the necessity for a face mask.

    Being in a "Furnace-planning mode" myself, I've just got a few tips:

    1) Blocks can be soaked in water before cutting, (temporarily) keeping the free dust down.

    2) Kanthal A-1 wire has higher temp, longer life, (higher prize) but it also assumes:

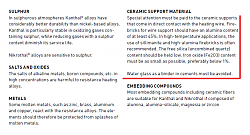
    3) Using the "26" type of blocks is absolutely recommended, as their alumina content is higher than lower grades
    (which can be seen from the Kanthal Handbook
    https://www.kanthal.com/globalassets...41-b-eng.pdf):

    Home built Heat Treating Oven-kanthal-handbook.png

    4) As they also simply say: "Water glass as a binder in cements must be avoided."

    I guess they mean avoided entirely in the oven, as the fumes seems to deteriorate the Kanthal wire over time.
    Which really is a PITA, as water glass/ sodium silicate is convenient, readily available and cheap.

    Just my 2 cents, and YMMV.
    Eagerly awaiting your next project videos!

    Johan

    2,000+ Tool Plans

  4. The Following User Says Thank You to DIYSwede For This Useful Post:

    anthonyget (Jun 7, 2020)

  5. #3
    Supporting Member anthonyget's Avatar
    Join Date
    Oct 2019
    Location
    Kelmarsh, UK
    Posts
    89
    Thanks
    31
    Thanked 153 Times in 42 Posts

    anthonyget's Tools
    Hi Johan,
    That's brilliant, thanks so much. I didn't even know that what I was mixing was known as liquid glass. As soon as I read it I realised. Getting a bit slow with age.
    I wish I had known that before I did it, but I guess I will now be able to observe its effects! At least my design allows for an easy replacement of the coil. Also great tip about soaking the bricks.
    Thanks again, Nick

  6. #4
    Supporting Member DIYSwede's Avatar
    Join Date
    May 2019
    Location
    Stockholm, Sweden...
    Posts
    634
    Thanks
    416
    Thanked 804 Times in 319 Posts

    DIYSwede's Tools
    Sharing is the way to go forward - none of those tips were originally my own.
    I can merely read and have a decent memory (for my age).

    AFAIK - the need for high alumina content of the "26" bricks (as to compared with lower temp grades),
    are that the content forms a greyish Al2O3 protective oxide cover on the A-1 wire when glowing,
    thus prolonging the life span of the wire.
    This is particularly true when running the oven/ kiln up to and above 1300C,
    where the wire really begins to suffer, and where the sodium silicate would become more detrimental.

    Water glass is usually one of my go-to materials (as a cement binder, water & fire protection, glue etc),
    and it would've darned useful for (cheaply) reinforcing these "26" series fire bricks...

    When my own melting foundry/ heat treatment facility (4 kW, 400 VAC 2-phase) eventually will be built,
    I guess I'll have to live with the bricks' brittleness w/o any Na-silicate mortar,
    having a thin stainless plate as a protective bottom?

    Without intention of hi-jacking your thread:
    I haven't actually found any suggested mortar for Kanthal A-1 & "26"-grade bricks anywhere...
    -Any other readers here that have done so - please pitch in!


    Cheers
    Johan

  7. #5
    Supporting Member anthonyget's Avatar
    Join Date
    Oct 2019
    Location
    Kelmarsh, UK
    Posts
    89
    Thanks
    31
    Thanked 153 Times in 42 Posts

    anthonyget's Tools
    One good thing is that my oven will never need to go as high as 1300C, Probably 900C max.

  8. #6
    Supporting Member anthonyget's Avatar
    Join Date
    Oct 2019
    Location
    Kelmarsh, UK
    Posts
    89
    Thanks
    31
    Thanked 153 Times in 42 Posts

    anthonyget's Tools
    Johan, maybe you can help me with something. I know I bought the wrong thermocouple and I am waiting for the correct one to arrive.
    But I set my oven to 600C and put an old file in there. When the oven got to 600C, I opened the oven and the file was bright red hot, and my infrared thermometer read 800C.
    How can it be that wrong? Any thoughts?

  9. #7
    Supporting Member DIYSwede's Avatar
    Join Date
    May 2019
    Location
    Stockholm, Sweden...
    Posts
    634
    Thanks
    416
    Thanked 804 Times in 319 Posts

    DIYSwede's Tools
    Thanks for your confidence, hope I won't botch it!
    Short answer: Trust the thermocouple - be wary of the IR thermo until you've figured out and applied this:

    // EDIT: You wrote "the wrong thermocouple" -
    did it max out at 600 C and the oven trampled on upwards, or what's the couple's upper limit?
    I guess tool steel shouldn't be bright red at 600... Better recheck that before anything else of the text below...
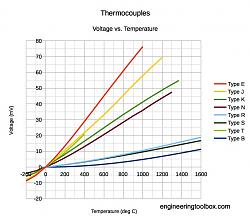
    Different types of thermocouples has different output voltages:

    Home built Heat Treating Oven-thermocouples.jpg

    So having a wrong type could fool your controller into thinking it's 600 when really at cherry red 800-ish C...
    For instance - plugging a "K" type into a controller set for a "J" type would perhaps be consistant with your result?
    (Just follow the 33 mV line from the yellow "J" line (600C) to the green "K" line and read its temp below)
    Sorry - I'm just about to hit the sack, so I wasn't really bright and fast enough.../
    /

    AFAIK: IR thermometers work by emission, and different materials have different emissivity values, kinda logical when you think of it.
    Remember the black body/ polished body relative heat experiment way back in the physics classroom?
    Emissivity is only radiated heat/ time unit - no more, no less.
    There's one reason (besides sexiness) for black-anodizing cooling fins...

    Then - a single, given material ALSO shows different emissivity att different temperatures as well - making it harder to measure correctly.
    Also logical - starting at black at room temp, then heating it to fiery red - different rate of heat radiation/ time unit from the same piece.

    For instance - I tried (in vain, of course) to use my IR thermo (1300C tops) for reading down into -80 deg C (CO2 extinguisher) a few weeks ago.

    I quick-searched. and found some hopefully decent info regarding these matters (I'm not plugging their brand - and physics dont care for shareholders):
    https://ennologic.com/ultimate-emissivity-table/
    https://ennologic.com/emissivity-inf...eter-readings/

    So for a proper readout - you need to know the emissivity of your chosen material, at the ball-park temp.

    Personally, when it comes for my own Al alloy melts - the dross kicks my 30 quid fancy-pants IR's readings all over the place -
    so I instead got a 5 quid cheapo thermocouple dipper/meter kit from China for consistent readings before the pour...

    Hope this helps - guess someone more insightful reader here will correct me - and that's how I learn too!

    Cheers
    Johan
    Last edited by DIYSwede; Jun 8, 2020 at 05:00 PM. Reason: Added Snipped text

  10. #8
    DanCom's Avatar
    Join Date
    Dec 2016
    Posts
    14
    Thanks
    1
    Thanked 17 Times in 7 Posts
    Nick,

    You can do a sanity check with a piece of carbon steel and a magnet. Once the Curie point is reached the steel will become non-magnetic. This should be around 770°C. You can also set the controller to 660° and put some aluminum in a crucible. The alum should be just starting to melt.

    A few points worth mentioning. In my experience with building ovens like this, the thin Kanthal will be susceptible to breakage. Once heated the first time it becomes very brittle. I would recommend at minimum 18 ga. 16 better, 14 better yet. Of course resistance (ohms per ft./m) drops significantly when moving to the heavier gauge. I have a Kanthal A1 spreadsheet on my blog page here. You may cover this a the another video but, make sure to double or triple back the wire on the leads exiting the kiln. This reduces the resistance and therefor reduces heat outside as well as makes for a better electrical connection. Also, the elements will sag when hot. Make sure they are stapled into the ledges. I will make a couple dozen from the Kanthal wire in a J shape and press them into the firebrick to secure the element. It would also not hurt to have a door switch that kills the power when you open the door. 220 VAC isn't fun to touch when extracting a hot blade. ;-)

    Thanks for sharing!

    Dan

  11. The Following User Says Thank You to DanCom For This Useful Post:

    Toolmaker51 (Feb 15, 2021)

  12. #9
    CanBeDone's Avatar
    Join Date
    Oct 2019
    Posts
    43
    Thanks
    0
    Thanked 38 Times in 18 Posts
    I know it will hurt, but this is a rubbish design, and not because of the effort you went to in building it, but because the design demonstrates that you never understood how heat is flowing, through the walls and (closed) door, out of your furnace. You do need a more than nodding understanding of Fick's laws to understand the spread of heat inside furnace walls and thus the resultant temperature distribution inside the furnace. I am not here to belittle your effort, I am writing to provide an explanation for your furnace's behaviour. Once you understand why you get this behaviour, you should be able to think up possible means to improve on it.
    First, temperature measurement. Forget about using a pyrometer (i.e. infrared radiation thermometer), because this will produce a meaningful reading only if you measure the radiation coming out of a black hole. With "black hole" I am not referring to the astronomical object, but to a box with a central, large cavity that is accessible only via a small hole. Only this small hole has an emissivity of 1, all other surfaces will have emissivities less then 1, emissivities that depend not only on the material, but also on surface roughness and time. Thus, forget about looking up any emissivity, it does not produce a trustworthy temperature reading without the black hole emitter.
    You could also estimate your temperature using Seger cones.
    Or you can attach some weight to the tip of a thermocouple and place that at different positions inside your furnace, to measure a temperature distribution chart. If you achieve a temparature variation of less than 50 oC, you have build well. From the pictures you provide on the placing of your heating element, I would expect a spread of 200 oC or more, just what you have observed.
    Once you have measured that and understand this is not simple bluster, we can talk again, this time about where to place the control thermocouple, and where to place the heating wires.

  13. #10
    Supporting Member DIYSwede's Avatar
    Join Date
    May 2019
    Location
    Stockholm, Sweden...
    Posts
    634
    Thanks
    416
    Thanked 804 Times in 319 Posts

    DIYSwede's Tools
    Thanks, Dan for pitching in: Nice blog btw.
    Thanks for also pointing out the brittleness of wires, and that max temperature degrades with wire dia:
    For instance: Kanthal A wire of 3 mm dia (not the average home shop kiln) could take 1350 deg,
    but around 1 mm it'll take max 1250.


    Sorry, Nick for perhaps being confusing in my previous post, I totally missed the obvious last night...
    The discussion on IR thermometer and materials & temp is probably NOT relevant in your case.

    I assume by "Wrong thermocouple" you meant you plugged a "K" type into a PID/ controller designed for a "J" type?

    Then, IF you choose 600 C as the limit temp, the controller will open the throttle wide open,
    until it gets 33 mV back from the thermocouple input.

    Fine and dandy IF you'd hook a "J" type up, which will precisely return that voltage at 600 C,
    - but a "K" type would give off 33 mV first when it's reached 830-ish degrees.

    I guess this was exactly what happened
    (but your IR thermometer could have had its emissivity factor off too, but NOT deviate by 200 degrees...)

    Hope this helps!
    Cheers
    Johan

Thread Information

Users Browsing this Thread

There are currently 1 users browsing this thread. (0 members and 1 guests)

Tags for this Thread

Bookmarks

Posting Permissions

  • You may not post new threads
  • You may not post replies
  • You may not post attachments
  • You may not edit your posts
  •